Course Creation on KnowxBox: User Manual
| Site: | Dynamic Pixel Demonstration Environment |
| Course: | Course Creation Steps-KnowxBox_update |
| Book: | Course Creation on KnowxBox: User Manual |
| Printed by: | Guest user |
| Date: | Wednesday, 16 September 2026, 6:21 PM |
Table of contents
- 1. Create a Blank Course
- 2. Adding Content in Course using HACC Gen
- 3. Setting up Course Completion Settings using Bulk Method
- 4. Completion Settings for Quiz
- 5. Add Teacher to a Course
- 6. Setting up Restriction Access to each Topic
- 7. Setting up Restriction Access to each Activity
- 8. Add a Certificate in the Course
- 9. Course Settings for Frontend before Go-Live
- 10. Course Enrolment Options before Go-Live
- 11. Make the Course Public
1. Create a Blank Course
Accessing KnowxBox Dashboard
- Open a web browser and enter the KnowxBox portal URL.
- The login page will be displayed.
- Enter valid Manager credentials (Username and Password).
- Click on the Login button.
- Upon successful authentication, the KnowxBox Dashboard will be displayed.
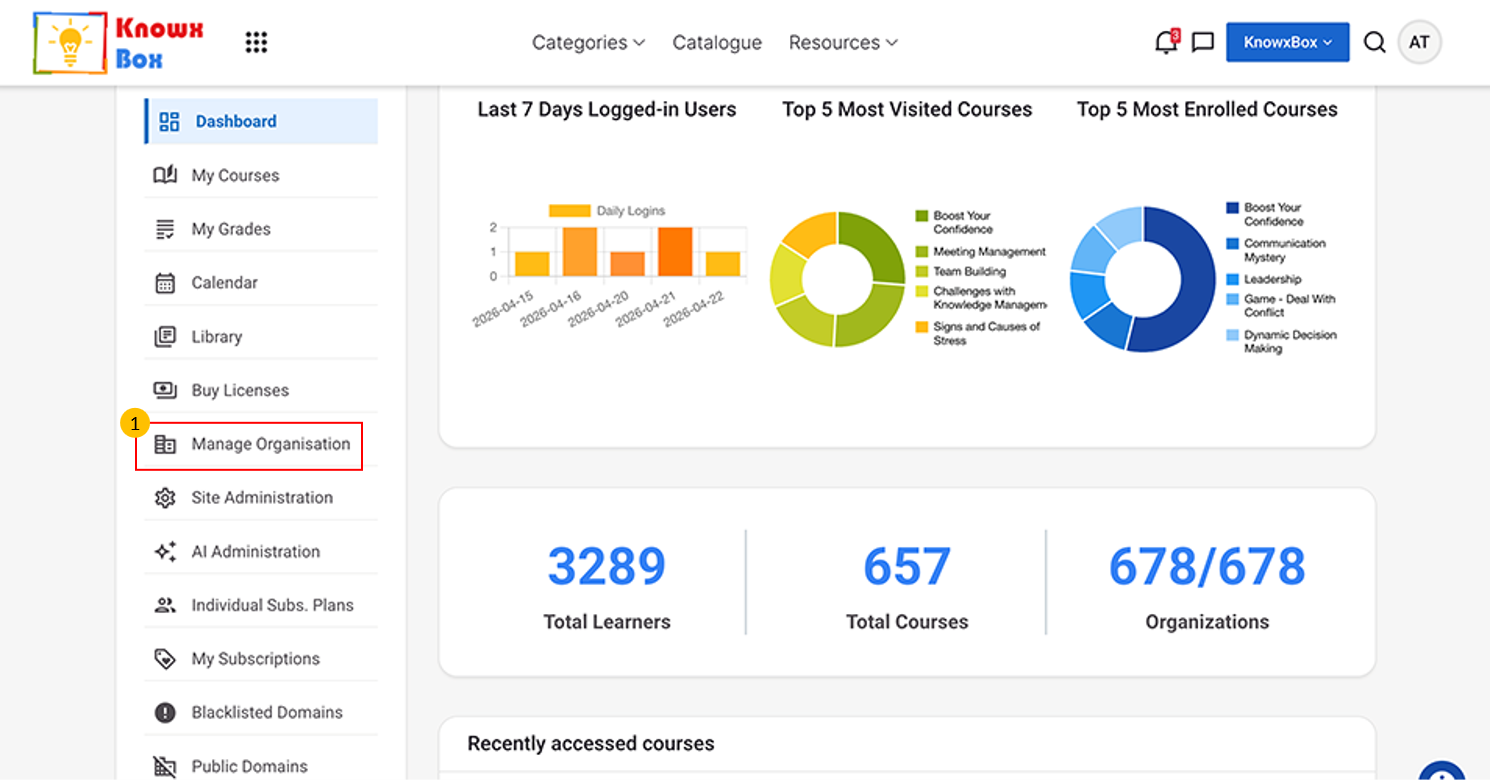
This is KnowxBox Dashboard view.
- Select Manage Organisation option.
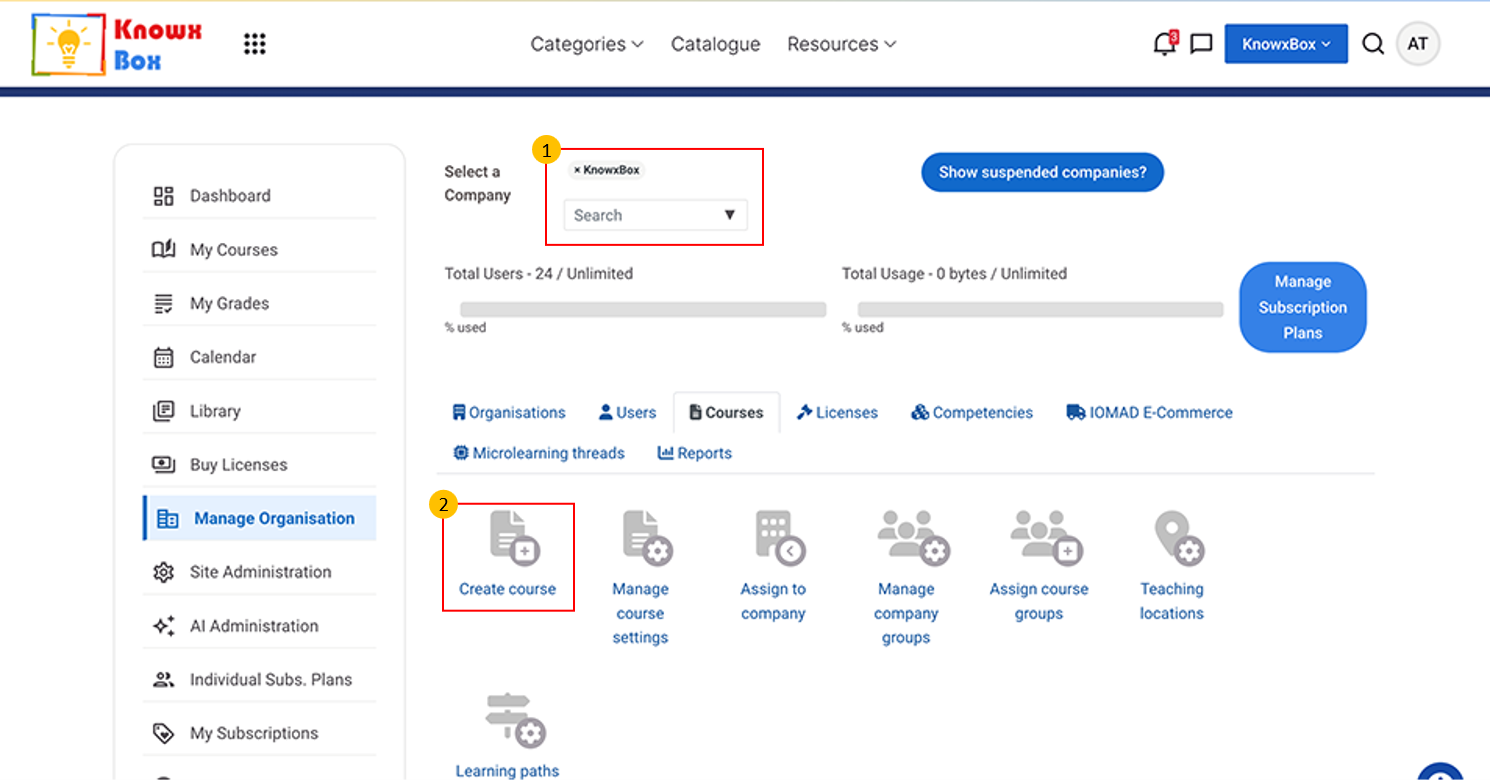
- Make sure the company selected must be KnowxBox here.
- Now, Click Courses option then Select Create Course.
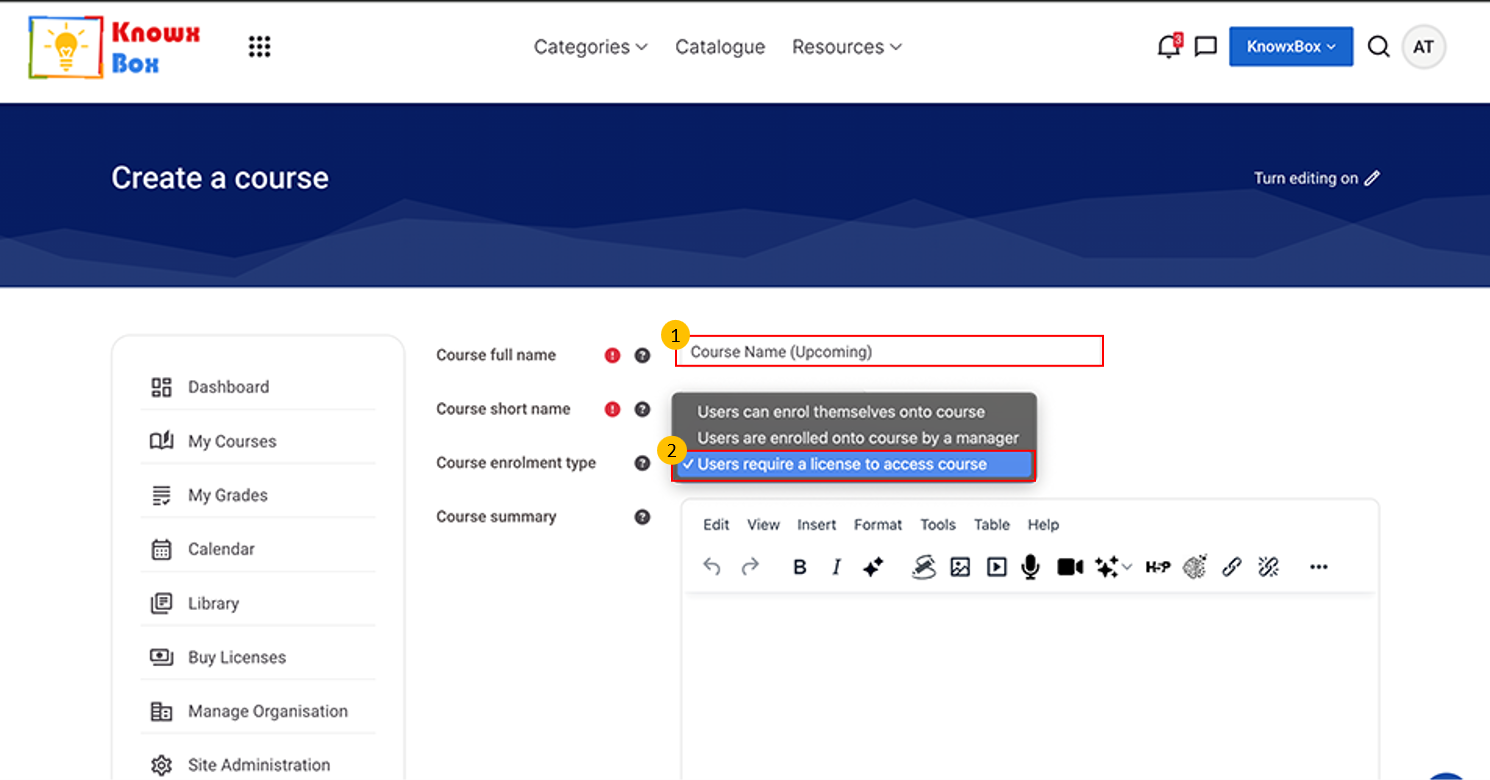
Fill the required fields:
- Course name - Mention Upcoming followed by course name e.g. Time
- Management (Upcoming)
- Course Short Name
- Course enrolment type - Select Users Require a license to access course in course enrolment type field
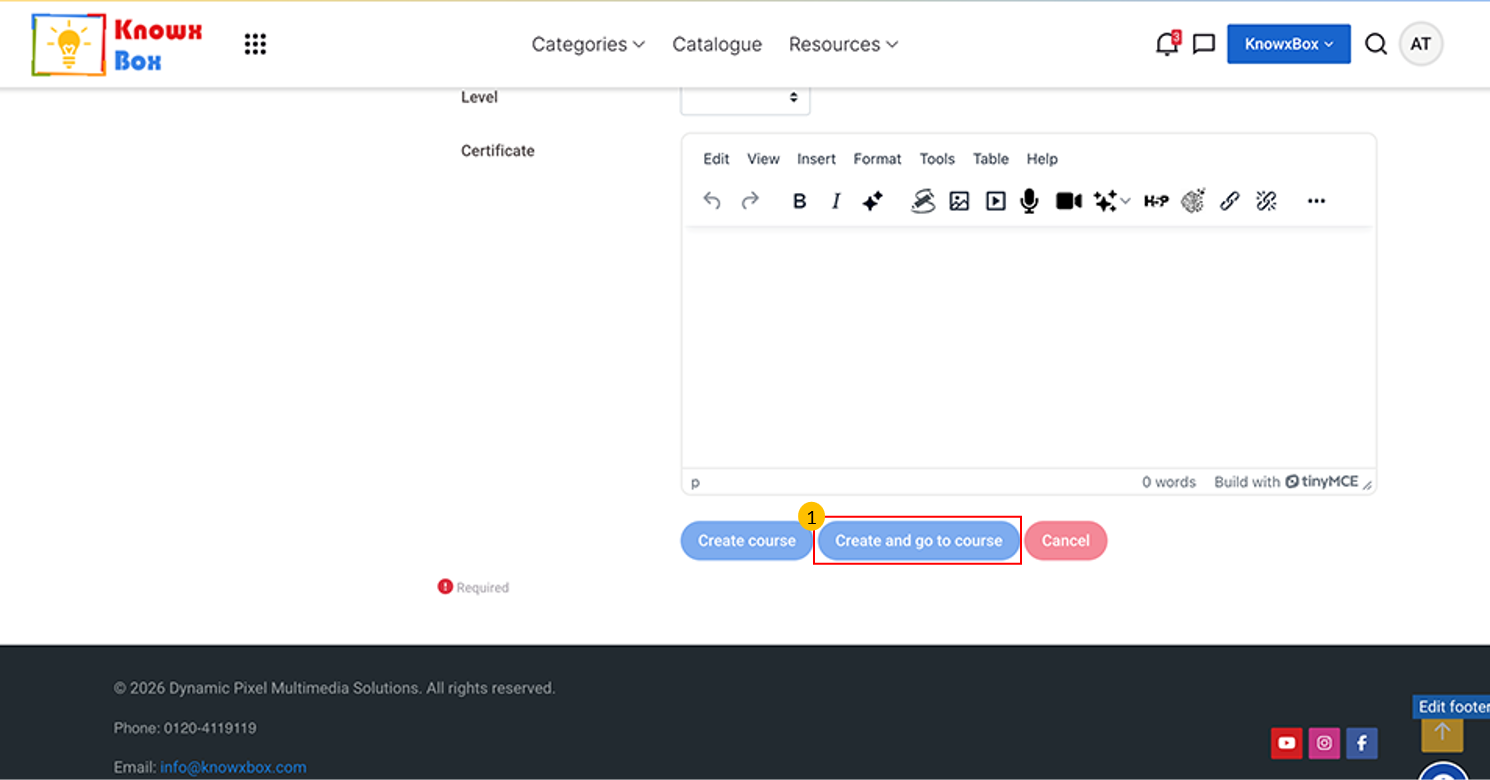
- Click Create and go to Course.
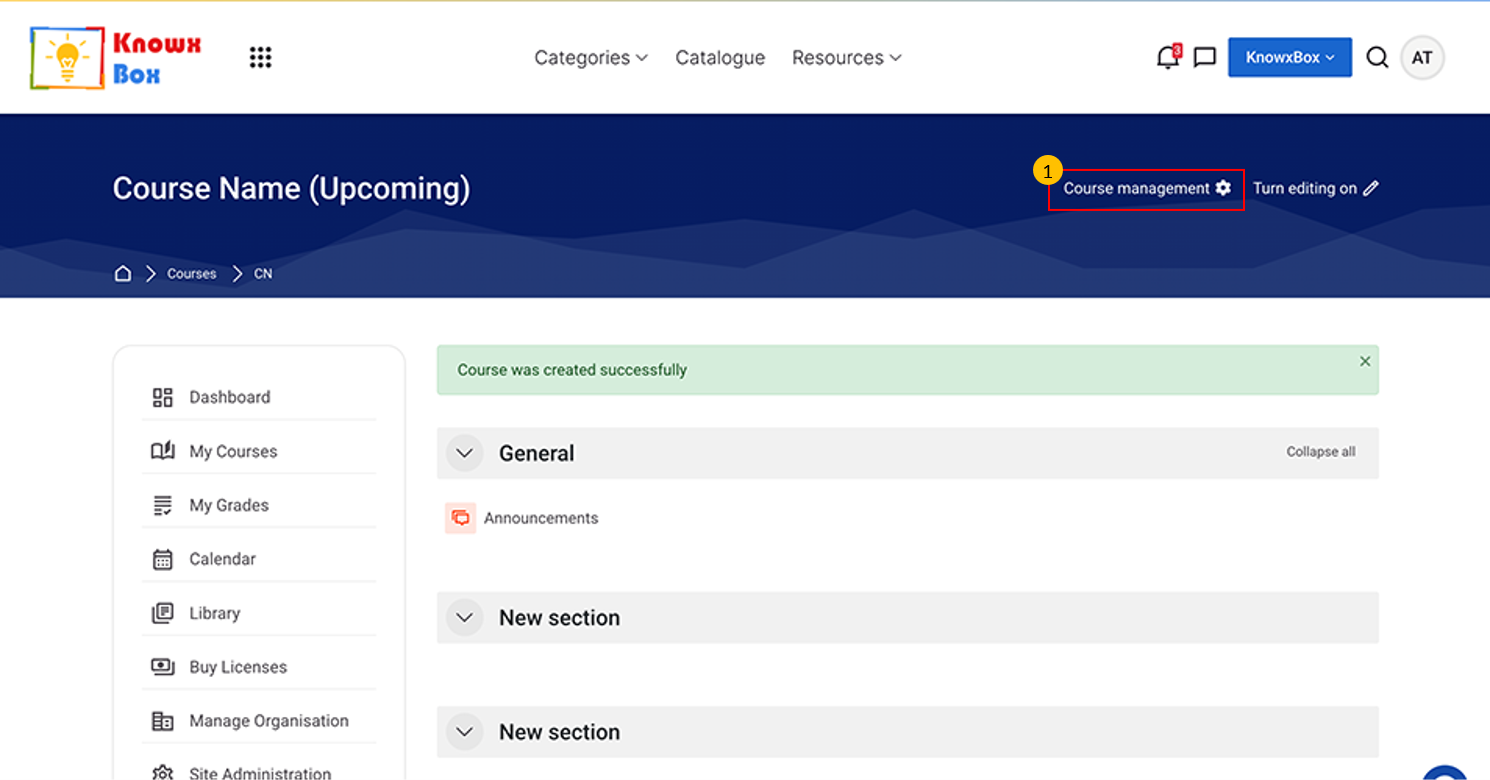
- Our course outer layer is created.
- Now, Click on Course Management.
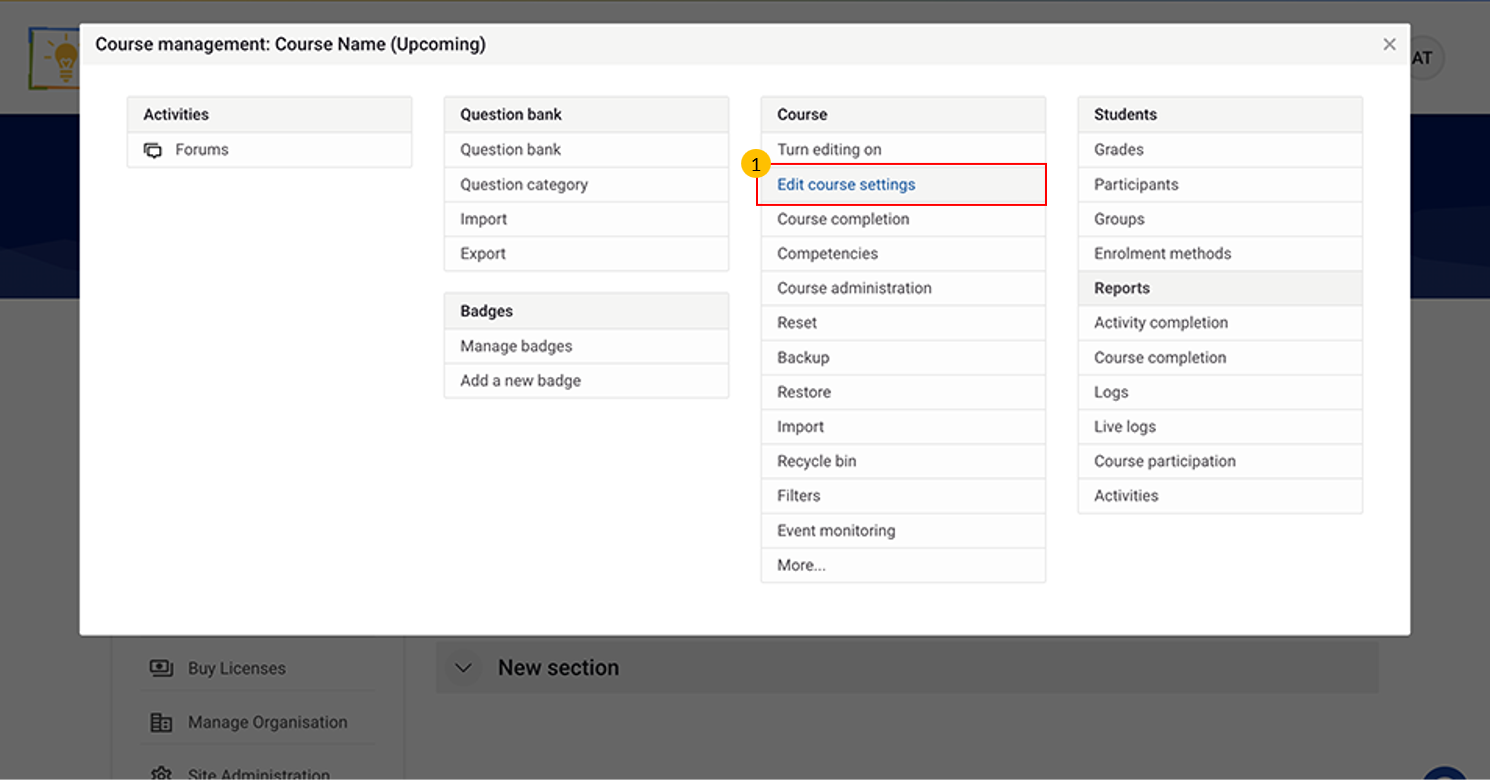
- Go to Edit Course Setting.
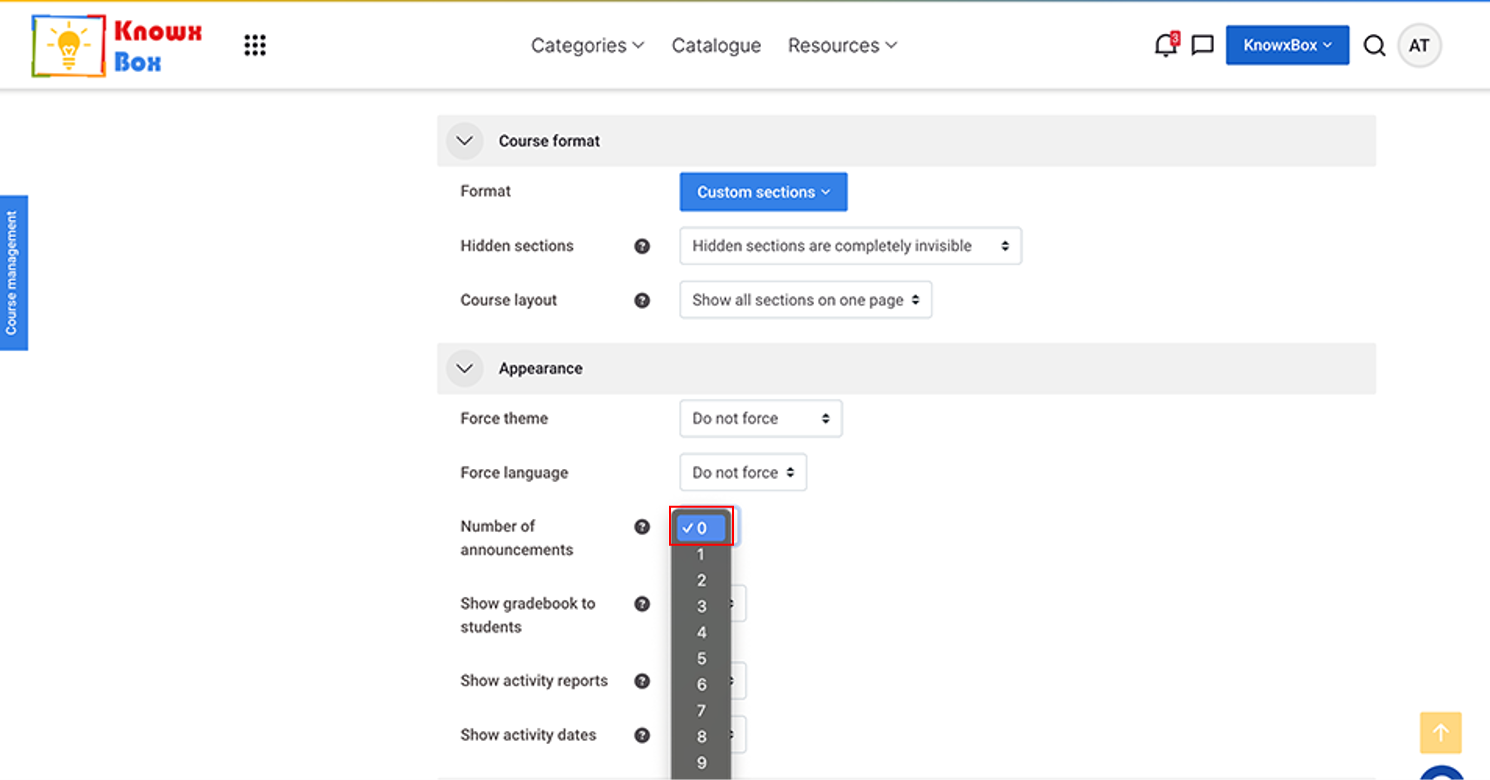
- Set Number of announcement to Zero.
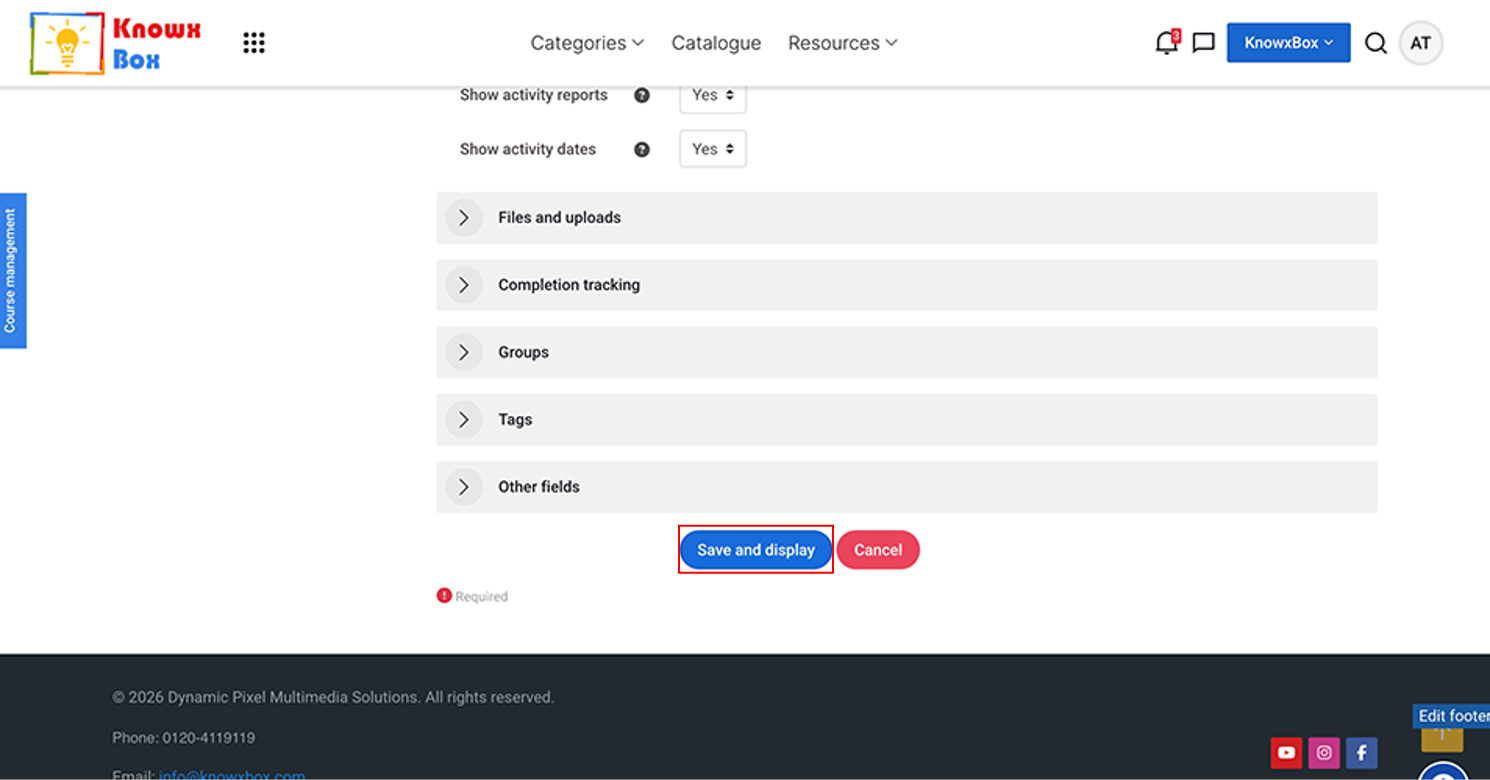
- Now Click on Save and display.
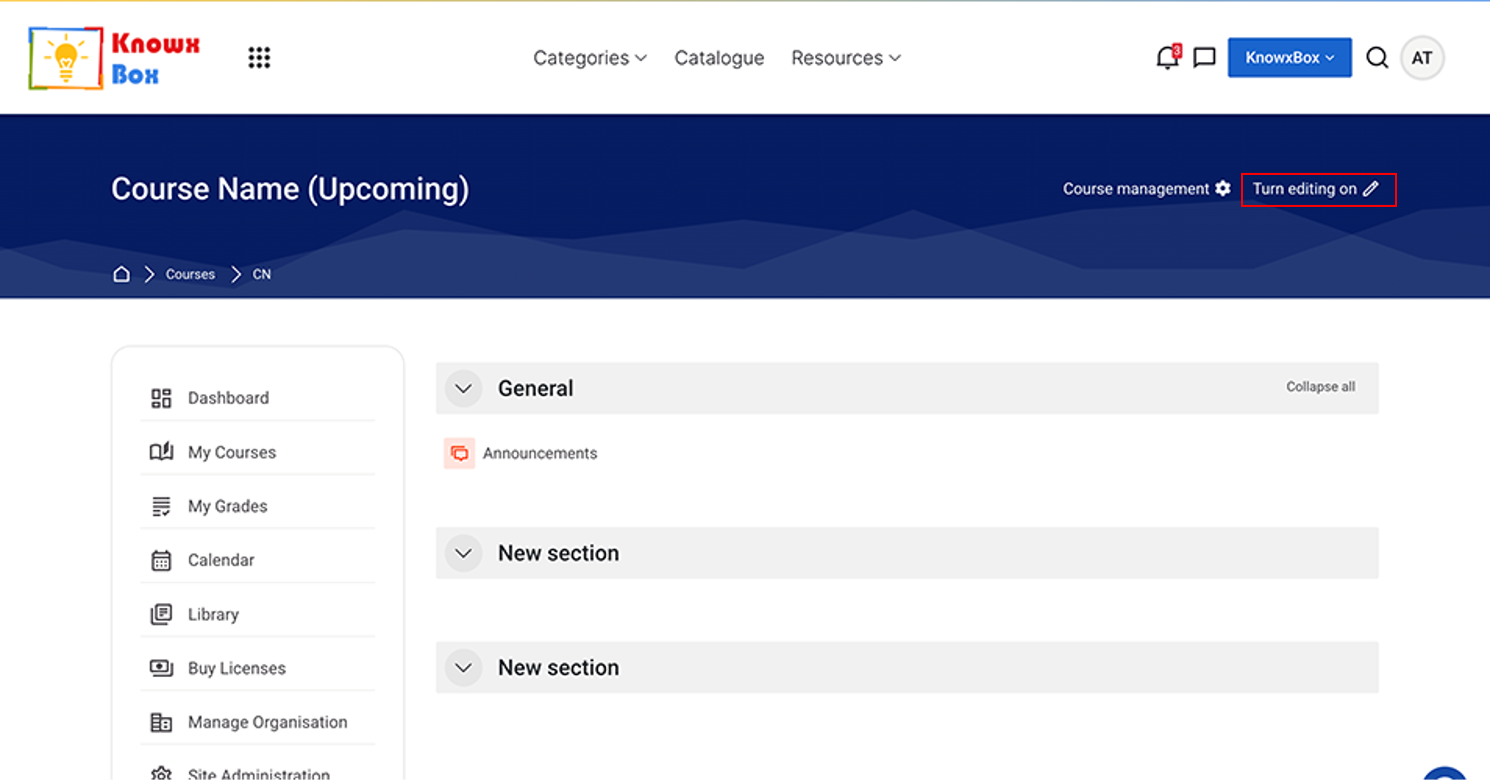
- Ensure that ‘Turn Editing On’ is enabled.
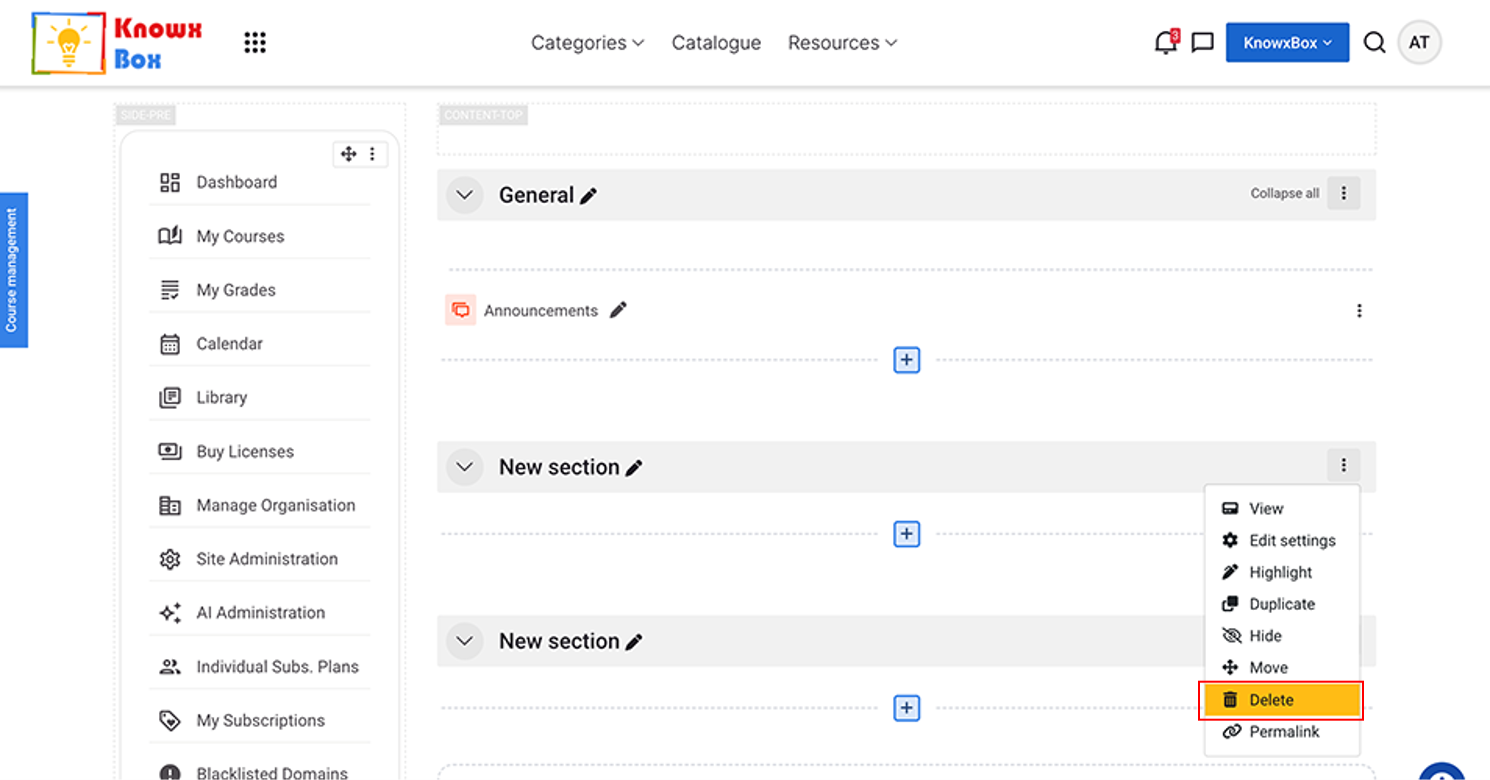
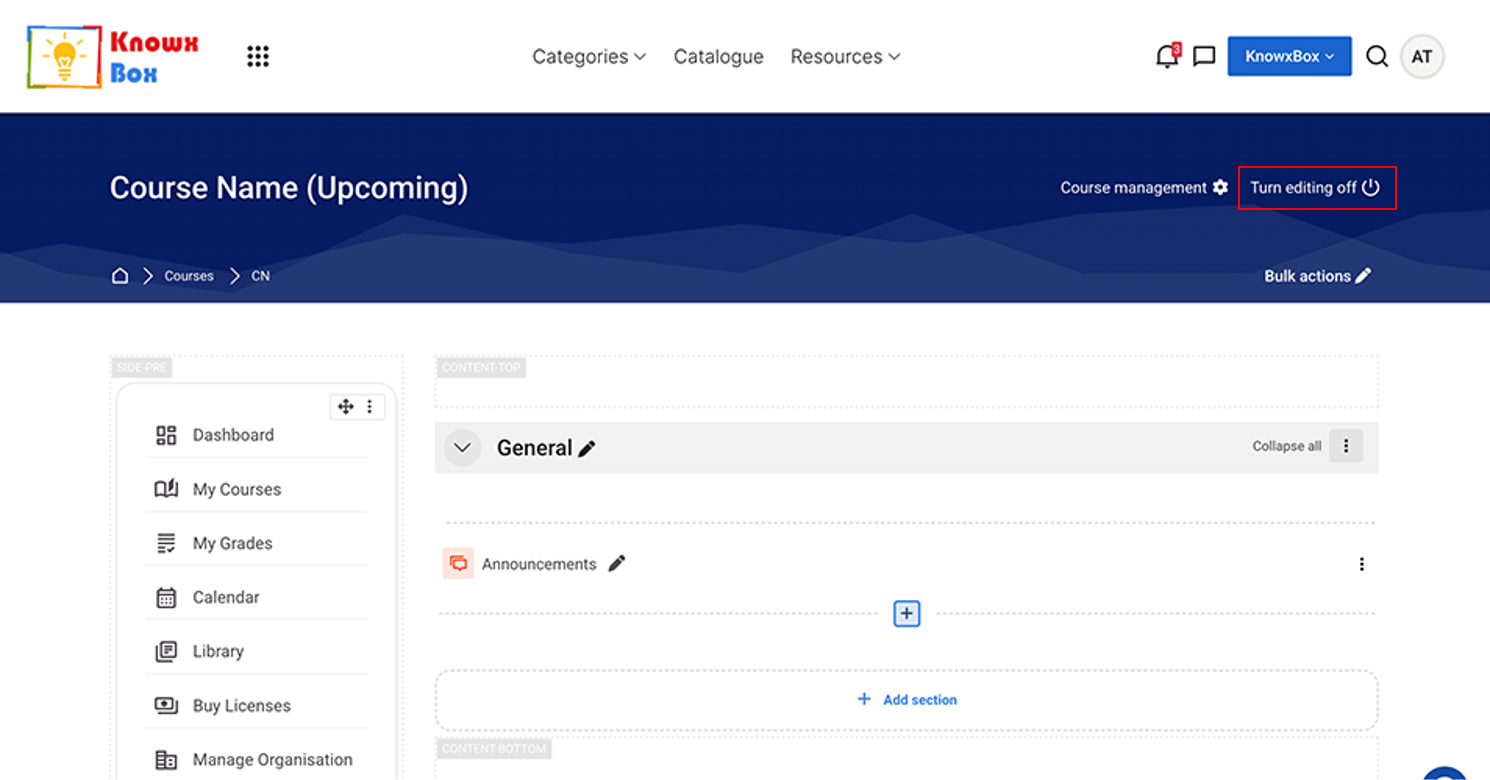
- Delete New sections by clicking the 3 vertical dots on the right-side then select Delete.
2. Adding Content in Course using HACC Gen
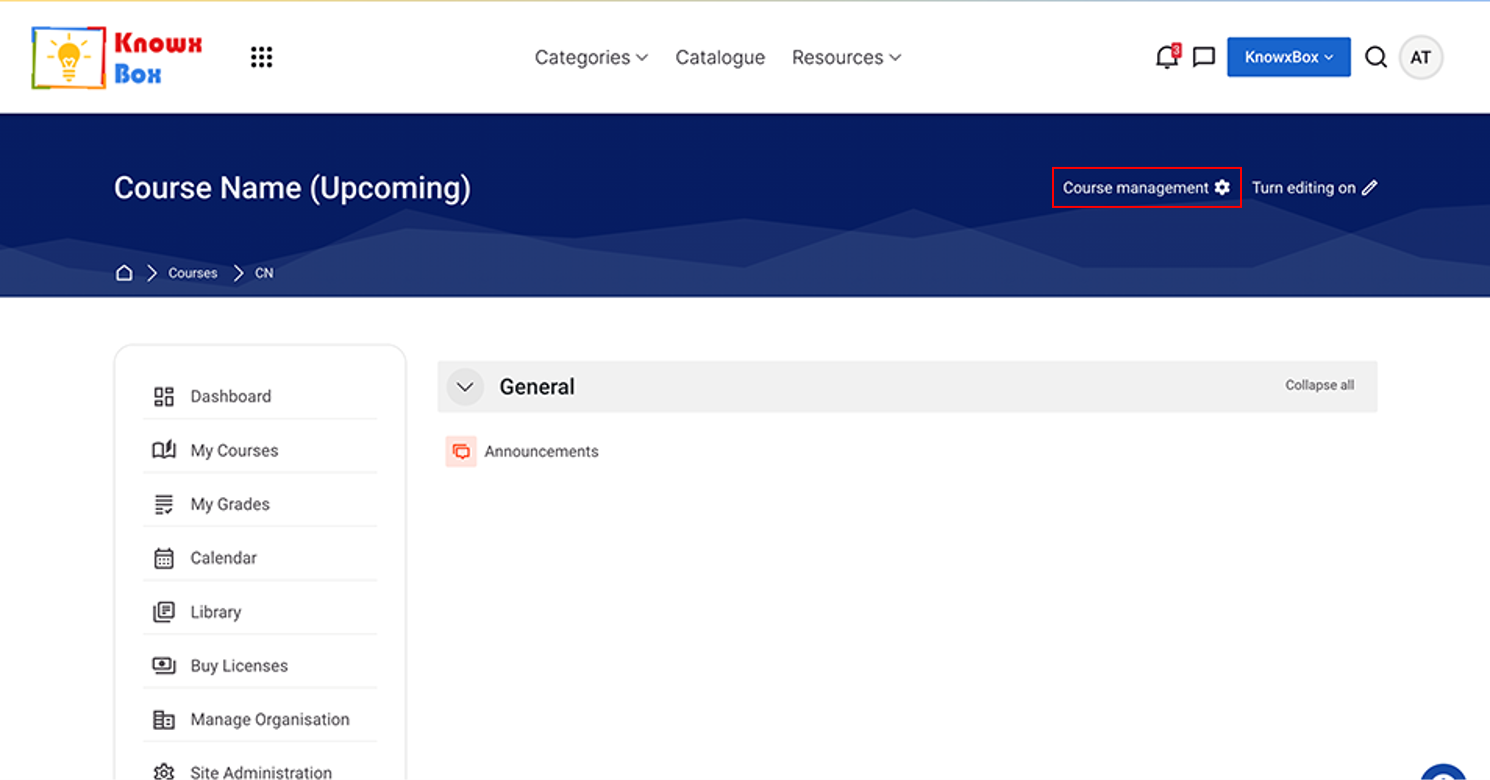
Click on Course Management.
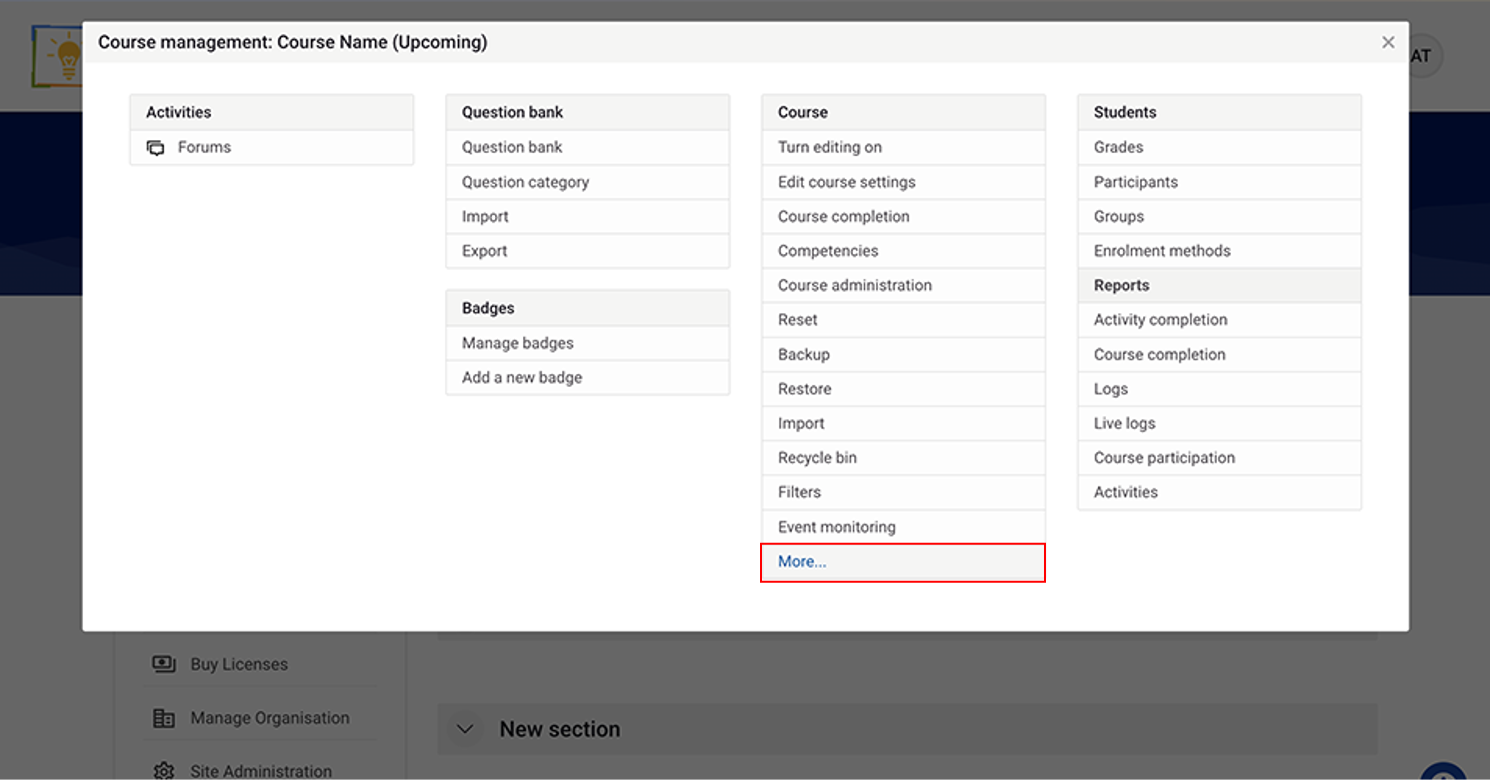
Go to “More…” Option under Course section.
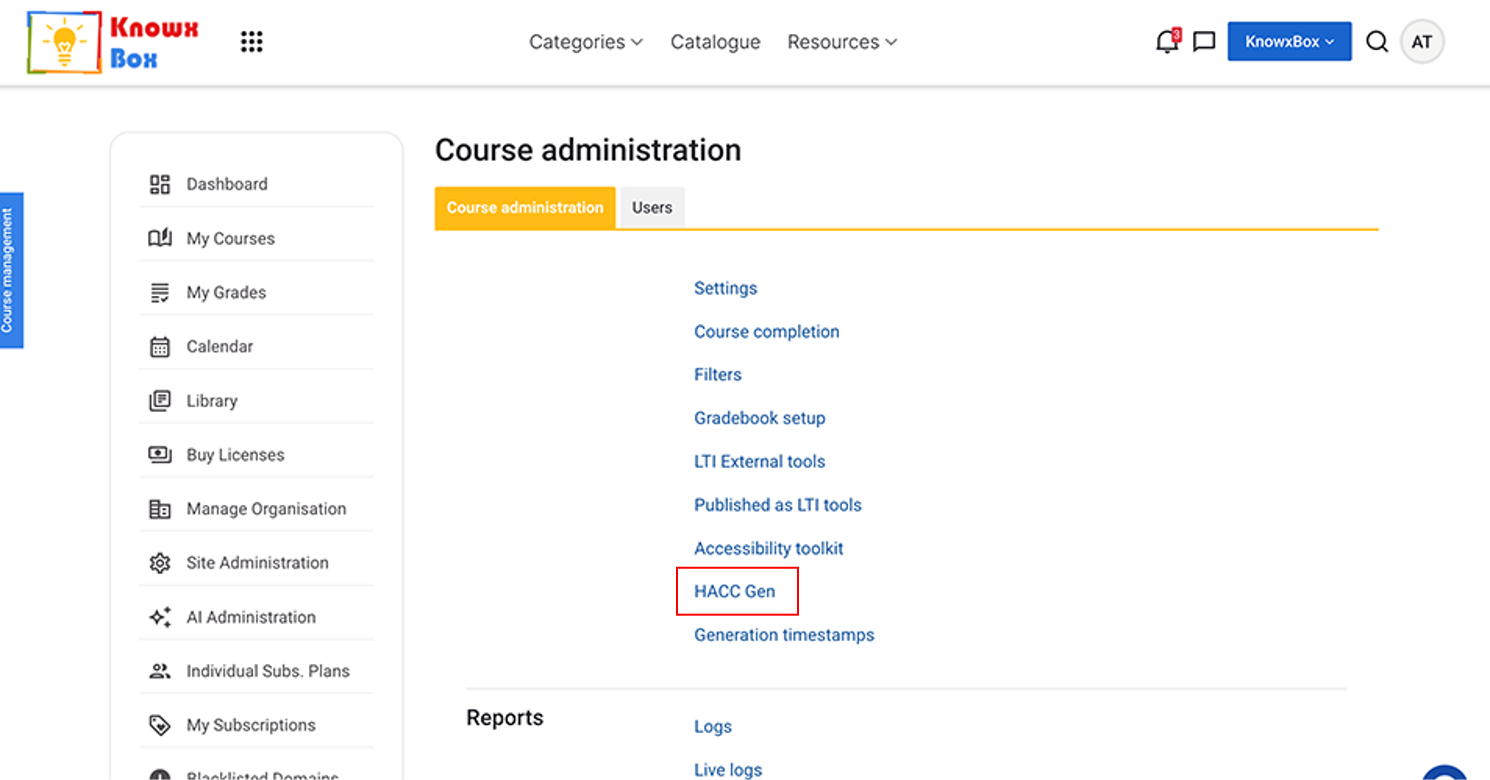
Select HACC Gen under Course Administration.
HACC Gen is our AI tool which will help us to create our course content.
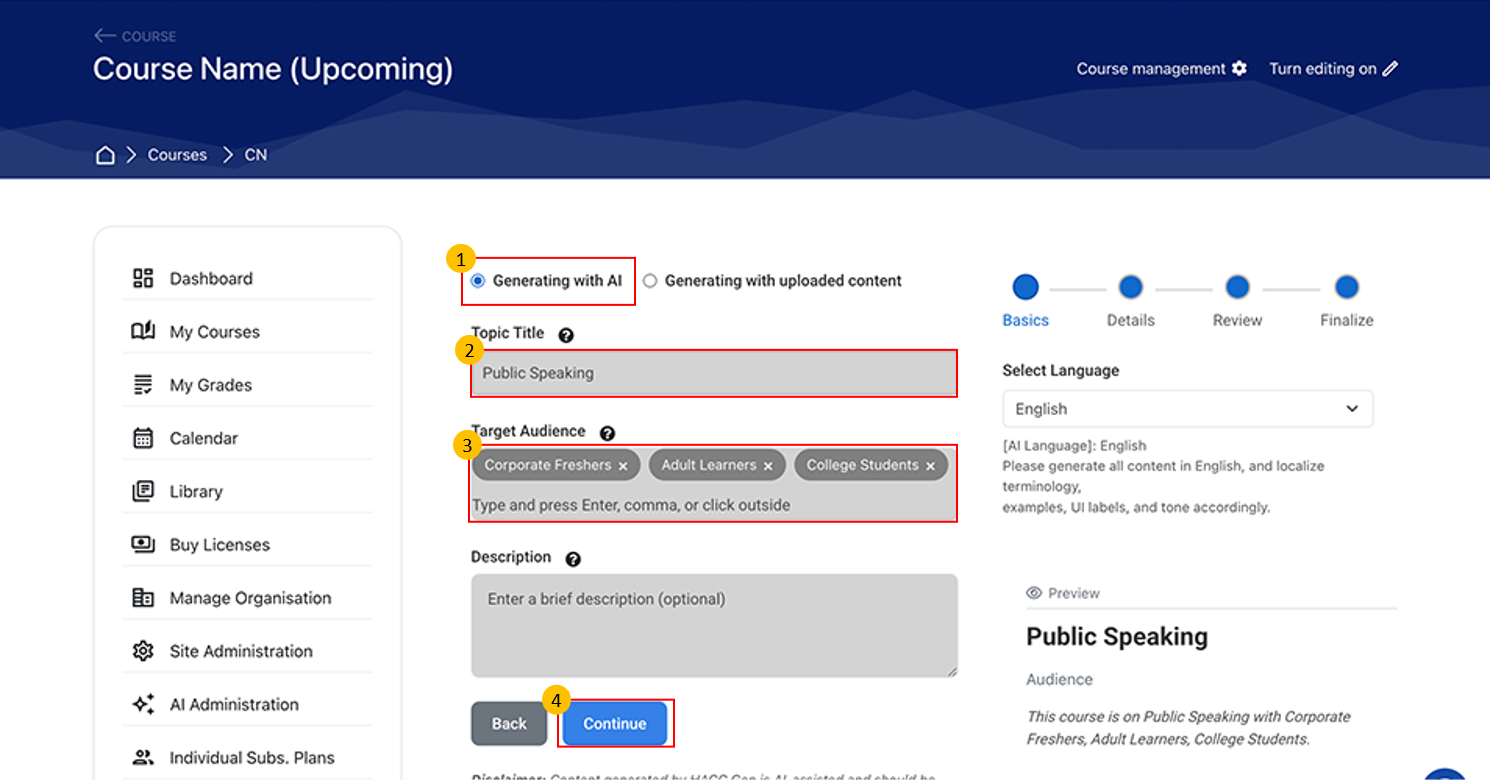
- Two options are available to create course content:
- Generate manually with AI
- Generate from an uploaded file
- Select “Generate with AI” (default option).
- Enter the required details to define the type of content you want.
- Step 1: Enter the Basic Details:
- Topic Title
- Target Audience
- Description (optional)
- Step 1: Enter the Basic Details:
- Preview your entered details on the right-hand side.
- Click “Continue” to proceed to the next step.
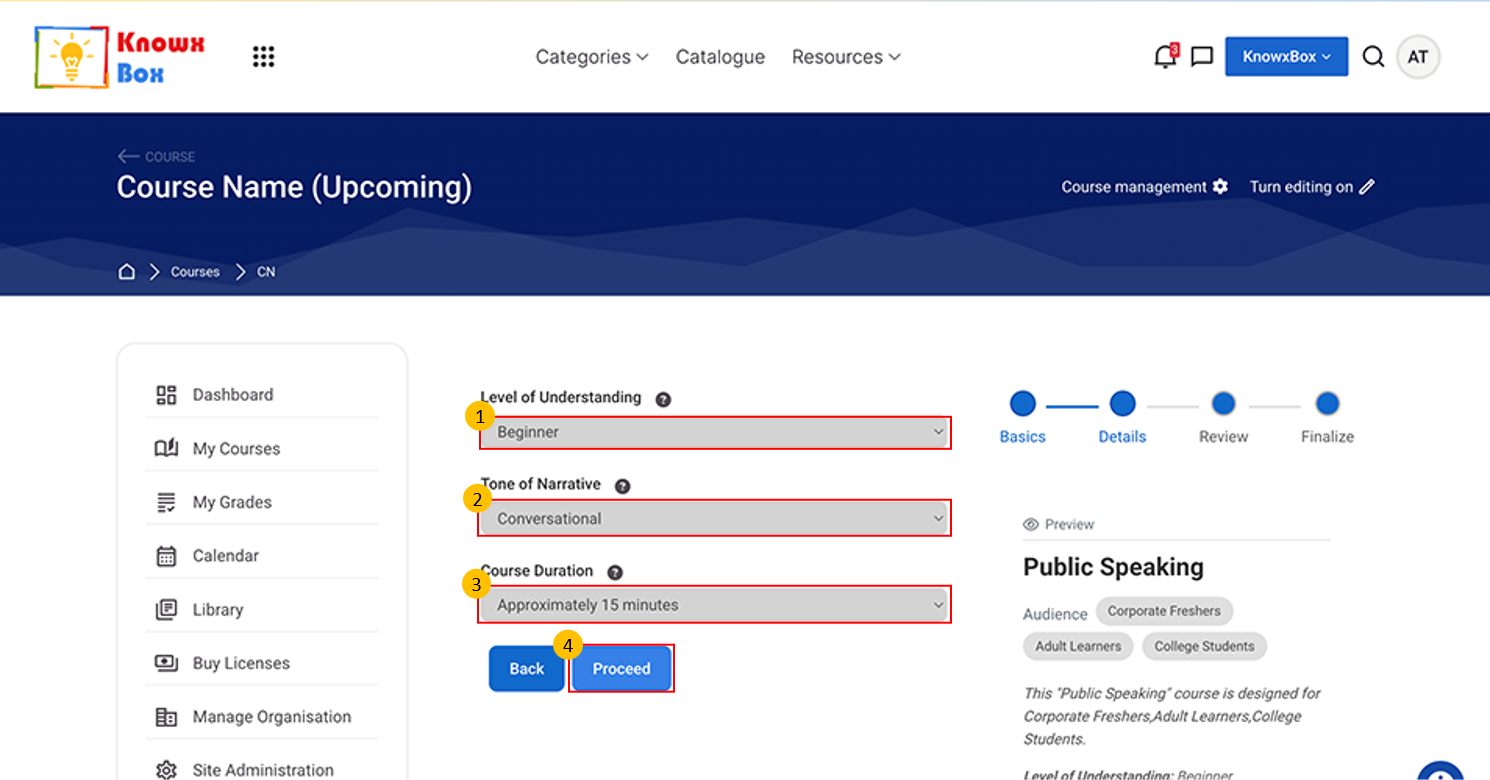
Step 2: Details
Select the Level of Understanding from the dropdown:
- Beginner
- Intermediate
- Advanced
Tone of Narrative:
- Formal
- Conversational
- Engaging
Select any one of these.
- Select course duration now from dropdown list.
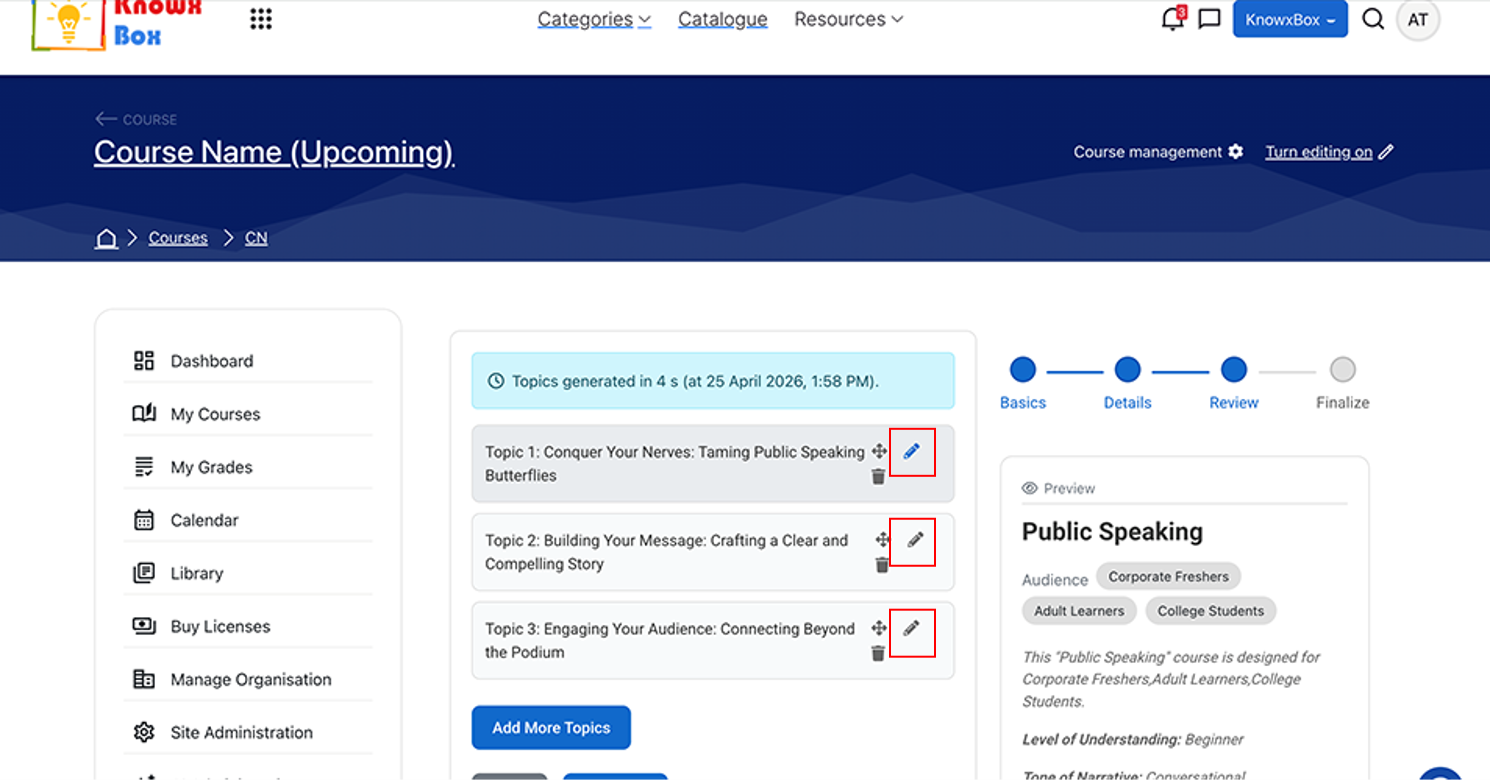
This is the review stage of the content generation. Here you can Add, Edit and Delete the Topics if required.
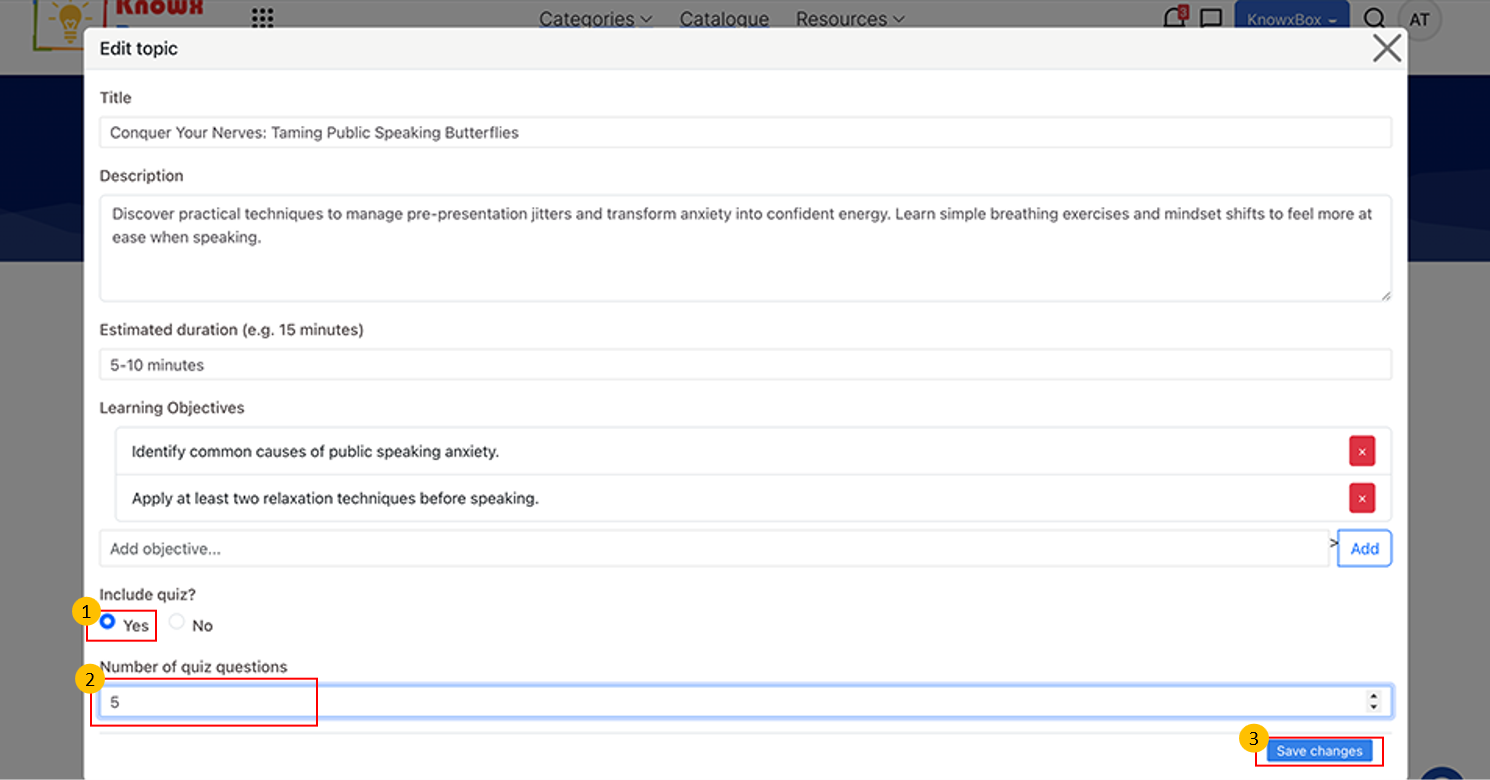
Add Quiz in all the topics and number of quiz questions should be 5.
Edit details whatever you want and click on Save Changes.
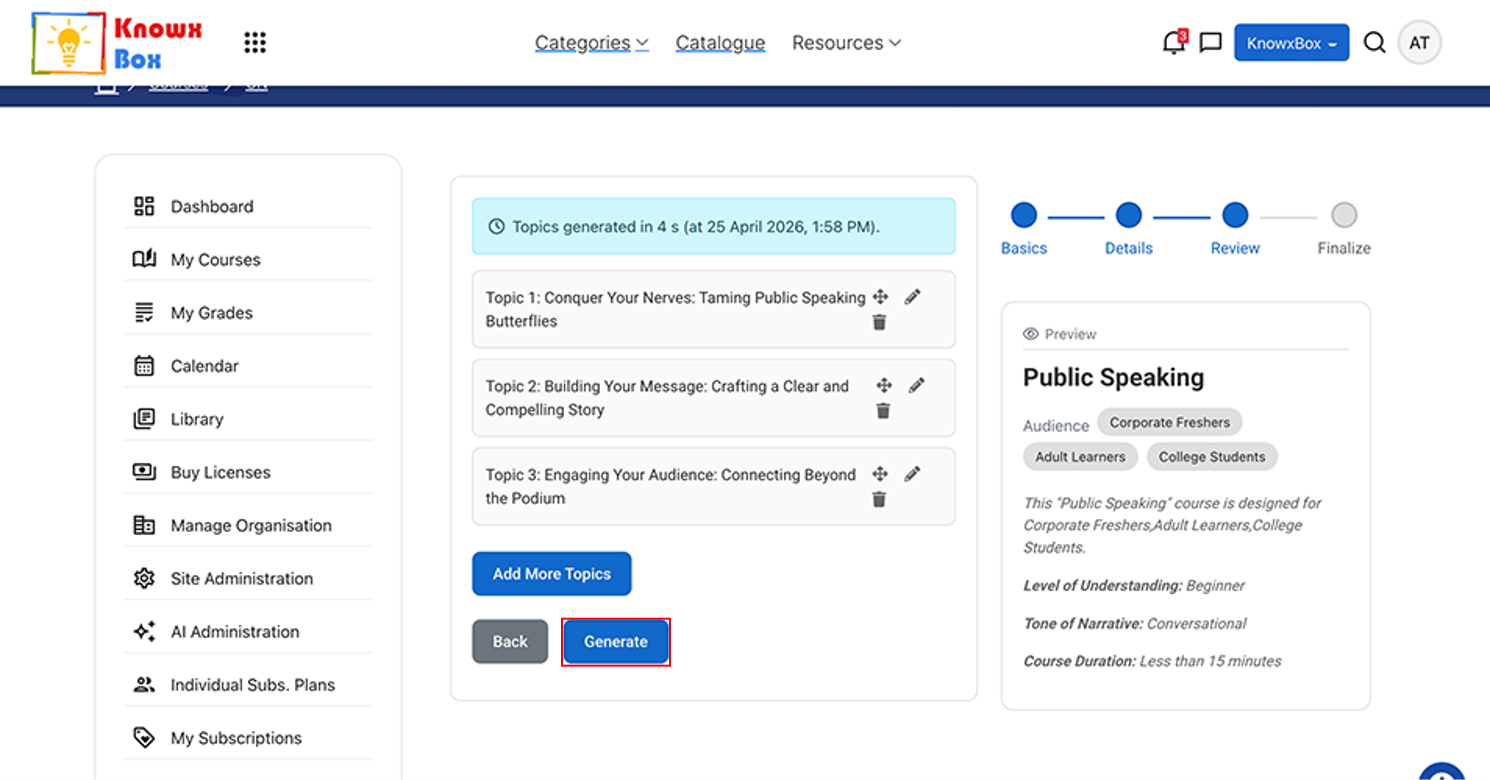
Now, click Generate.
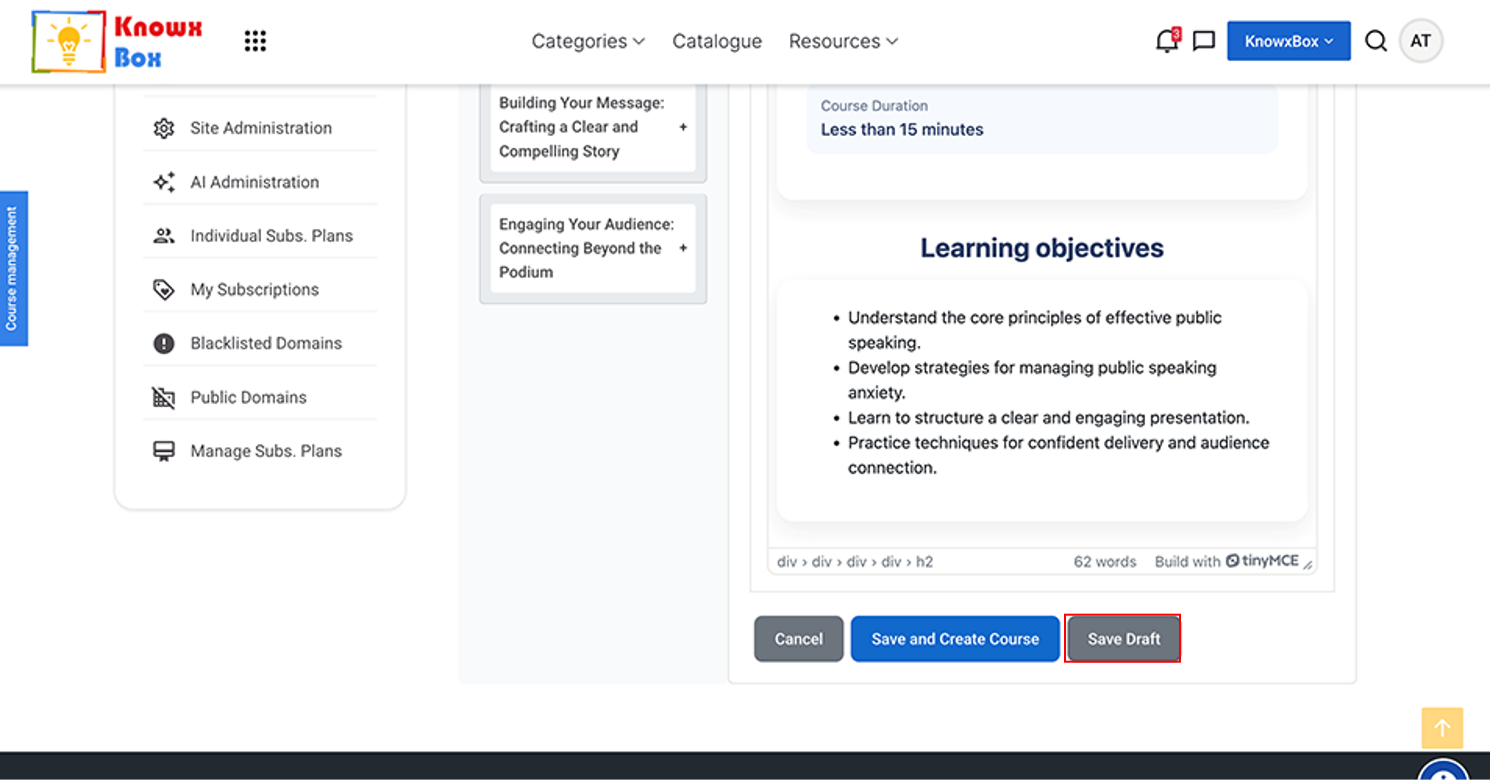
Now , you can save the content by clicking on Save Draft option.
Your complete editing in the content will be saved.
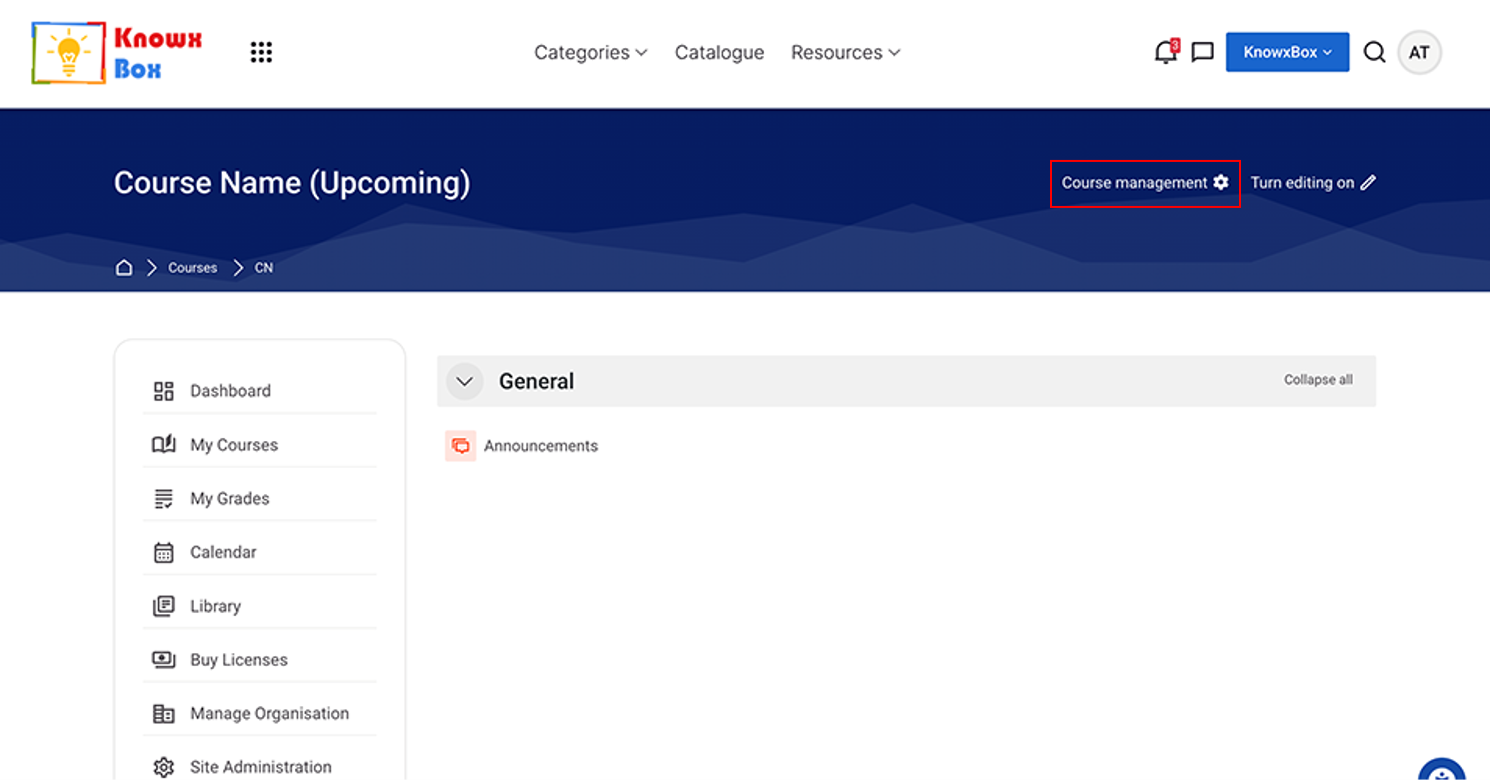
To resume the course creation, Come to the Course management.
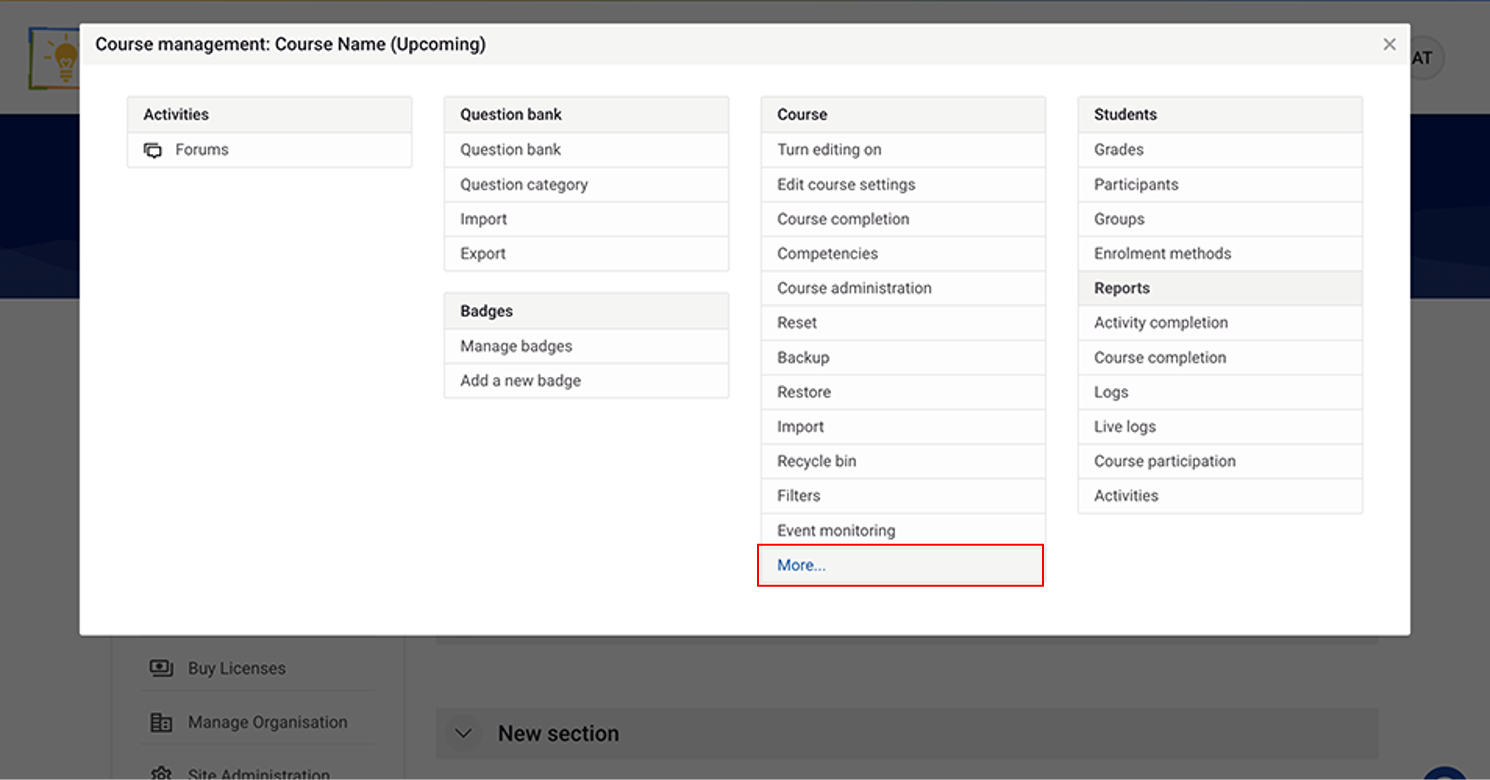
Click on More…
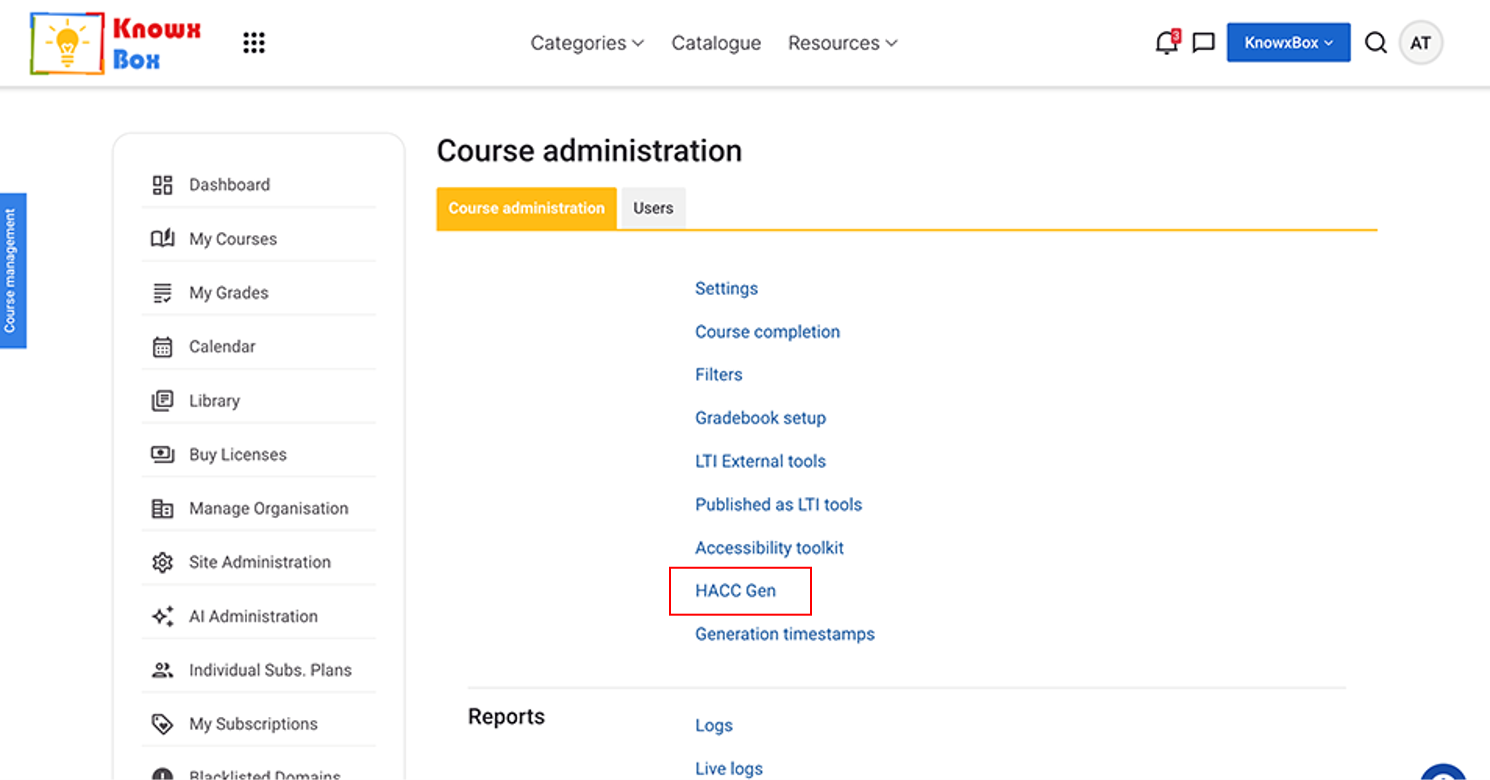
Select HACC Gen.
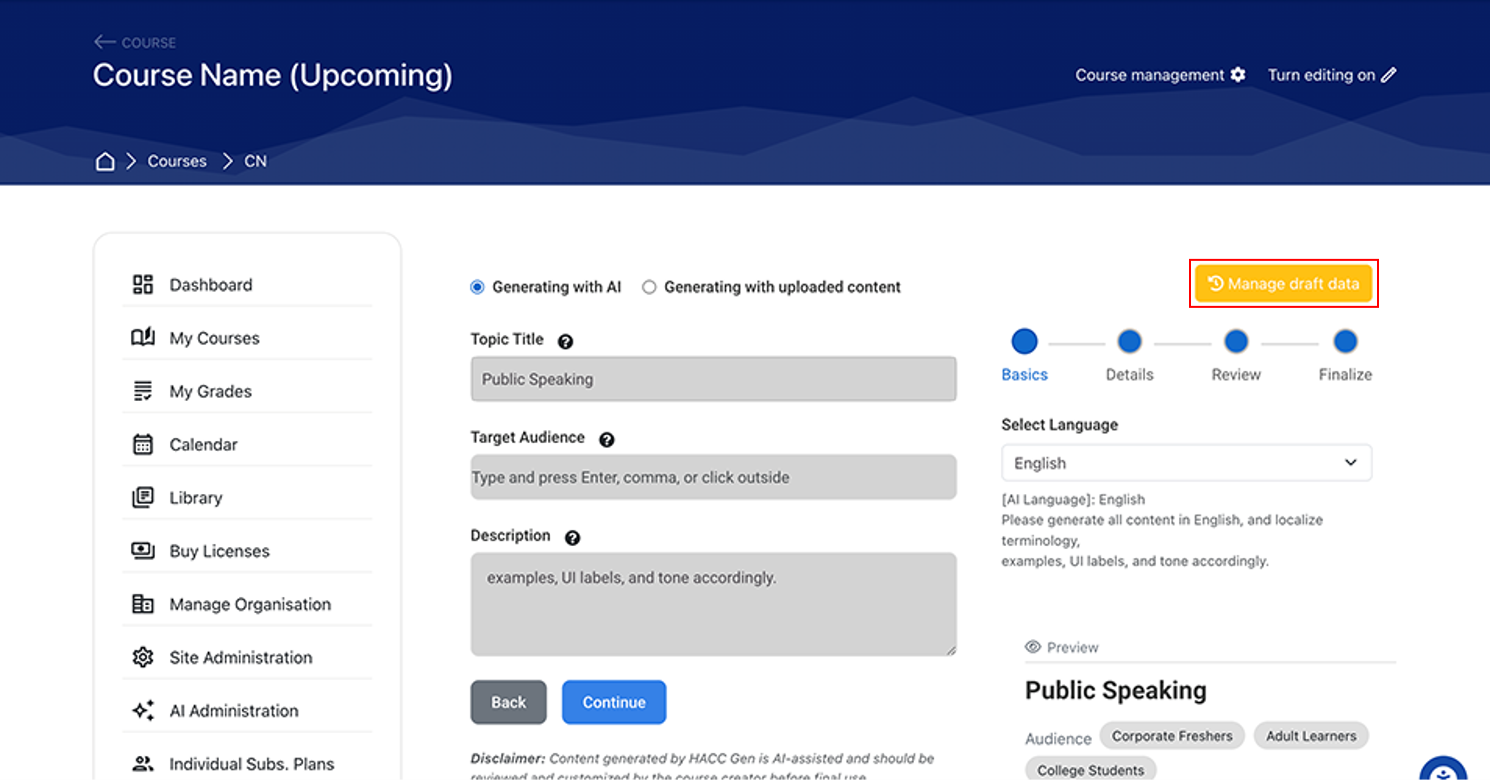
Click on the yellow button Manage Draft Data.
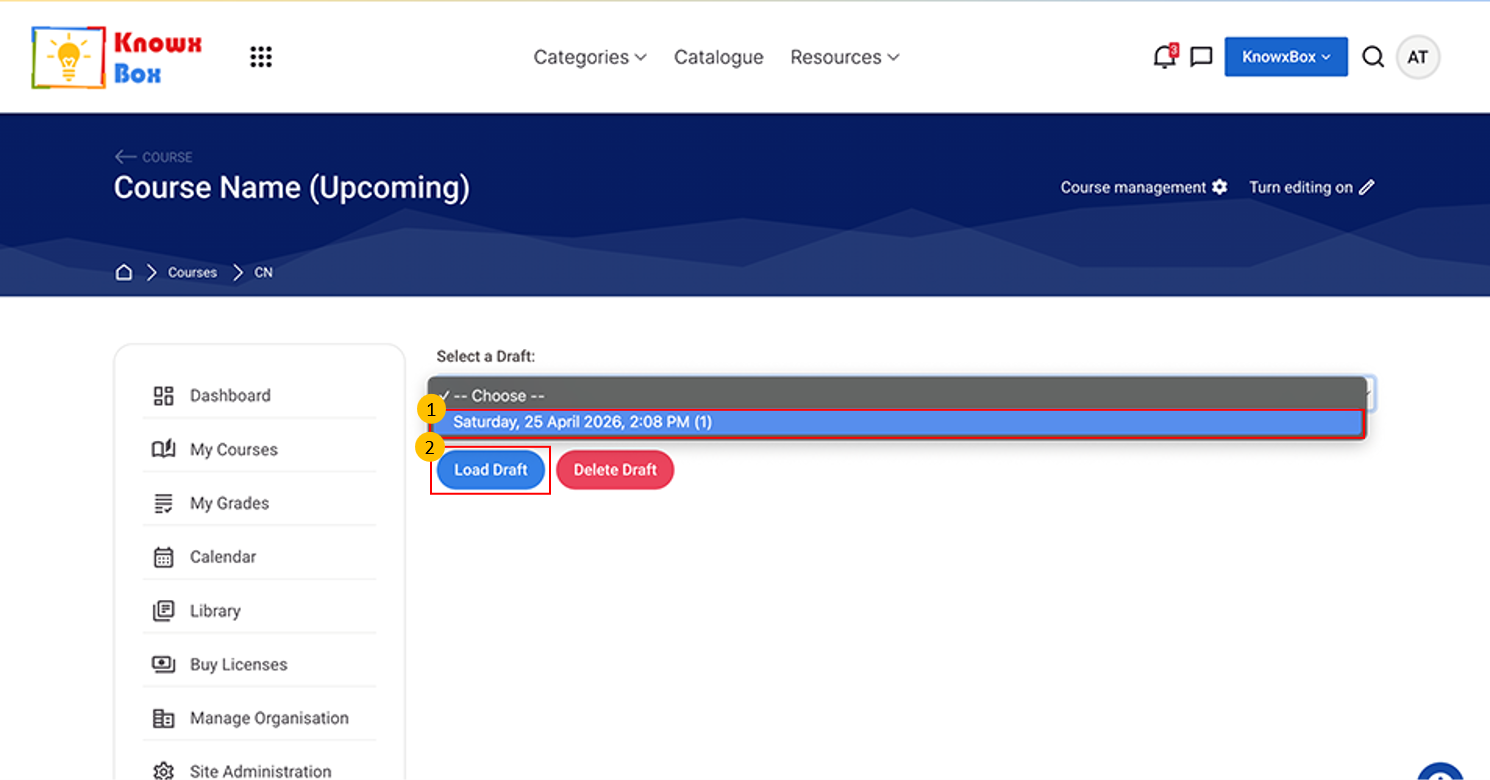
Select draft, from dropdown then Click on Load Draft.
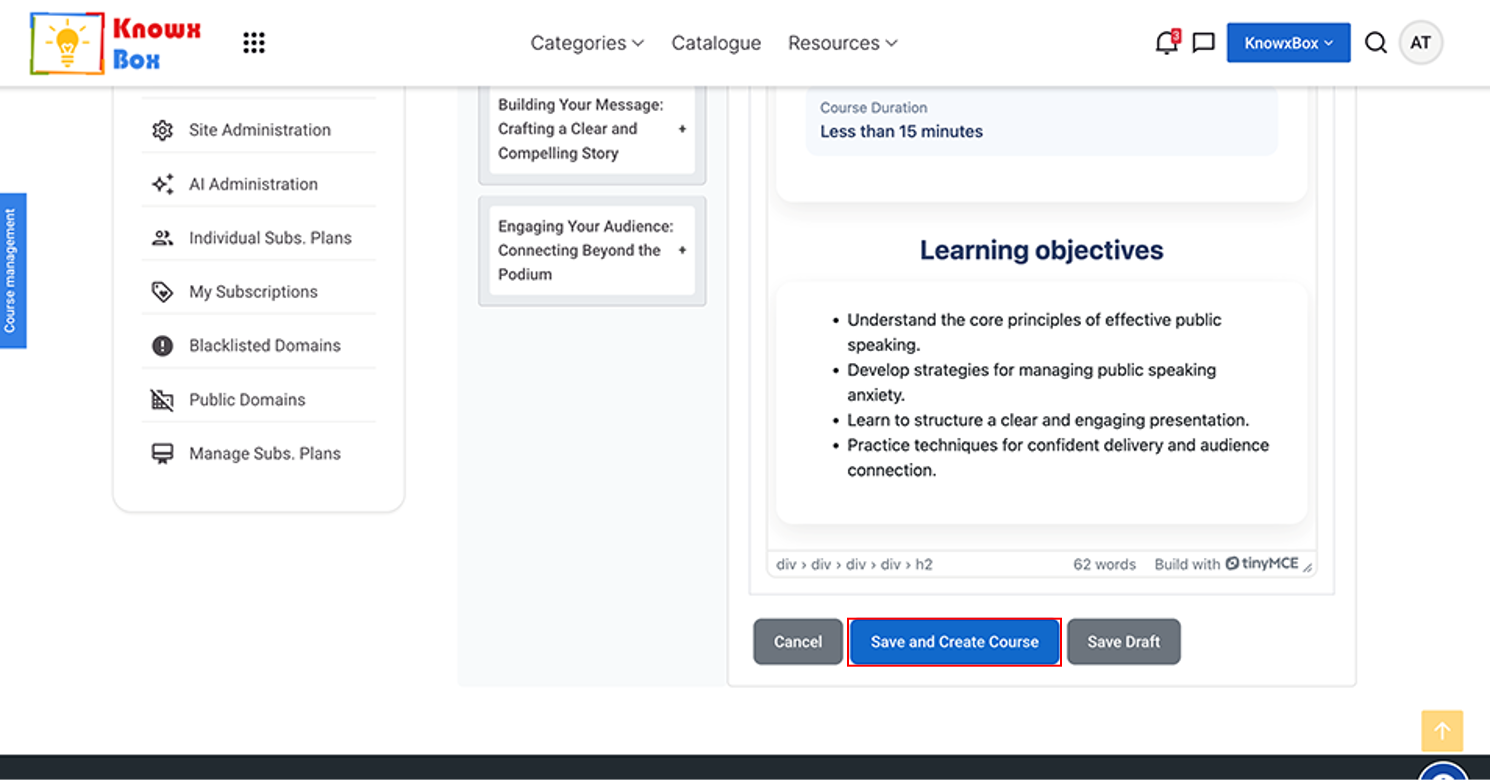
This is your complete content of course.
When you feel sure about the content then click on Save and Create Course.
Your course will be created.
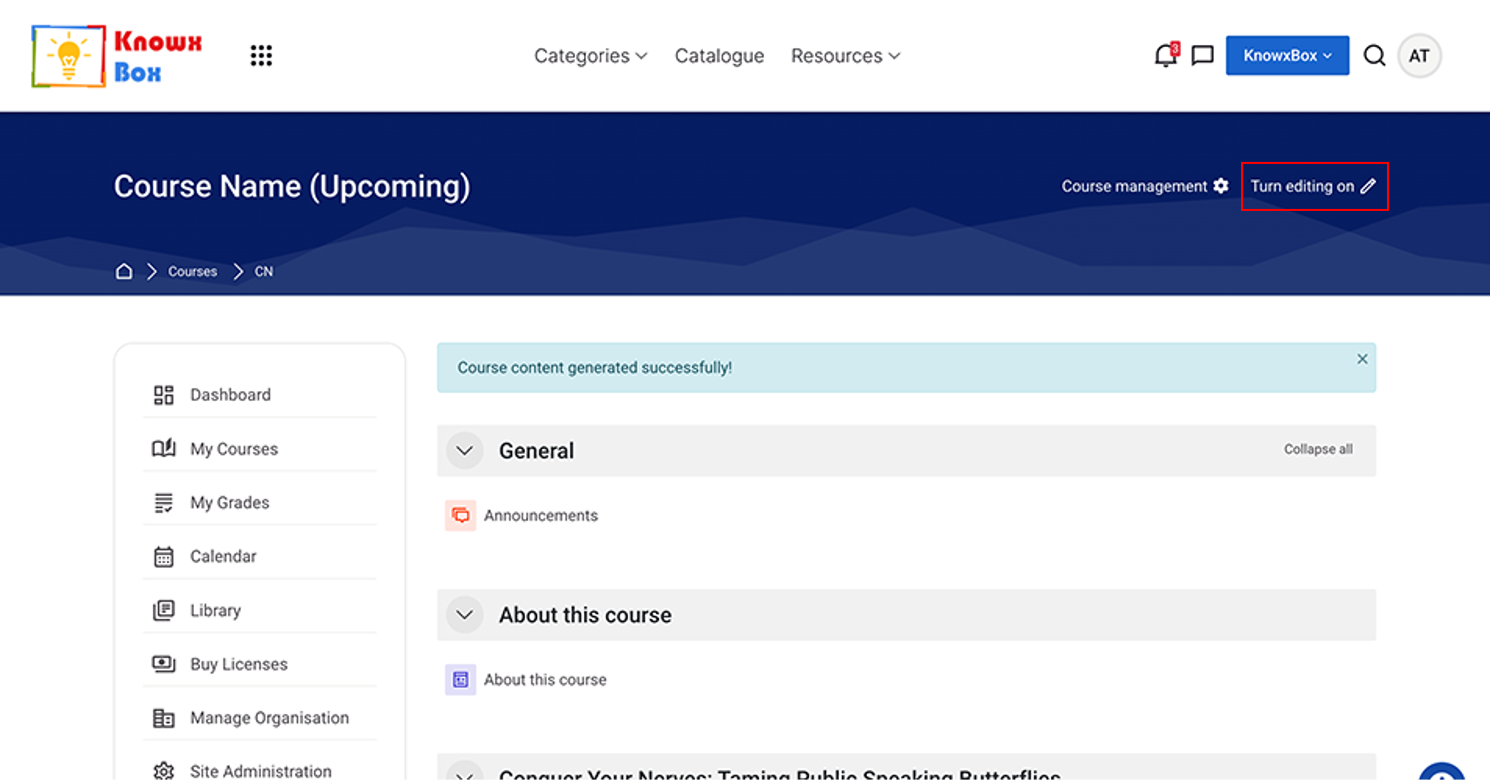
Ensure that ‘Turn Editing On’ is enabled.
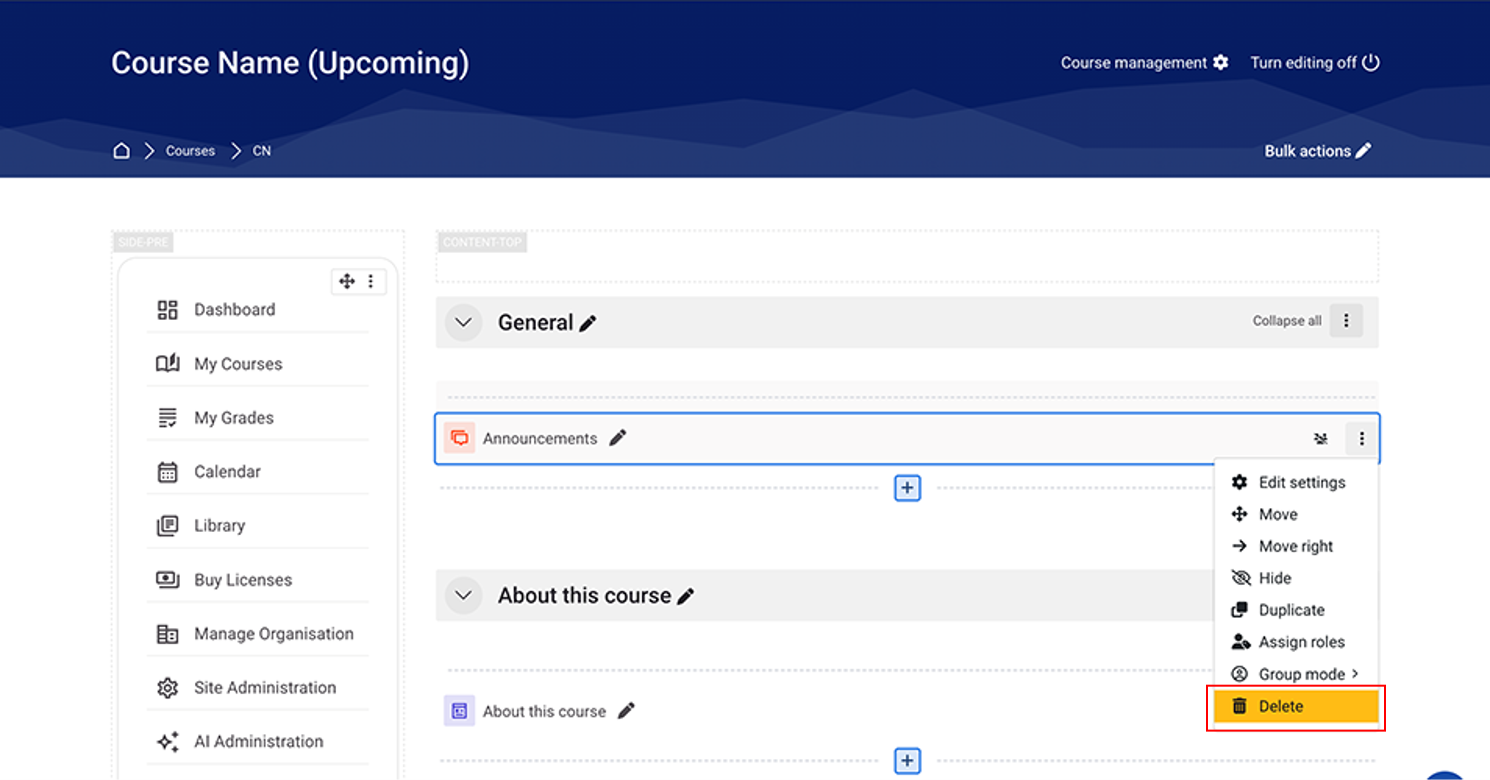
Delete New sections by clicking the 3 vertical dots on the right-side then select Delete.
3. Setting up Course Completion Settings using Bulk Method
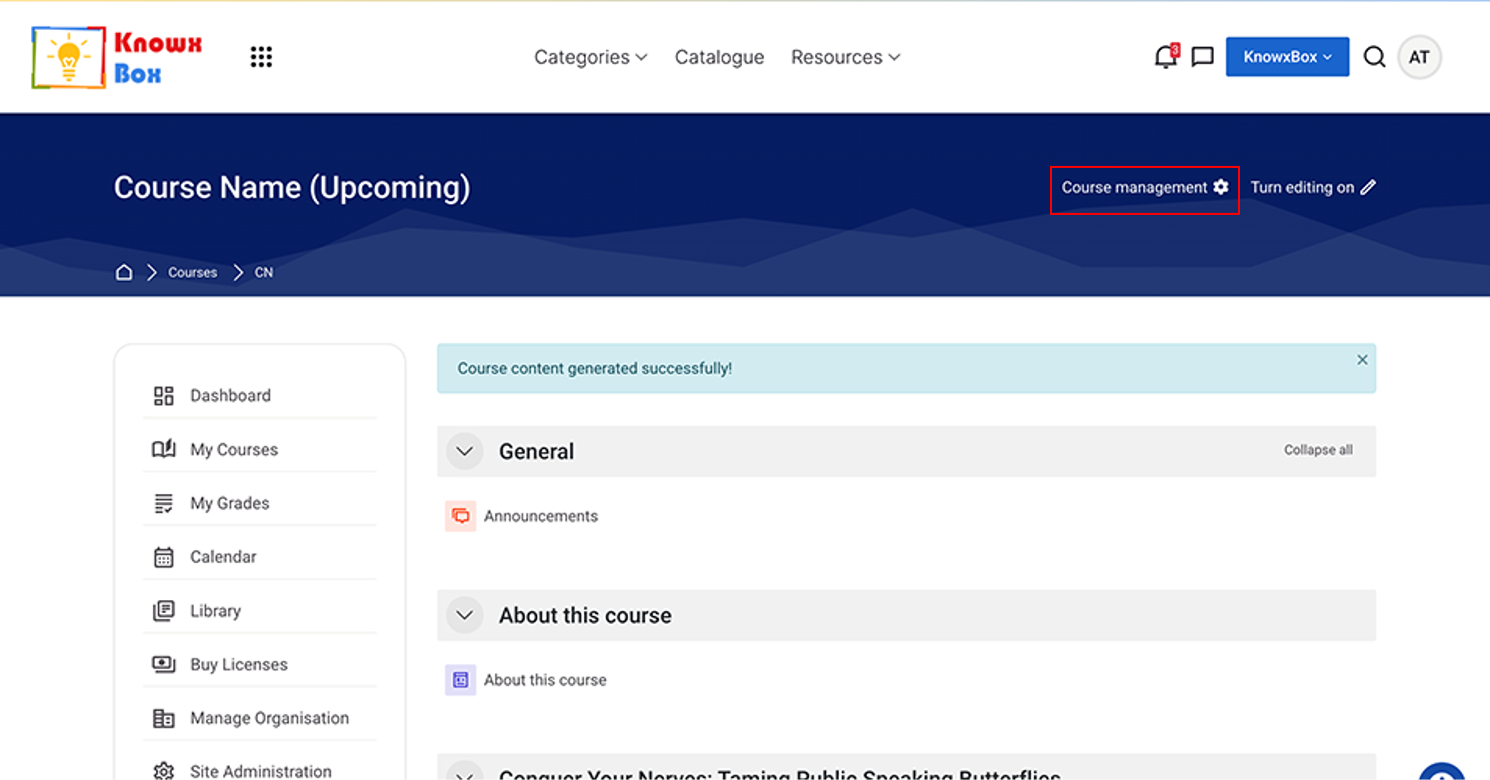
Again, Click on Course management.
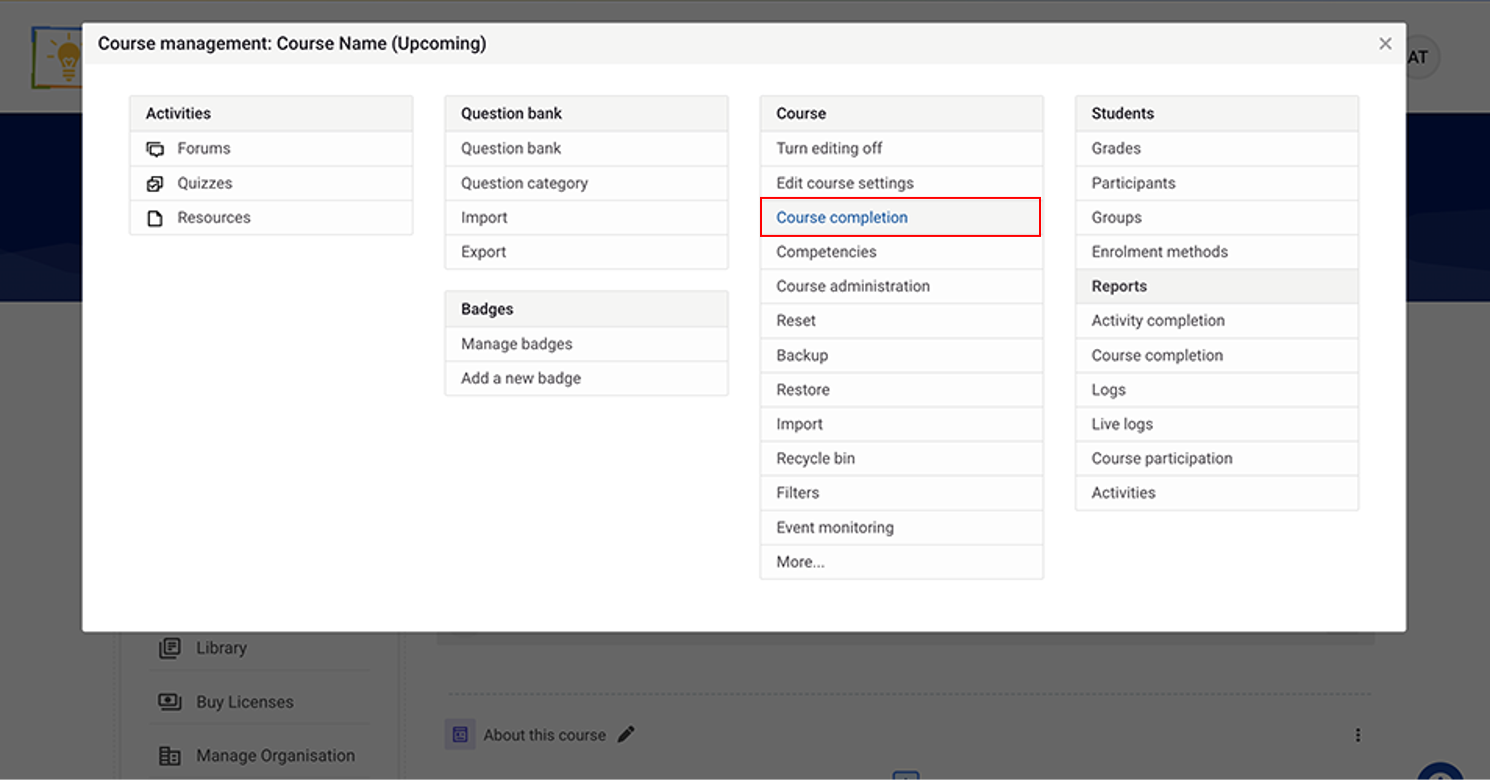
Click Course completion.
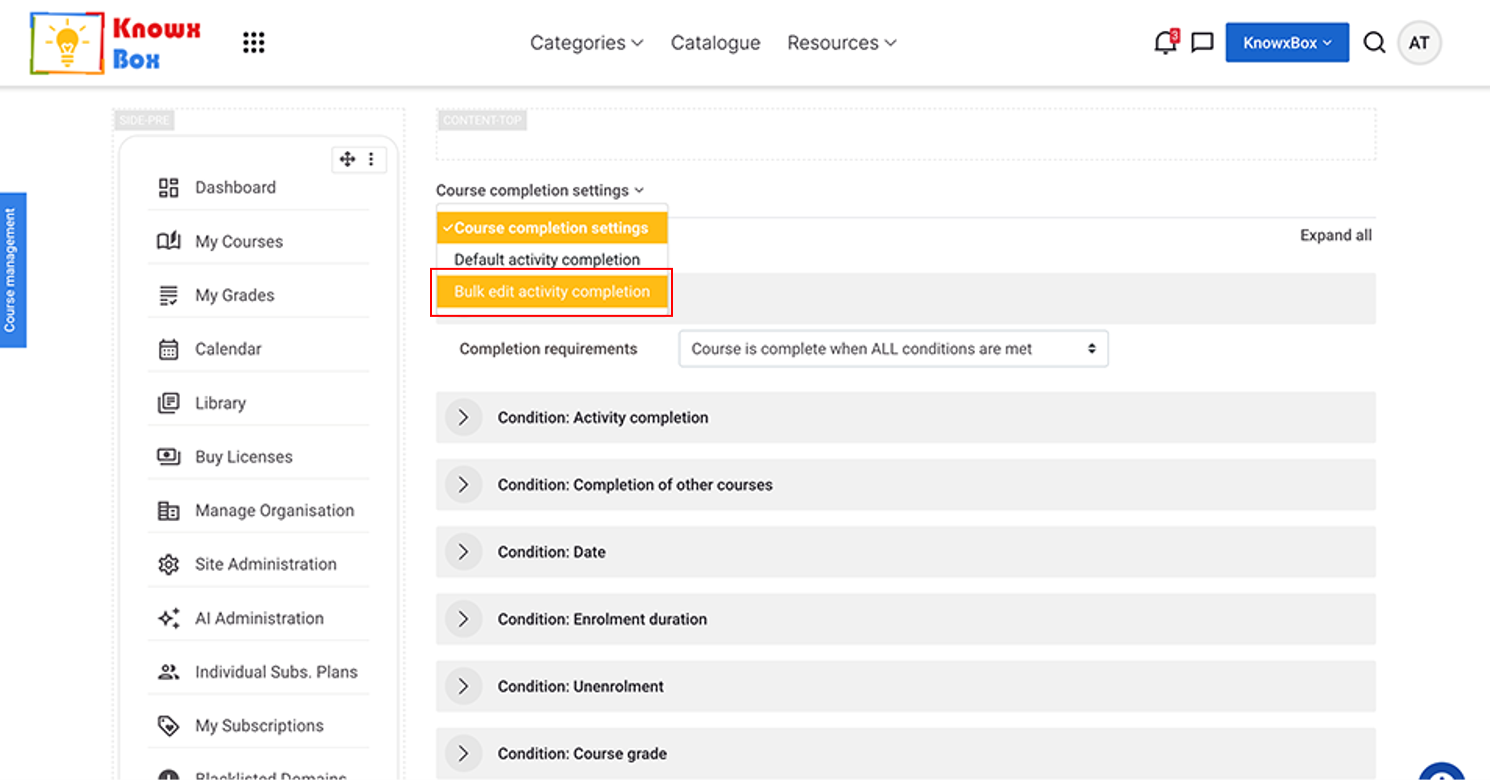
Select Bulk edit activity completion from dropdown under Course completion setting.
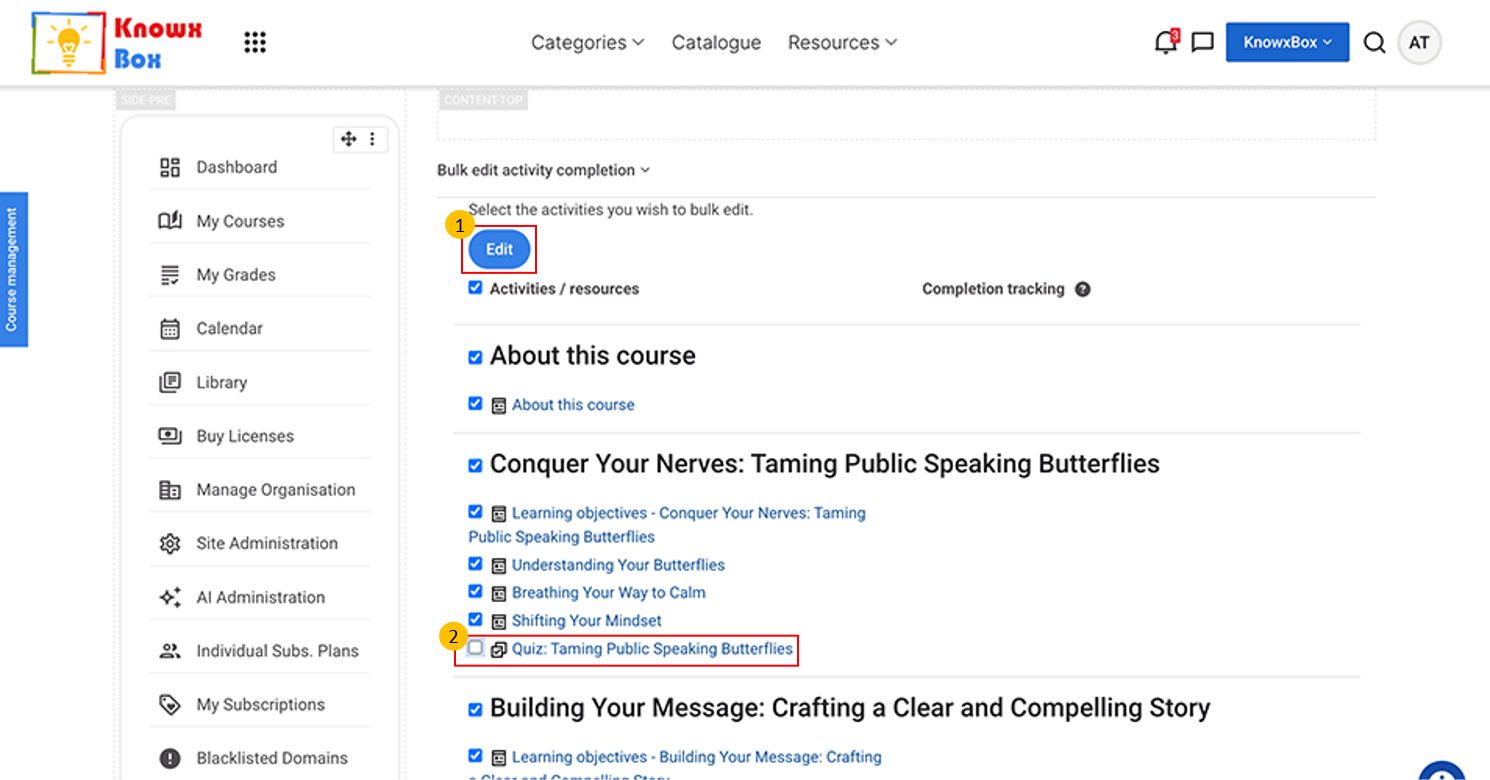
Select all activities except quizzes then Click on Edit
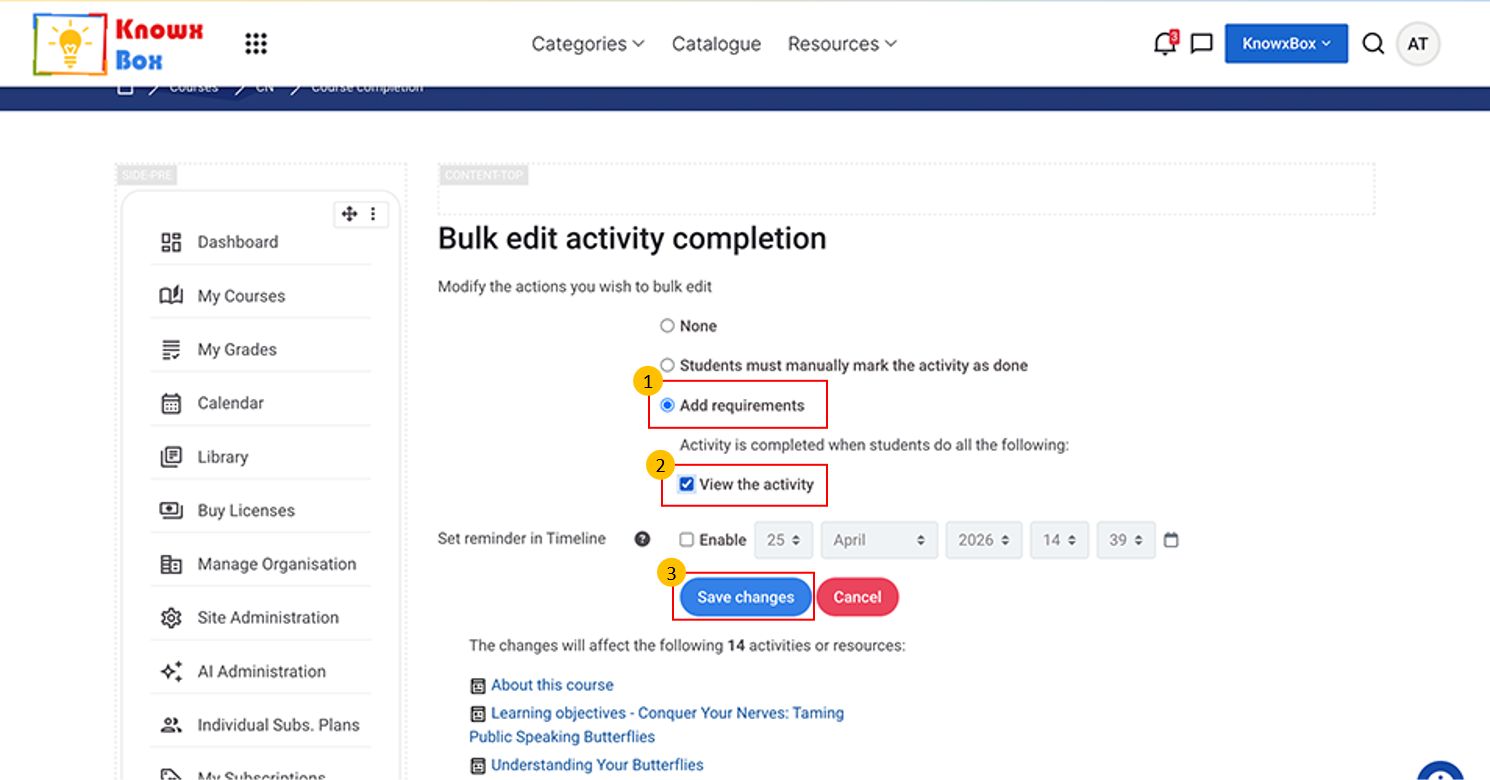
Now, select Add requirement, View the activity then Click on Save changes.
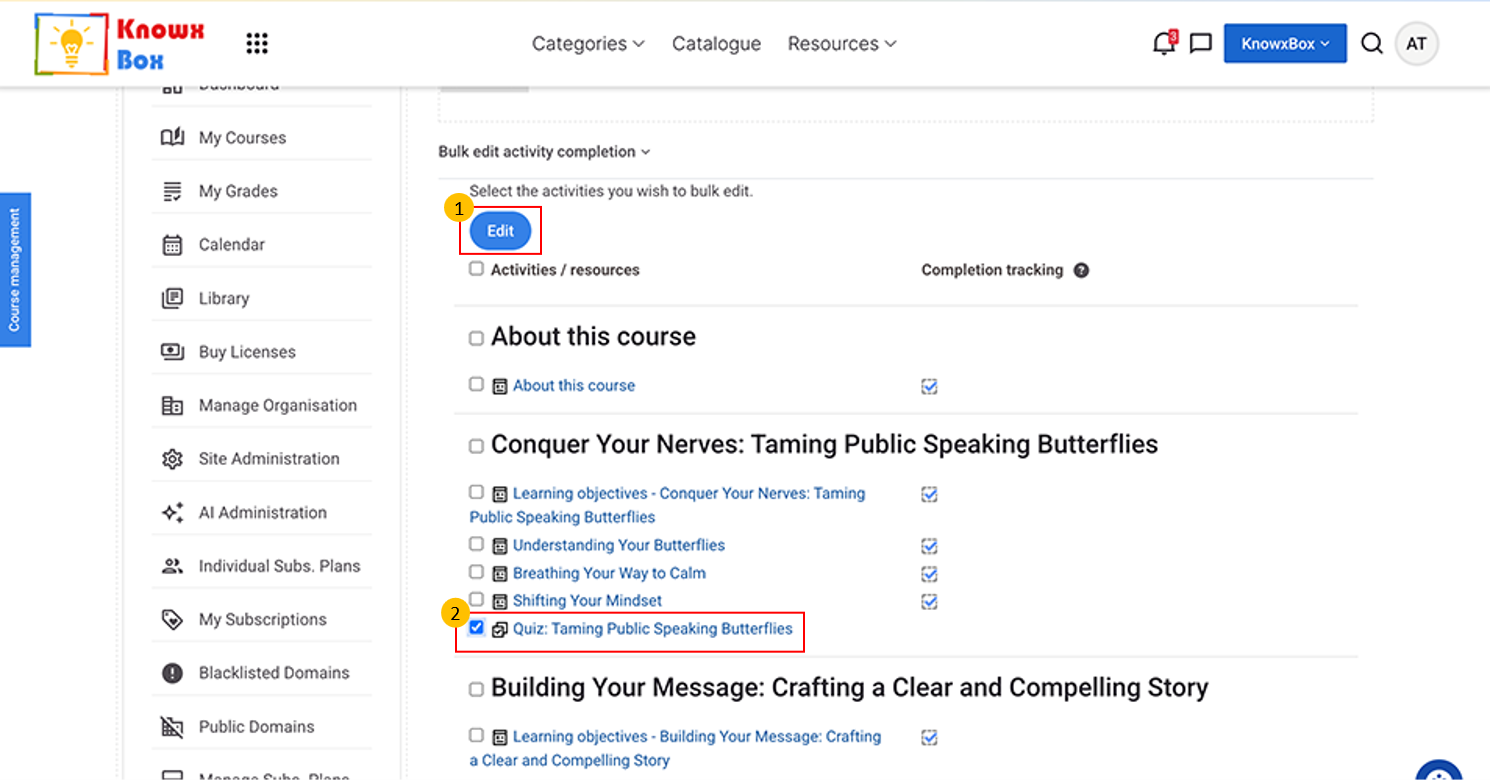
Now, select all the Quiz activities then click on Edit.
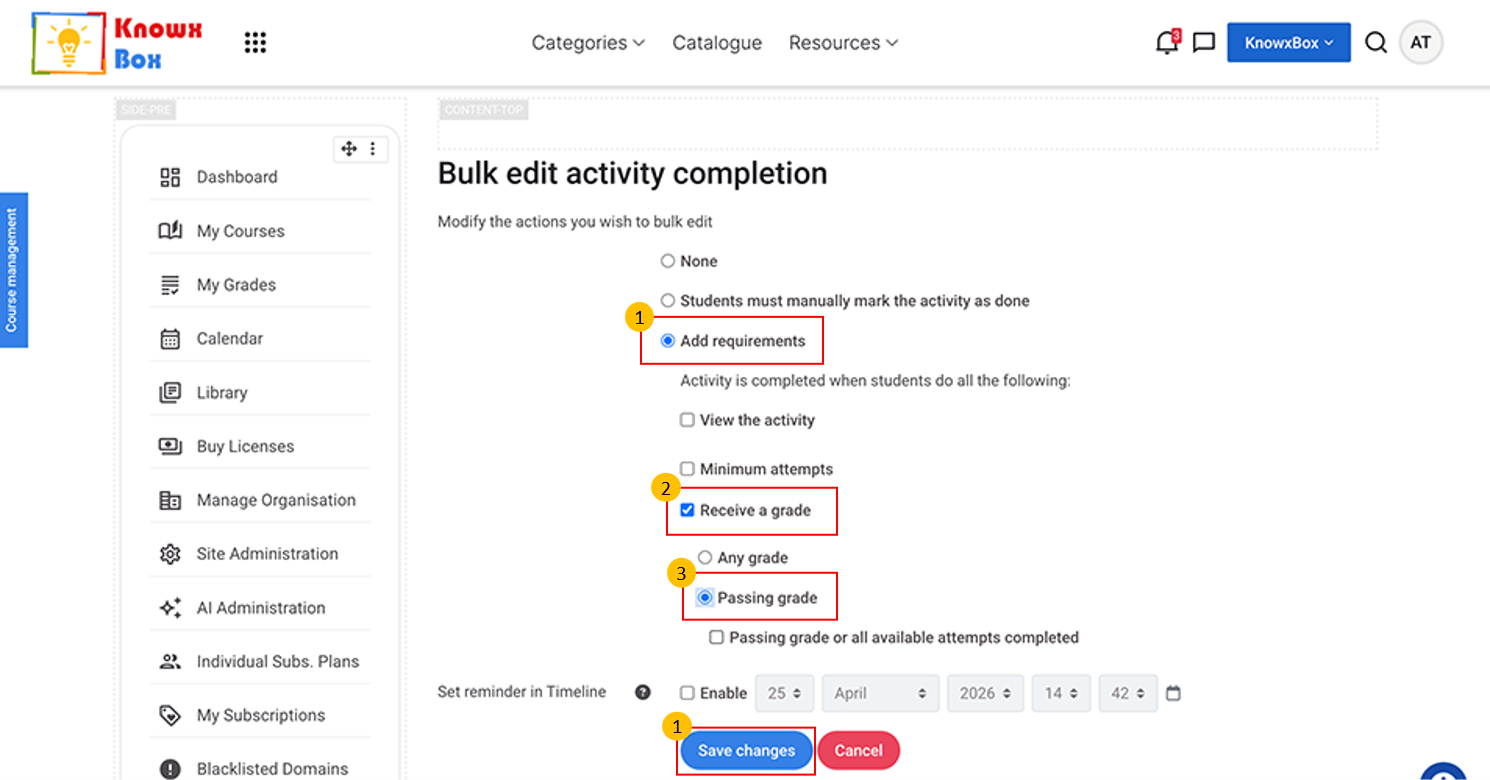
Select Add Requirements -> Receive a grade -> Passing Grade.
Fix this setting to all quiz activities.
Click on Save changes.
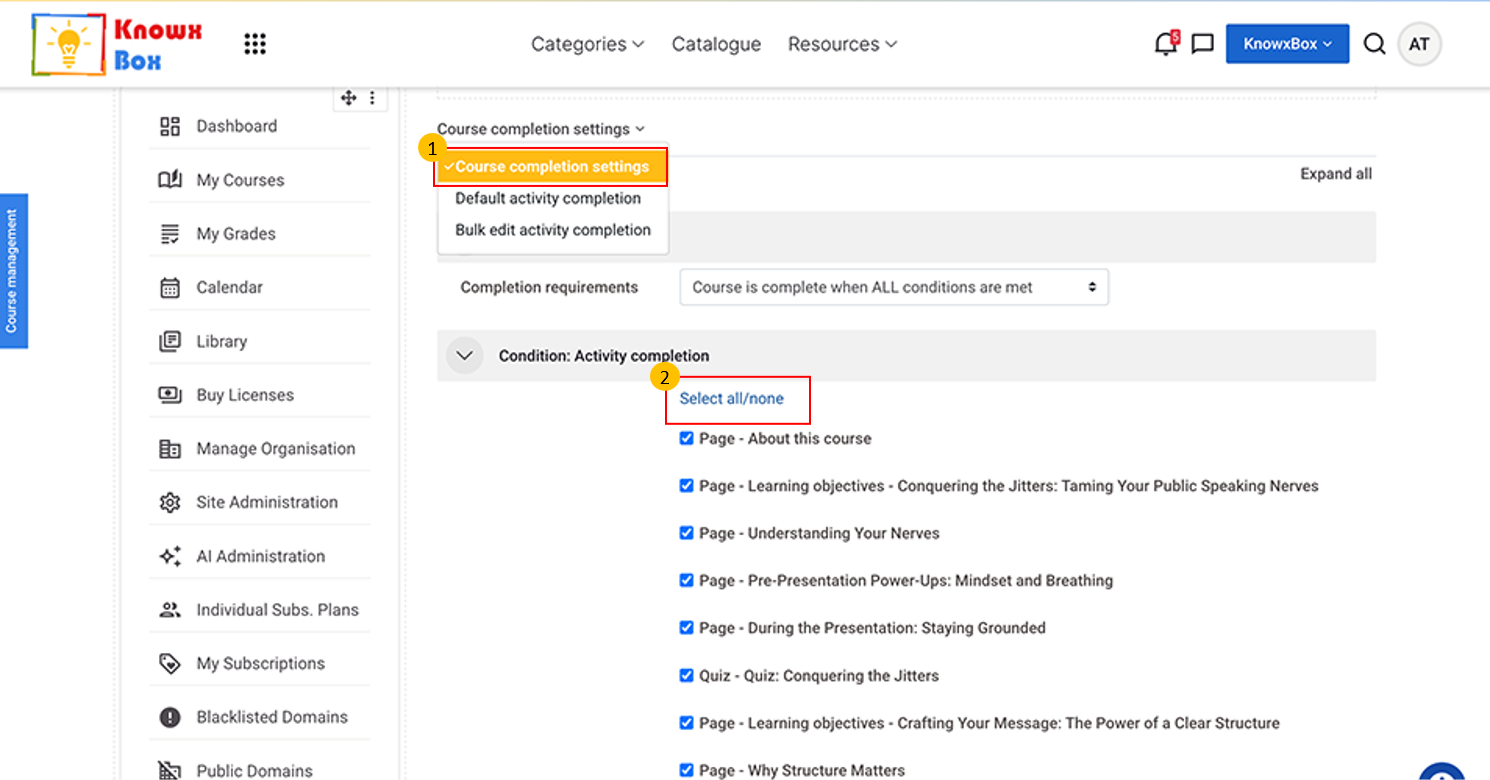
Again, come to the Course completion setting.
Click Select all. Make sure all activities checkboxes must ticked.
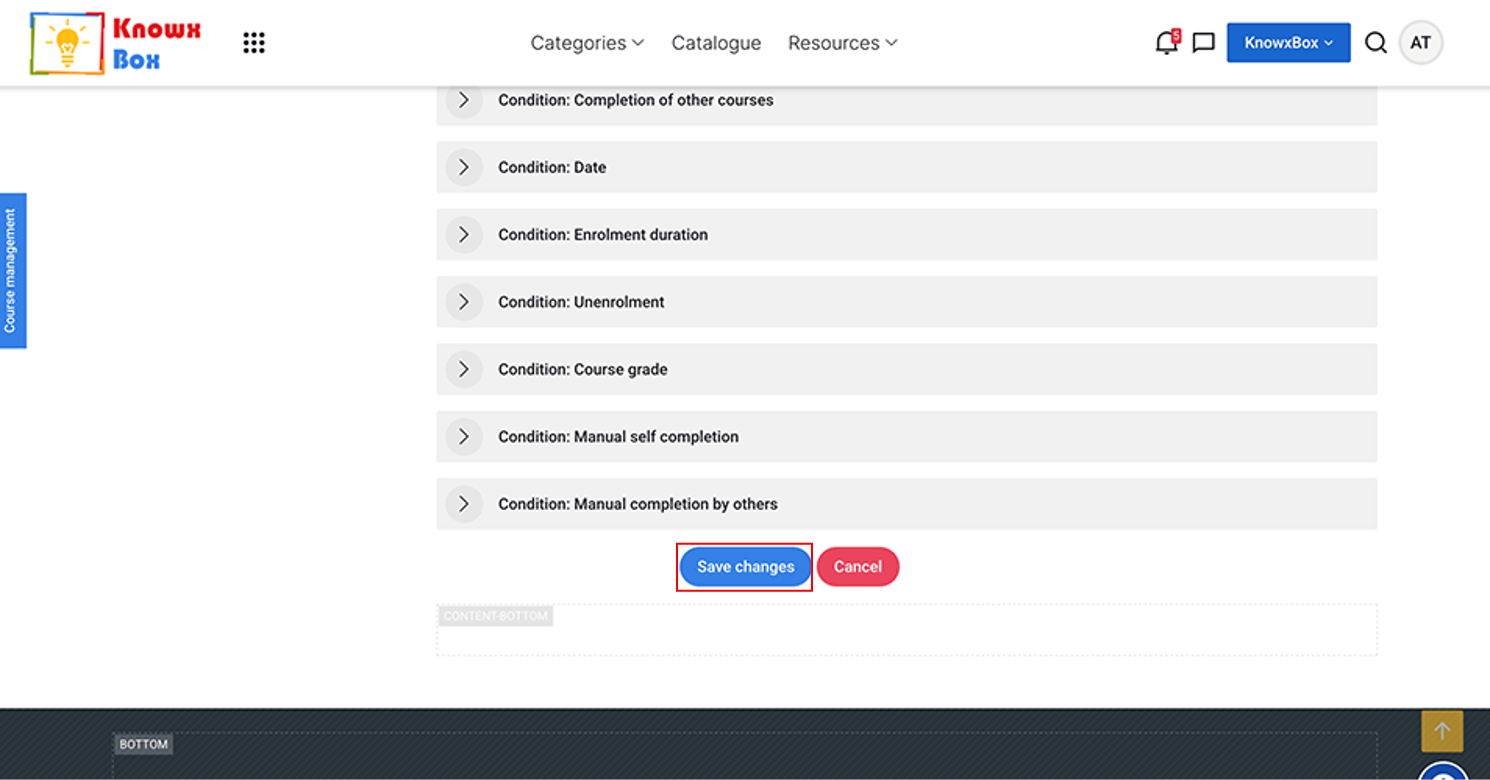
Click Save changes.
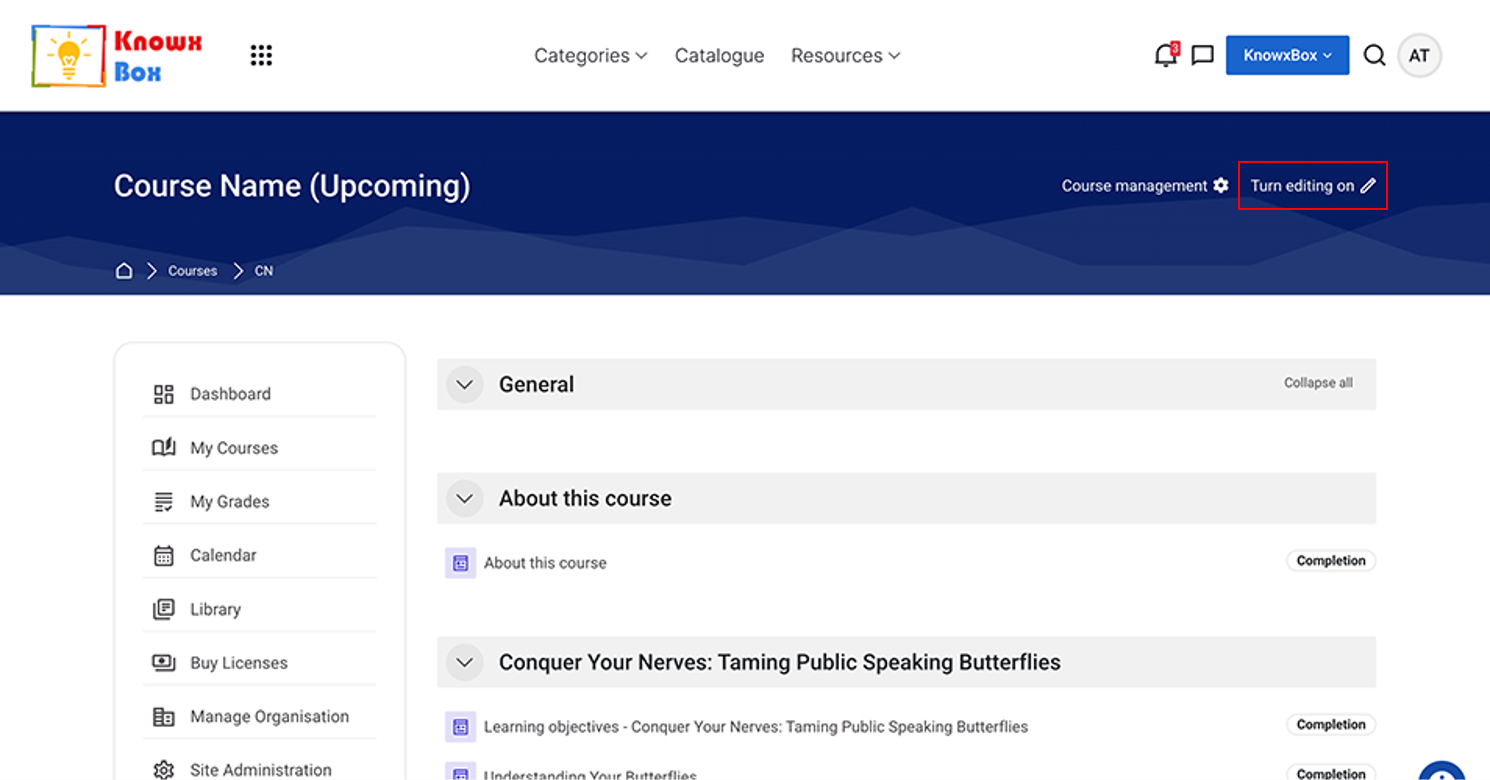
Make sure ‘Turn Editing On’ is selected.
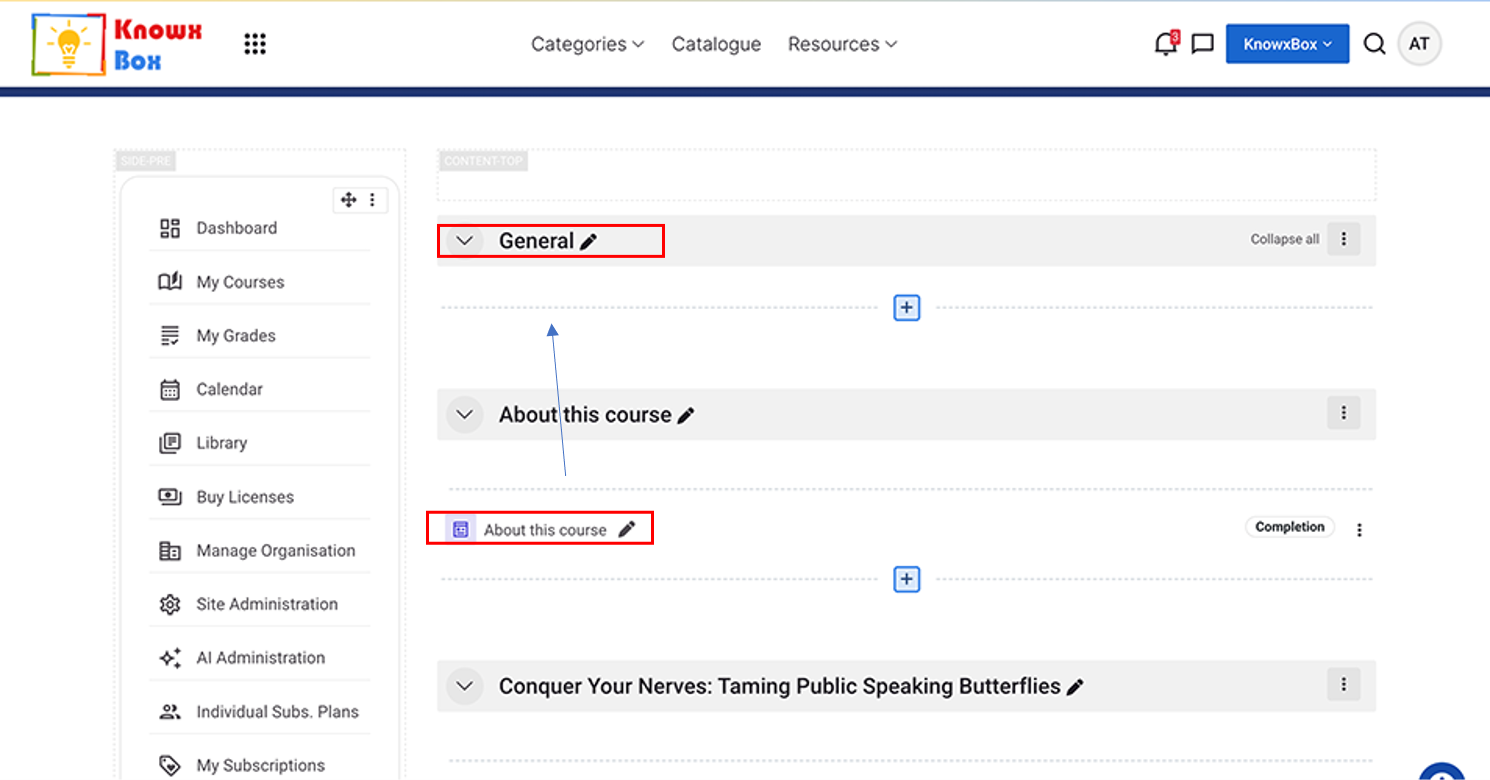
Replace General with About this Course by Drag and Drop.
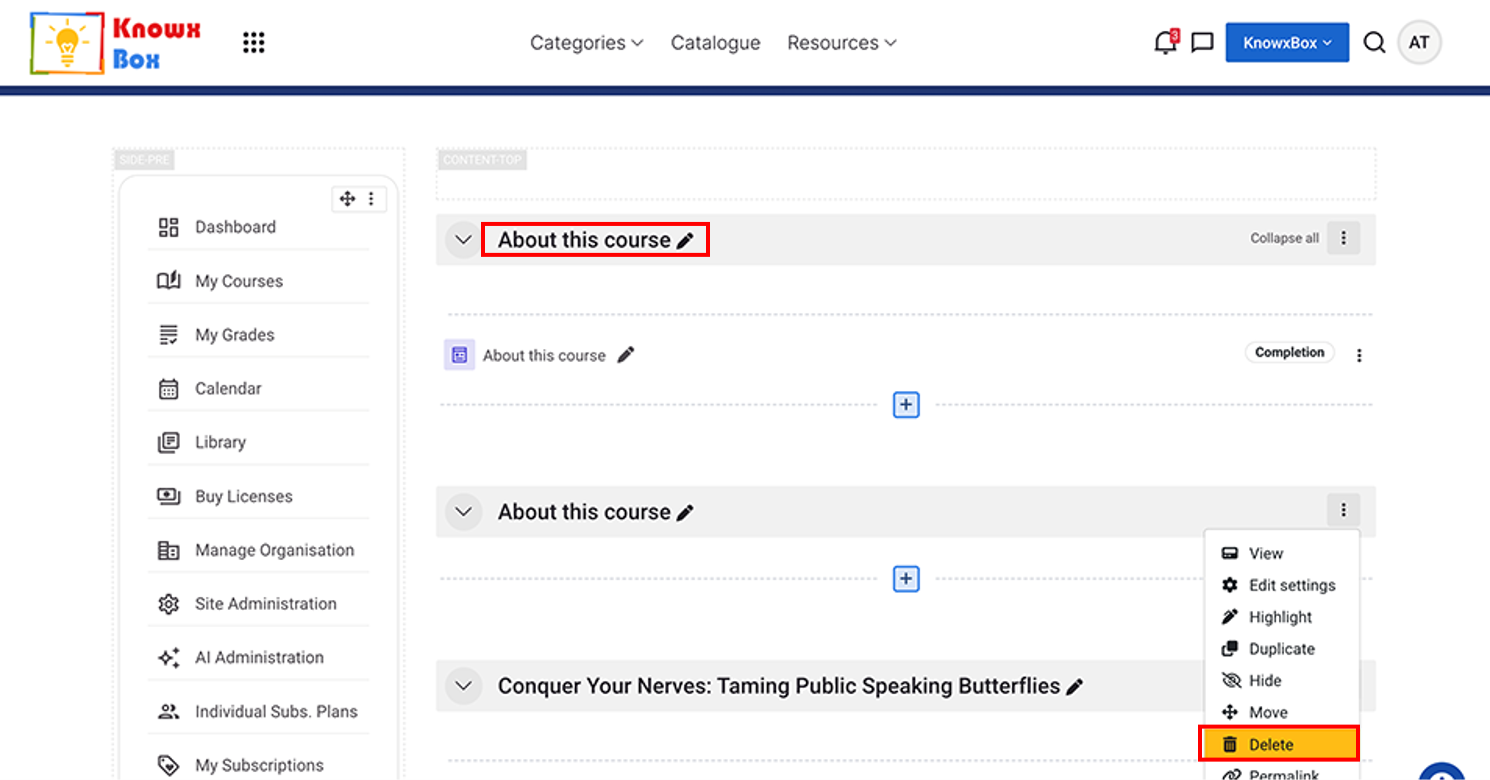
Now, Delete the 2nd activity by clicking on 3 dots.
4. Completion Settings for Quiz
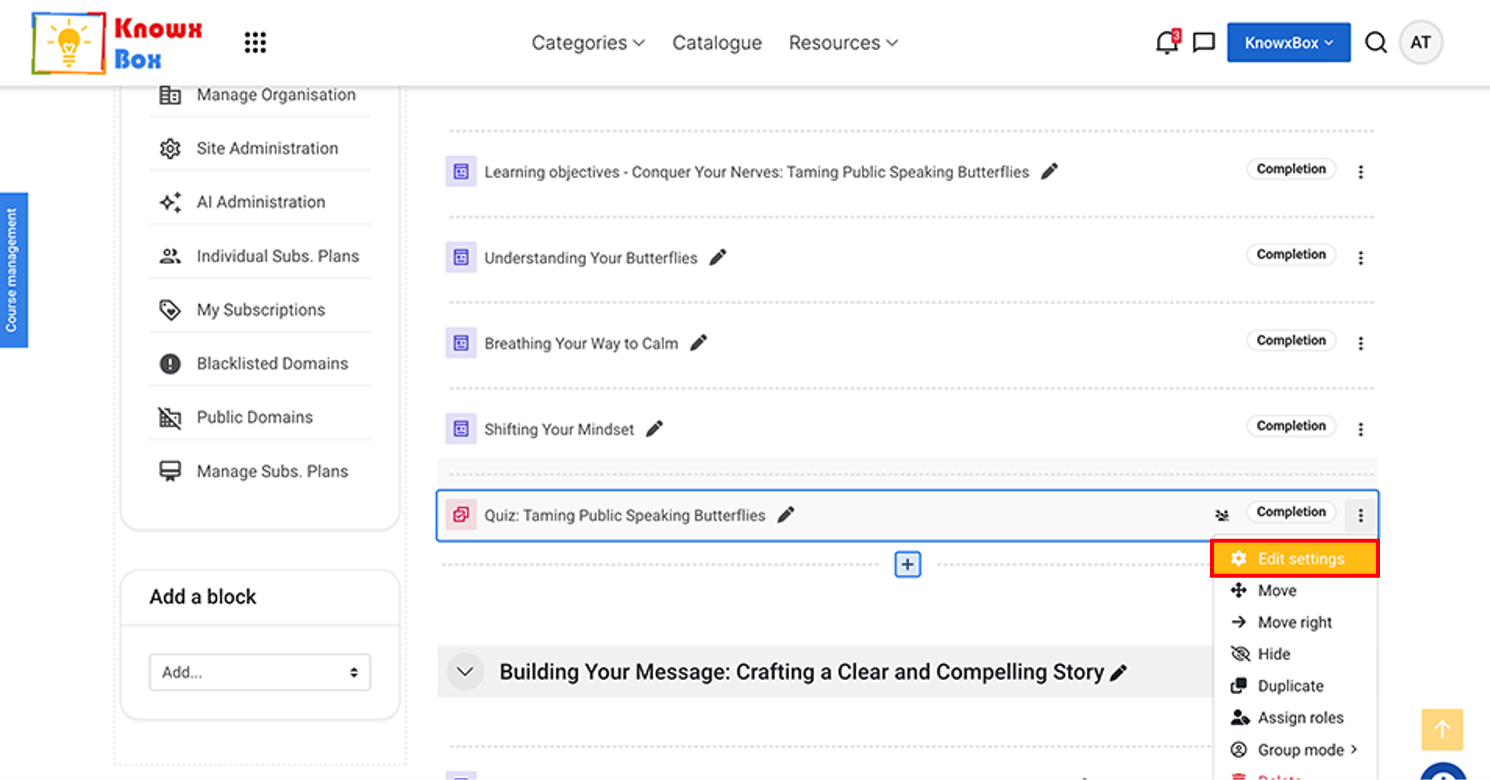
Click on three dots then Edit setting.
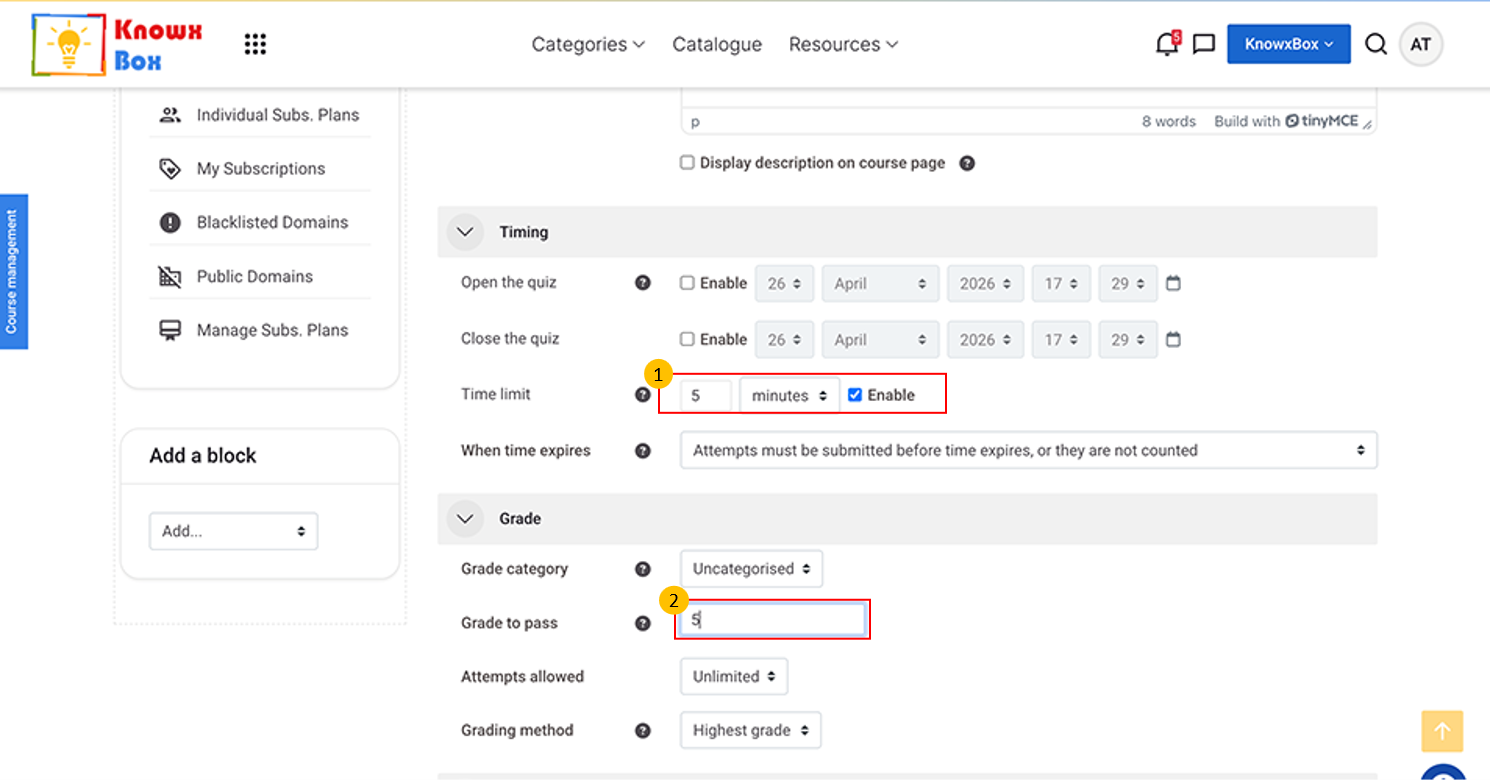
Click on Timing, set the quiz time limit from dropdown to 5 minutes then check Enable.
Click the “Grade” dropdown and set the passing grade to 5.
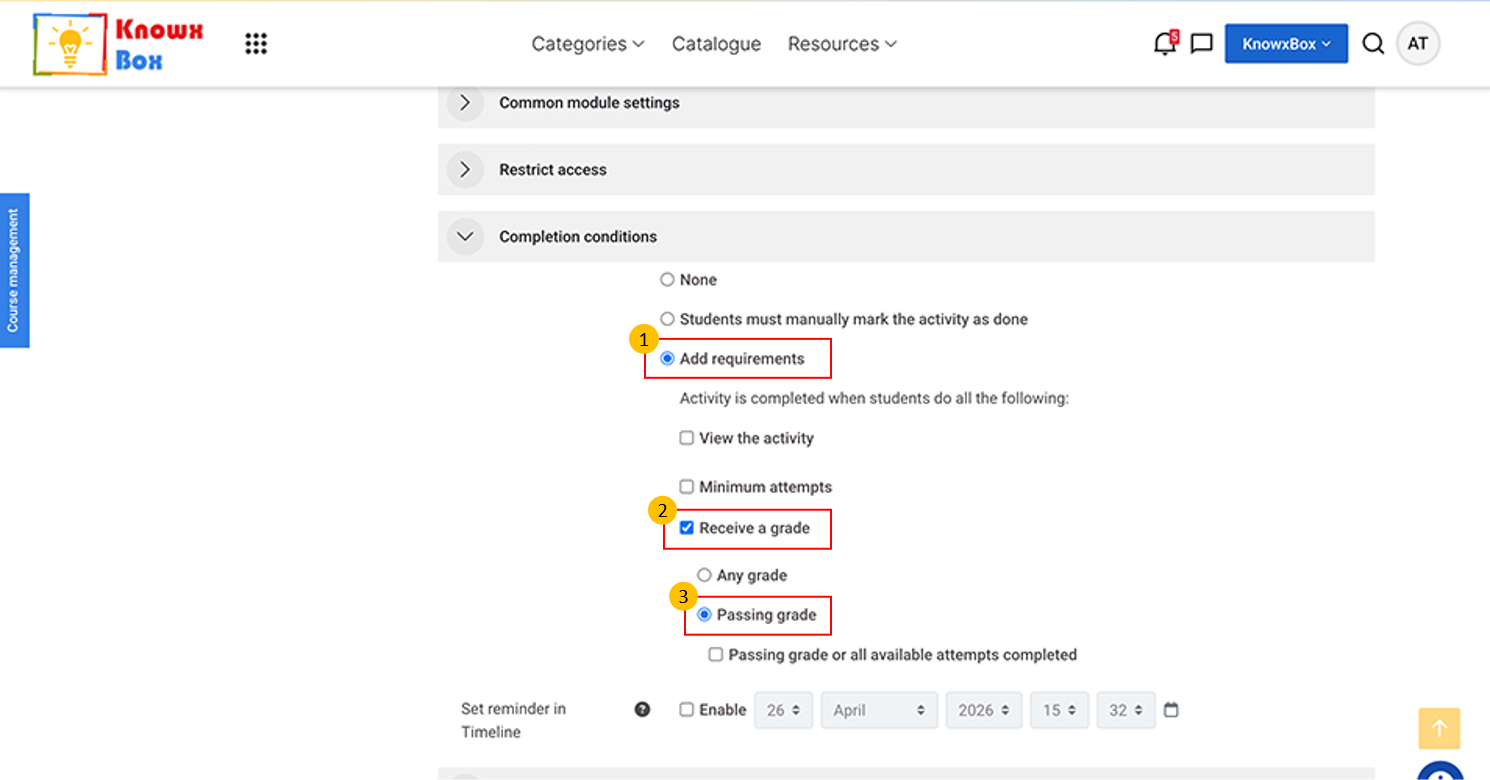
Click on Completion conditions
Select Add Requirements -> Receive a grade -> Passing Grade.
Fix this setting to all quiz activities.
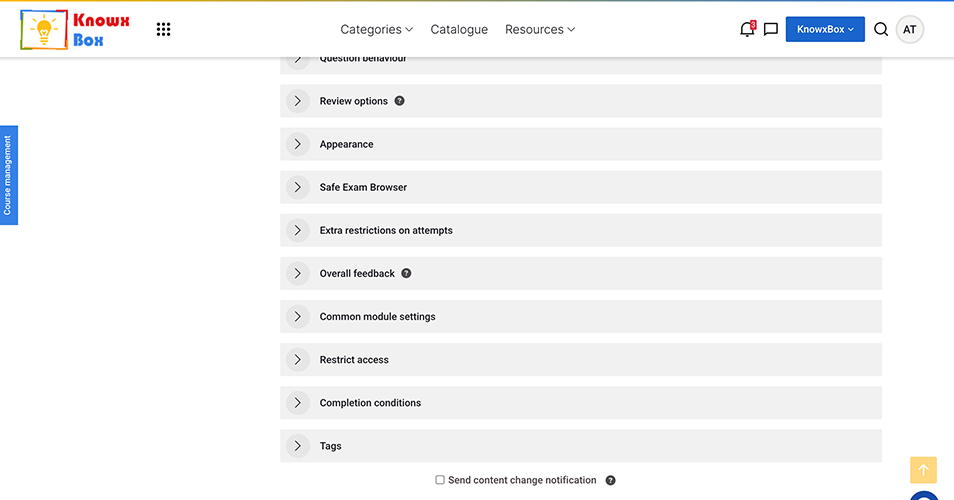
Click on Save and display.
5. Add Teacher to a Course
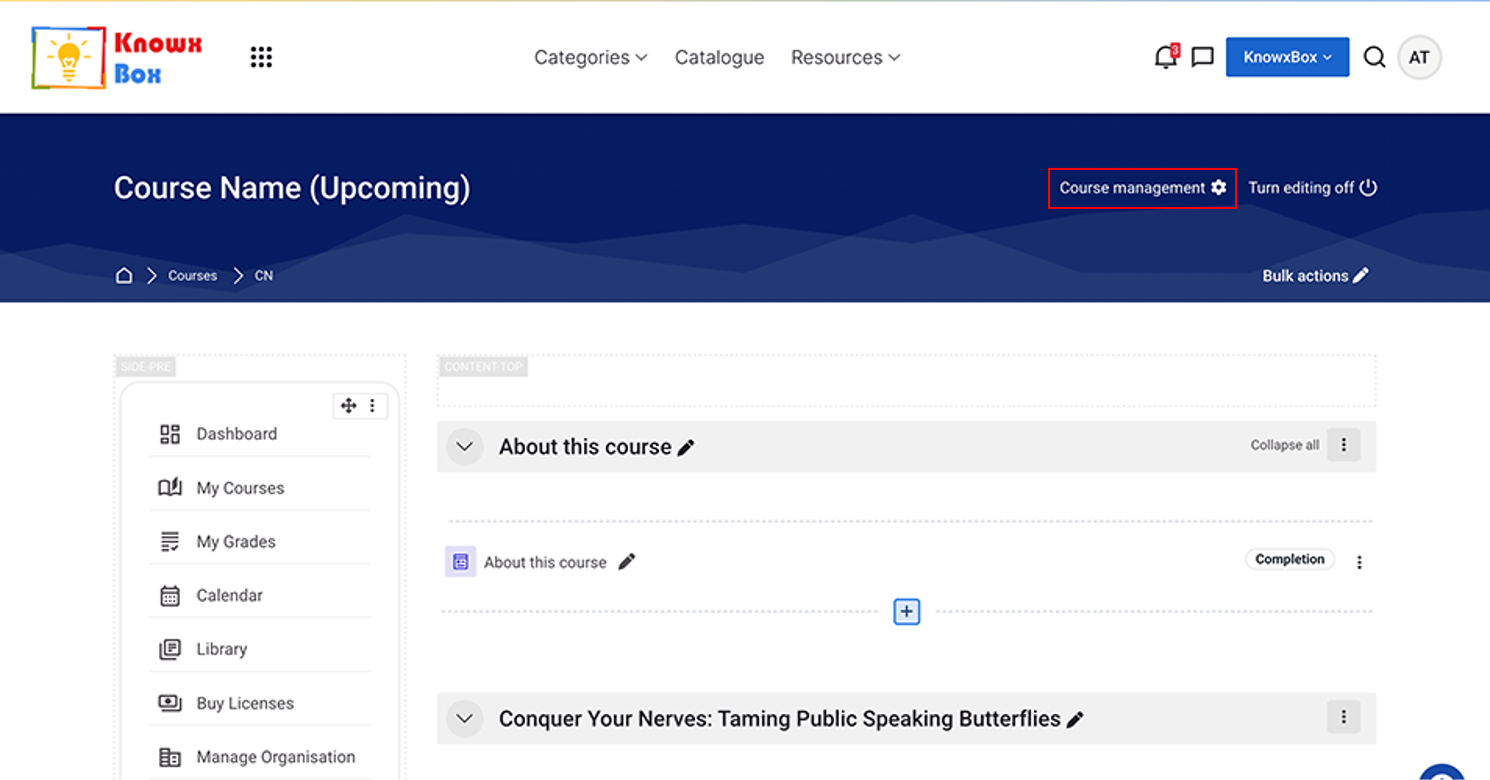
Click on Course Management.
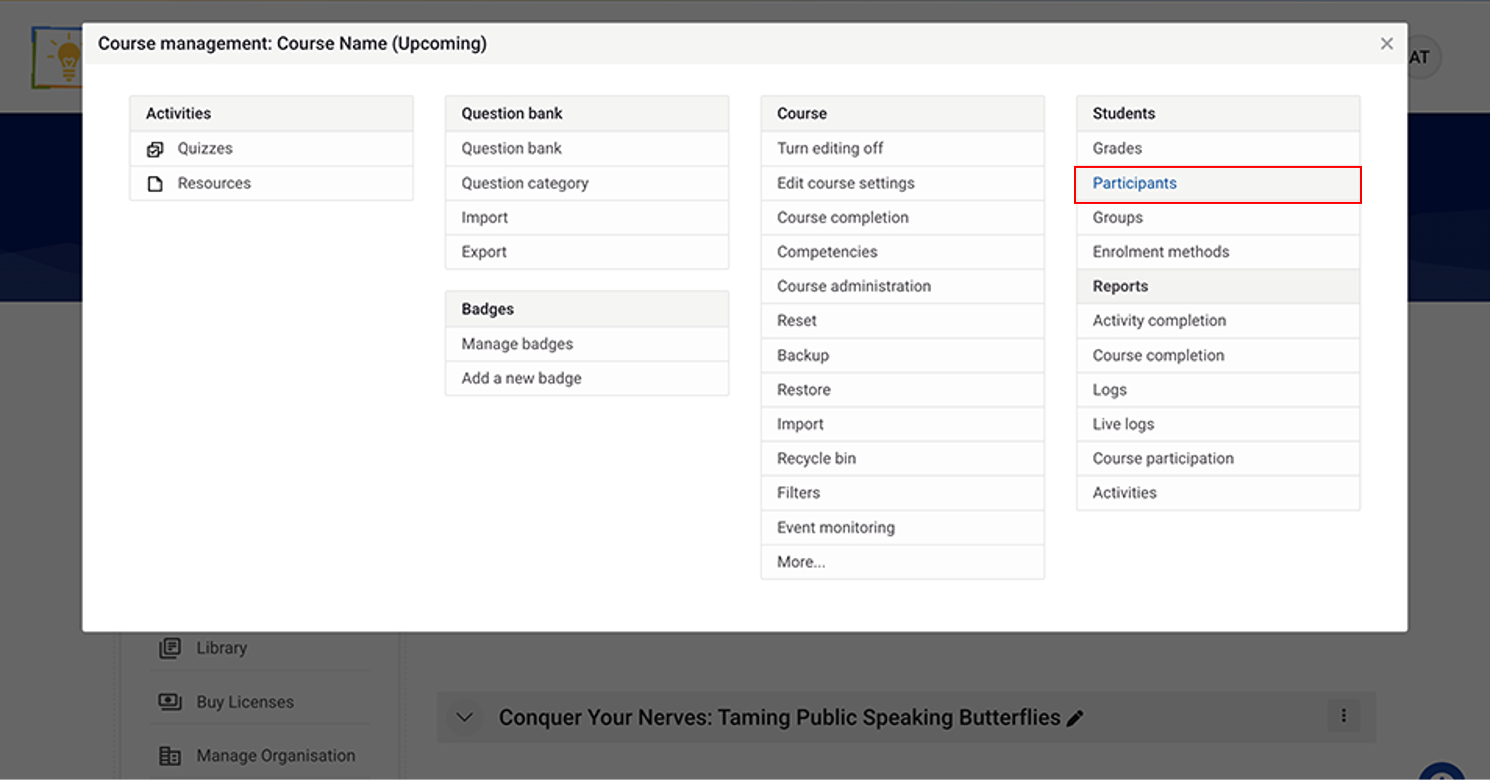
Click Participants.
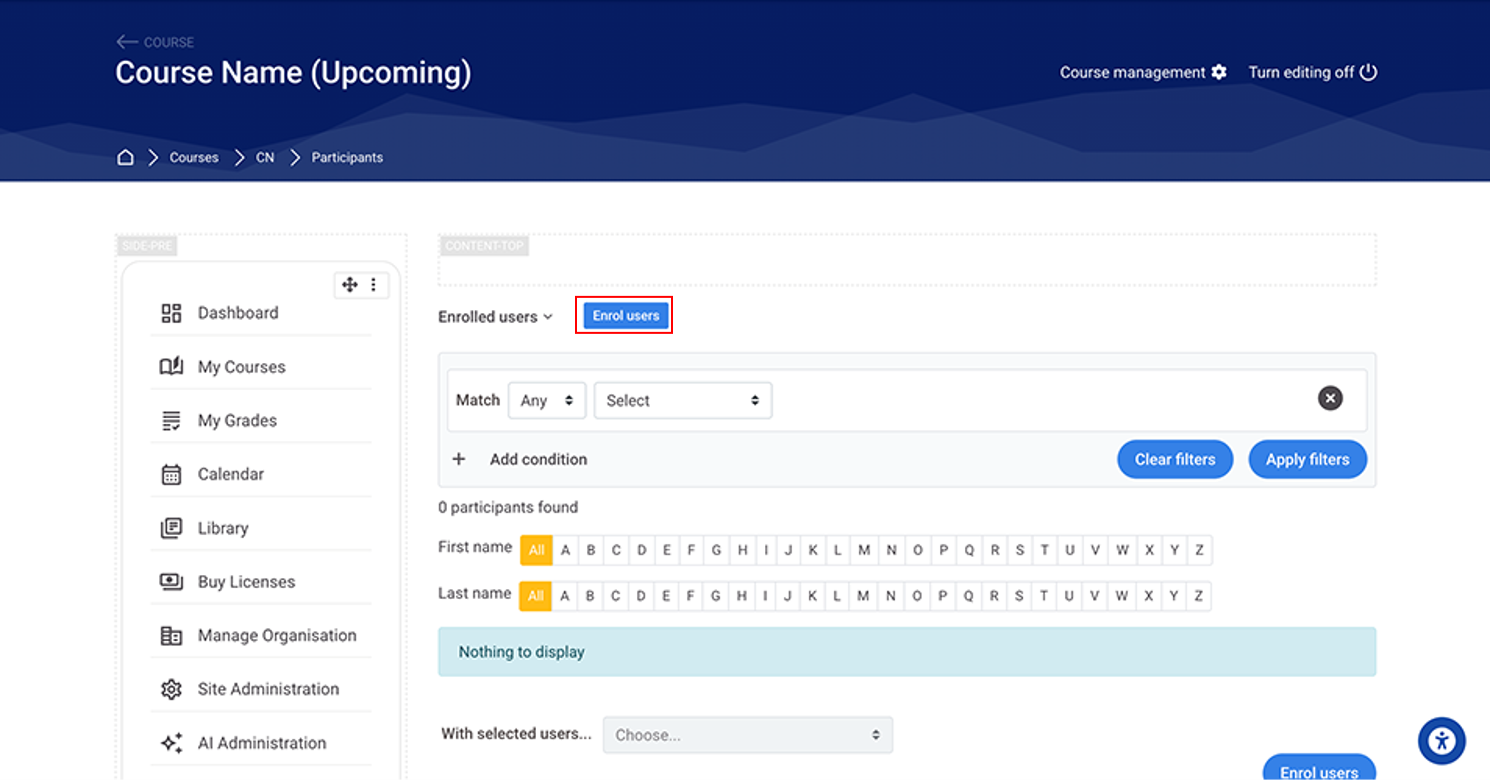
Now, enroll the User.
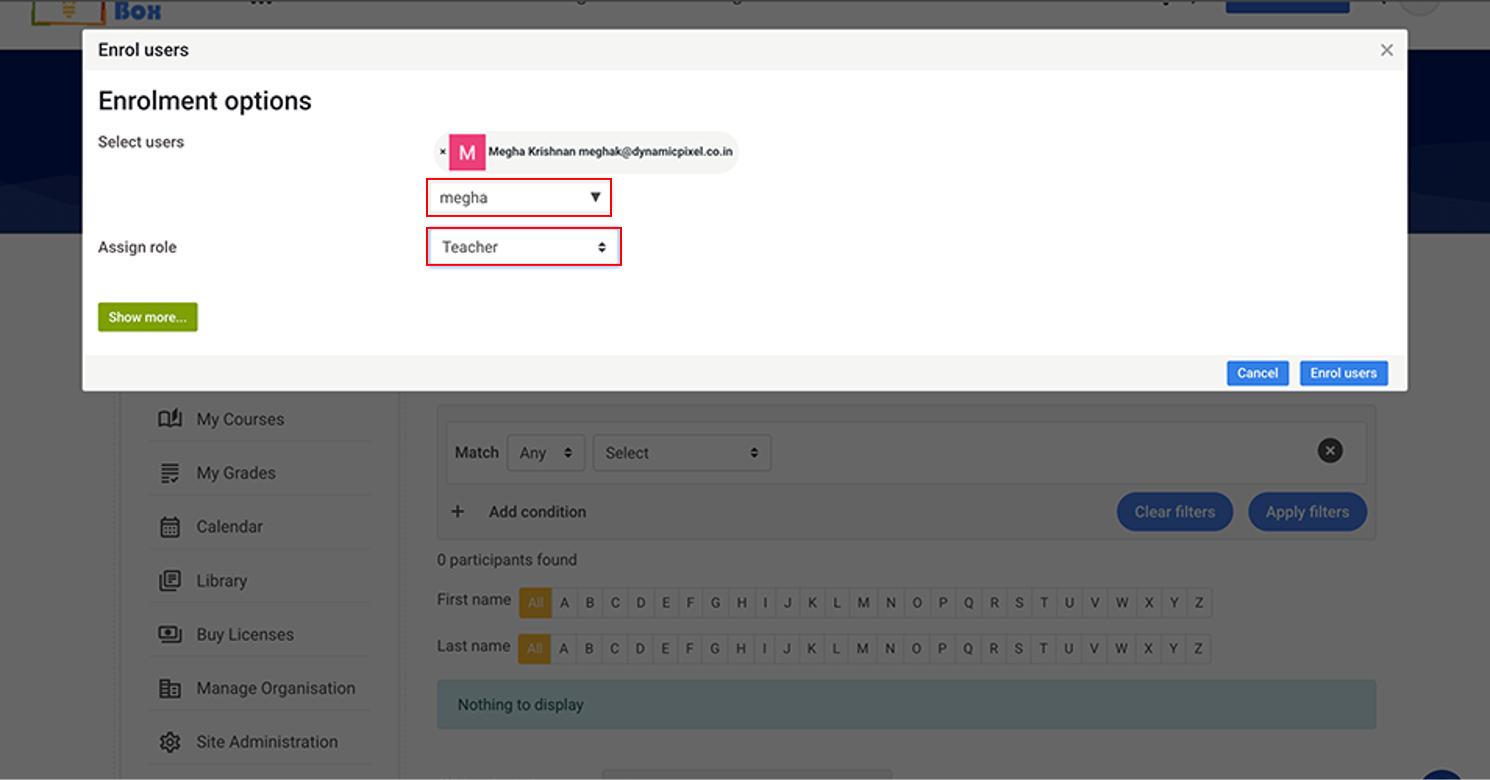
Select the user, assign the Teacher Role and click on Enrol users.
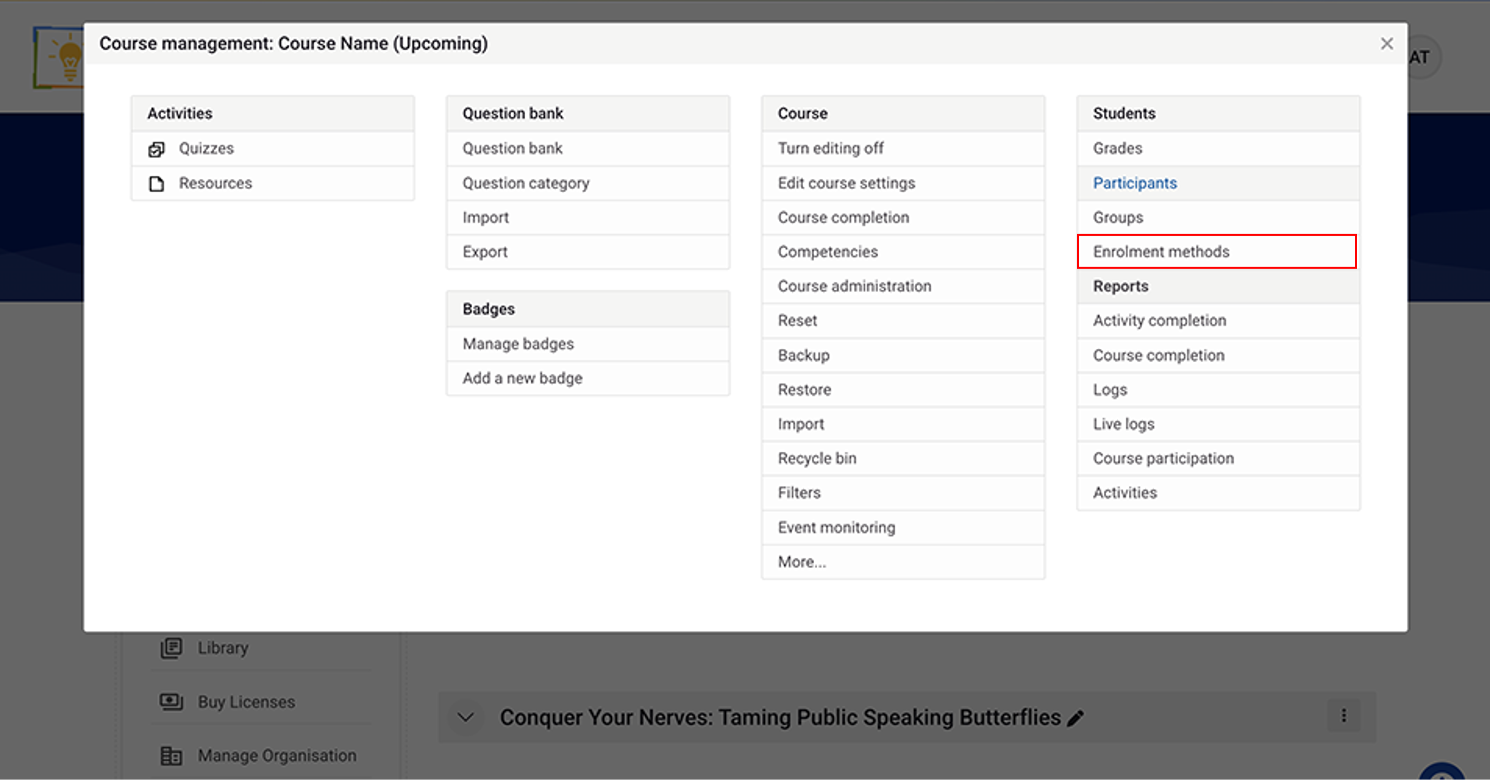
Click on Enrolment methods
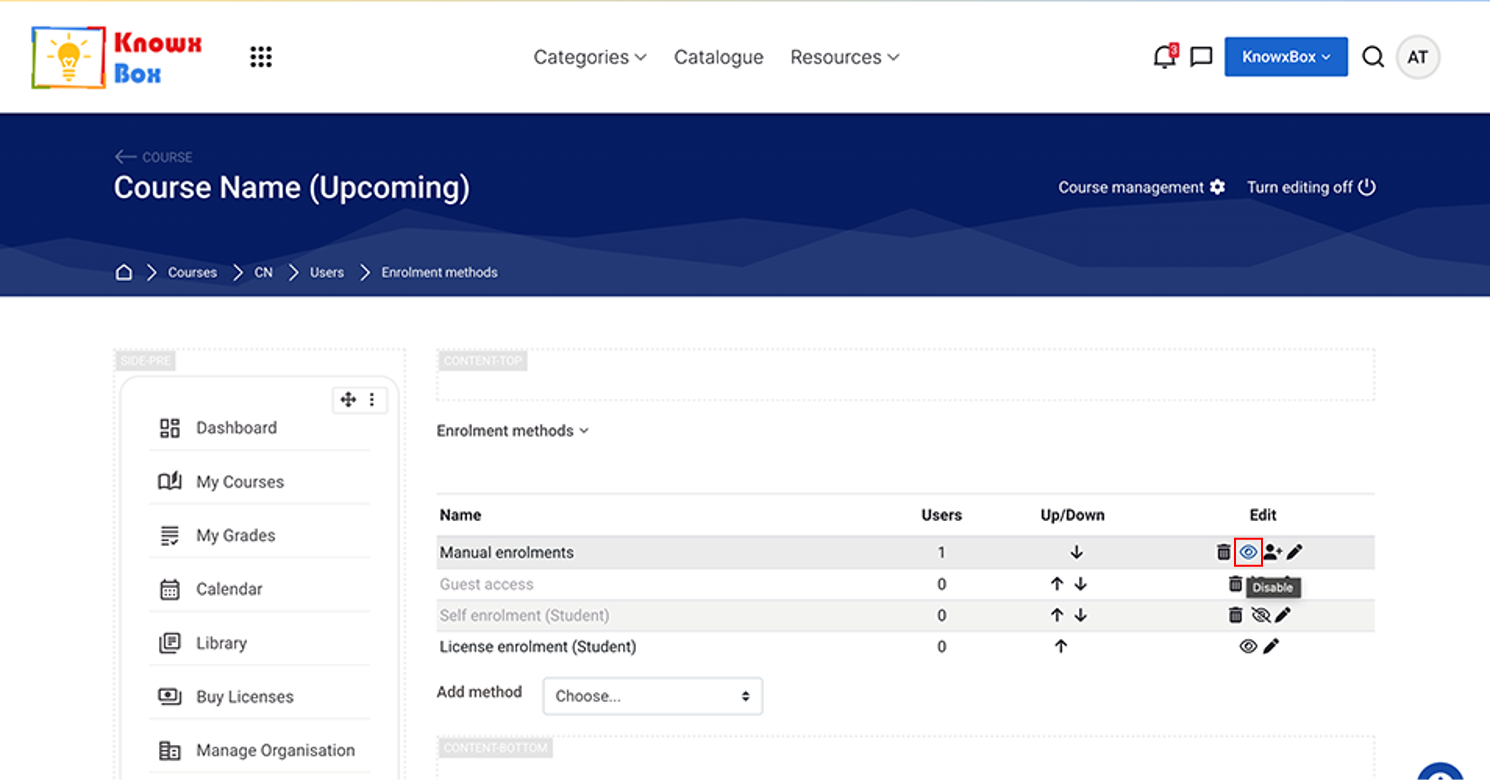
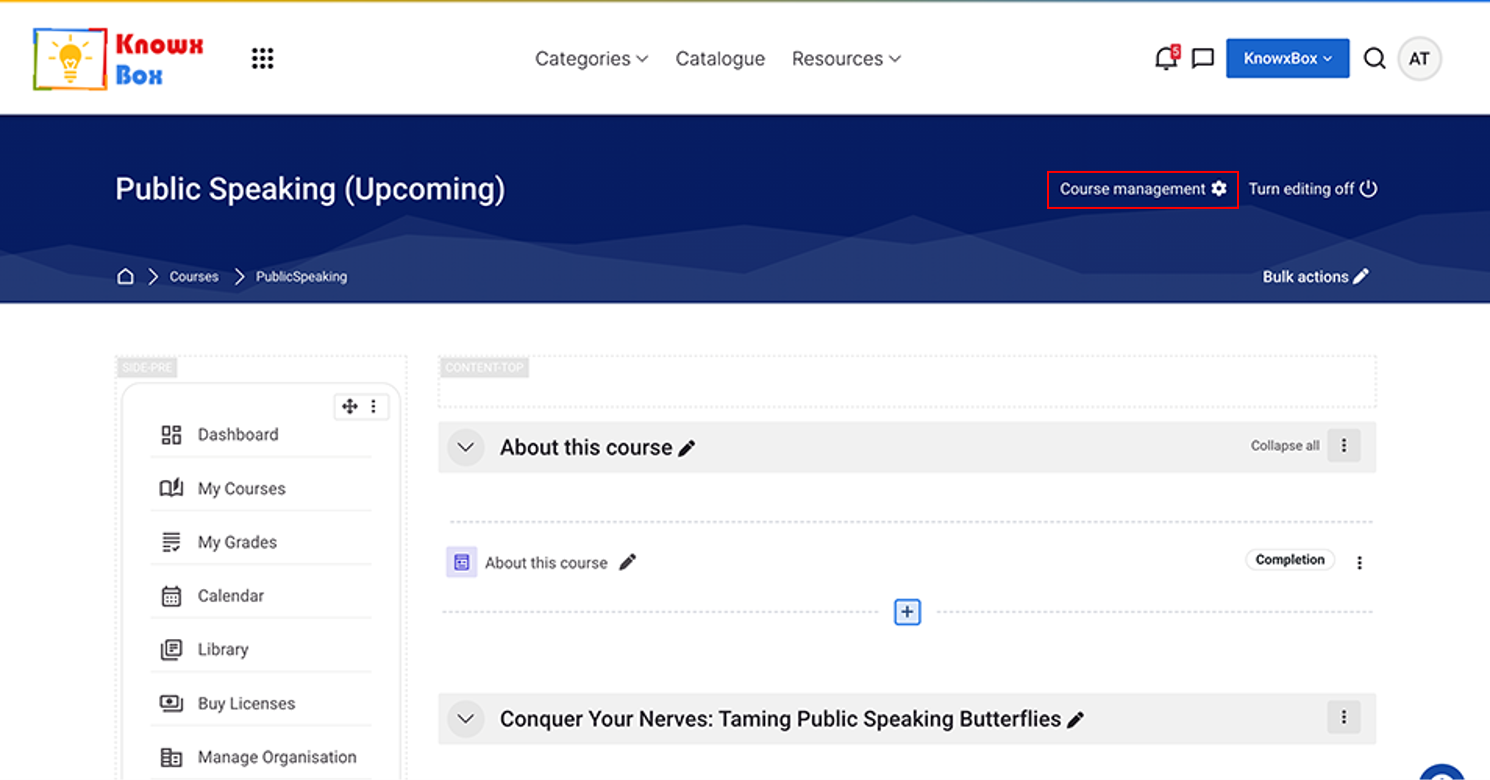
Click on Course Management
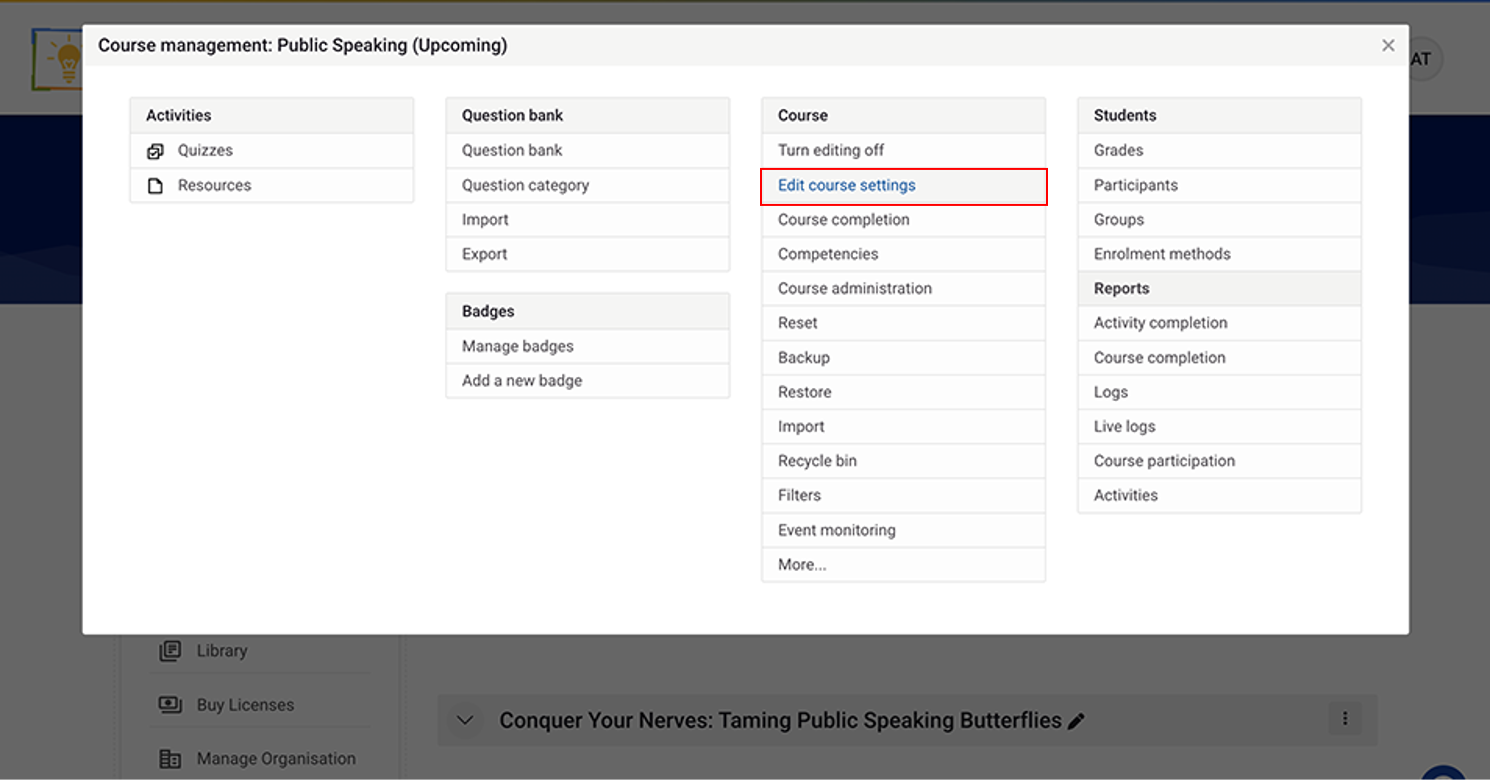
Now, click on Edit course setting.
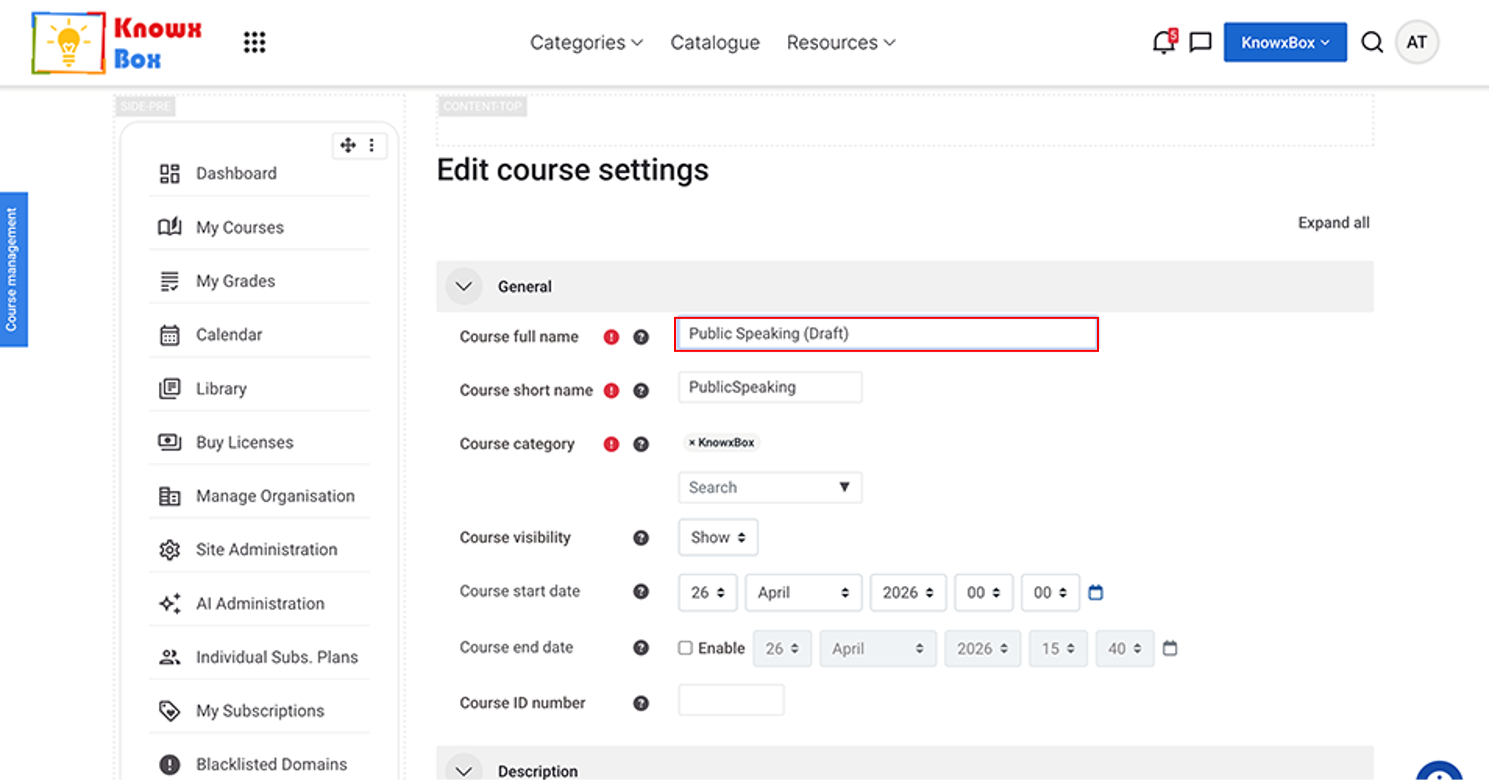
Change the status of the course to Draft.
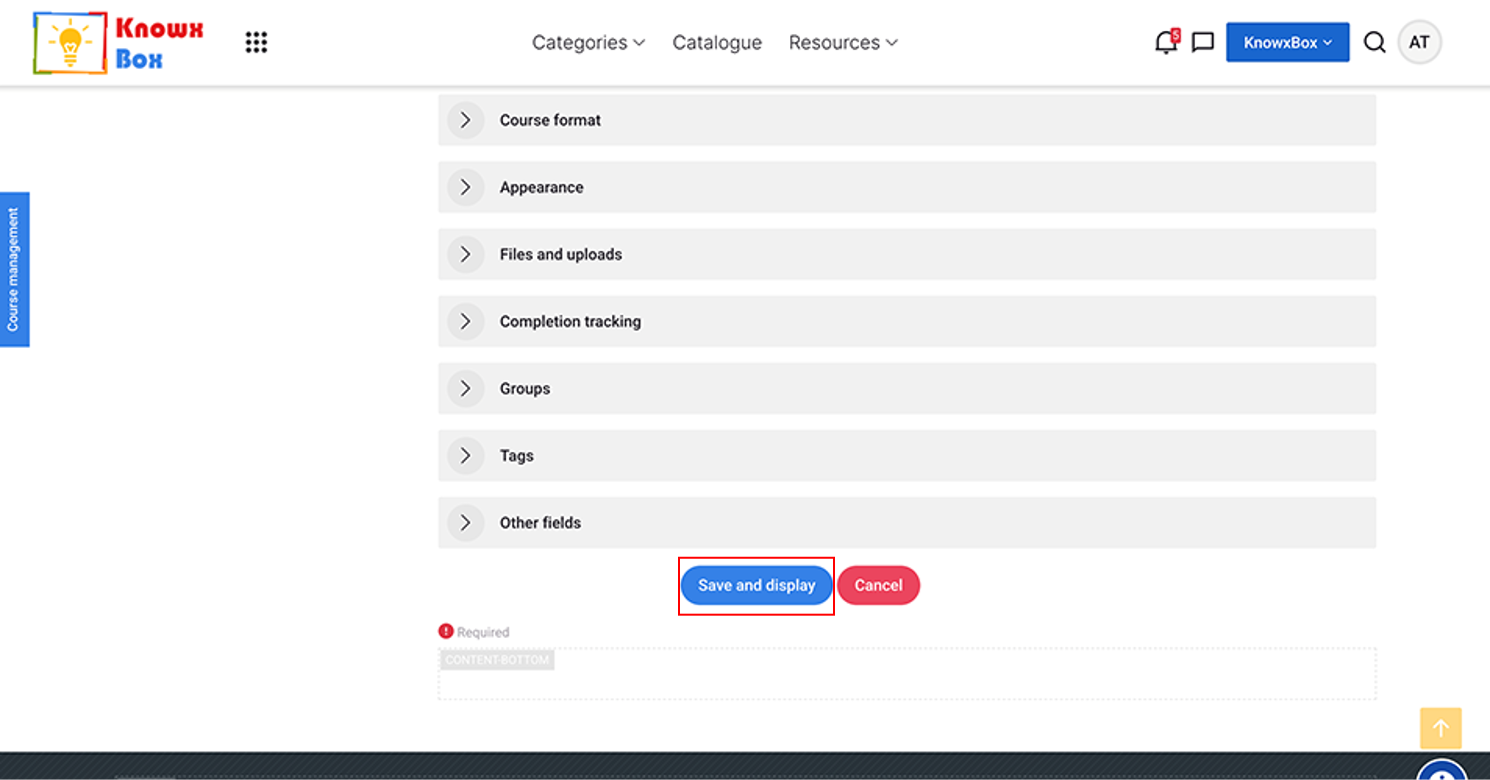
Click Save and display
6. Setting up Restriction Access to each Topic
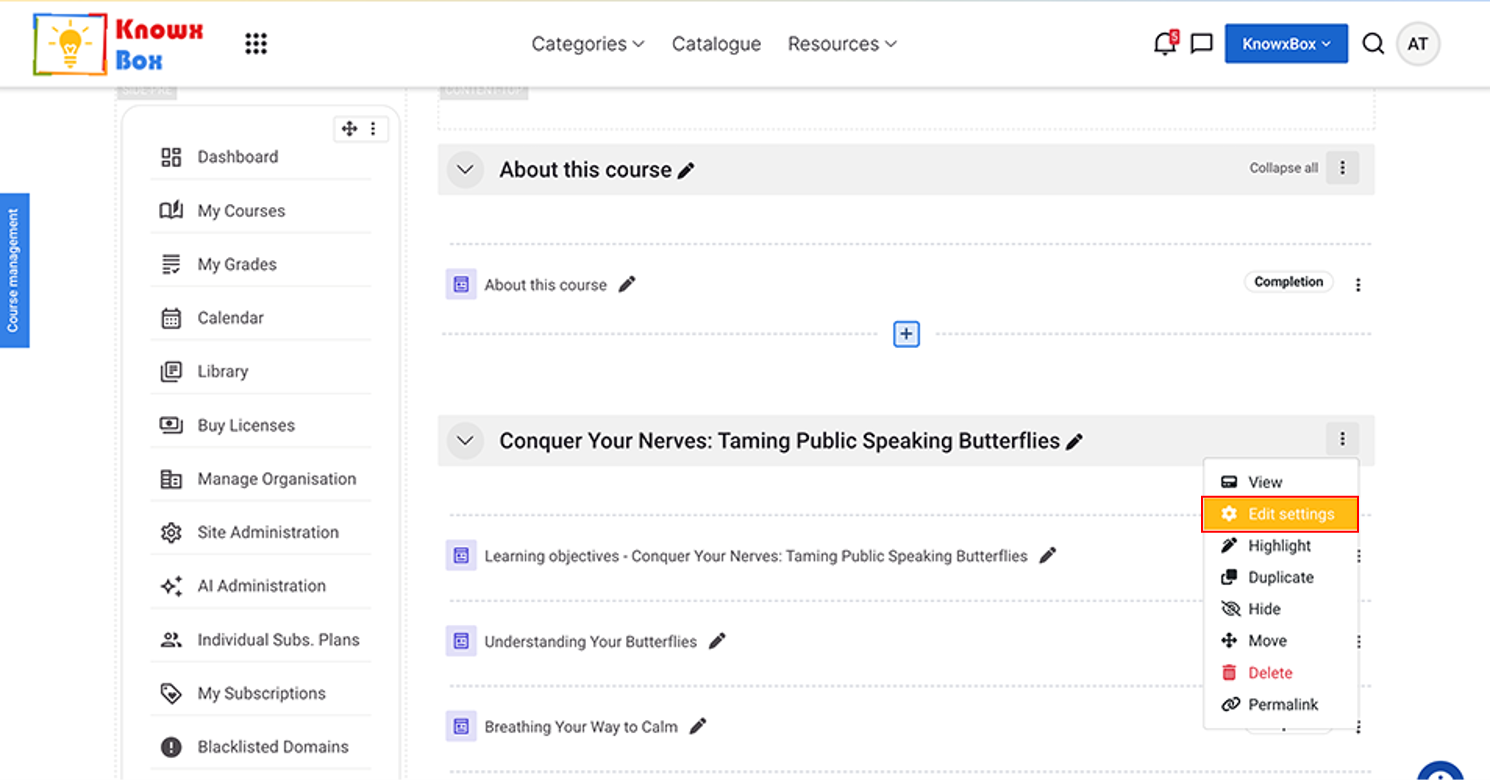
Go to the course, select the topic and click on Edit setting.
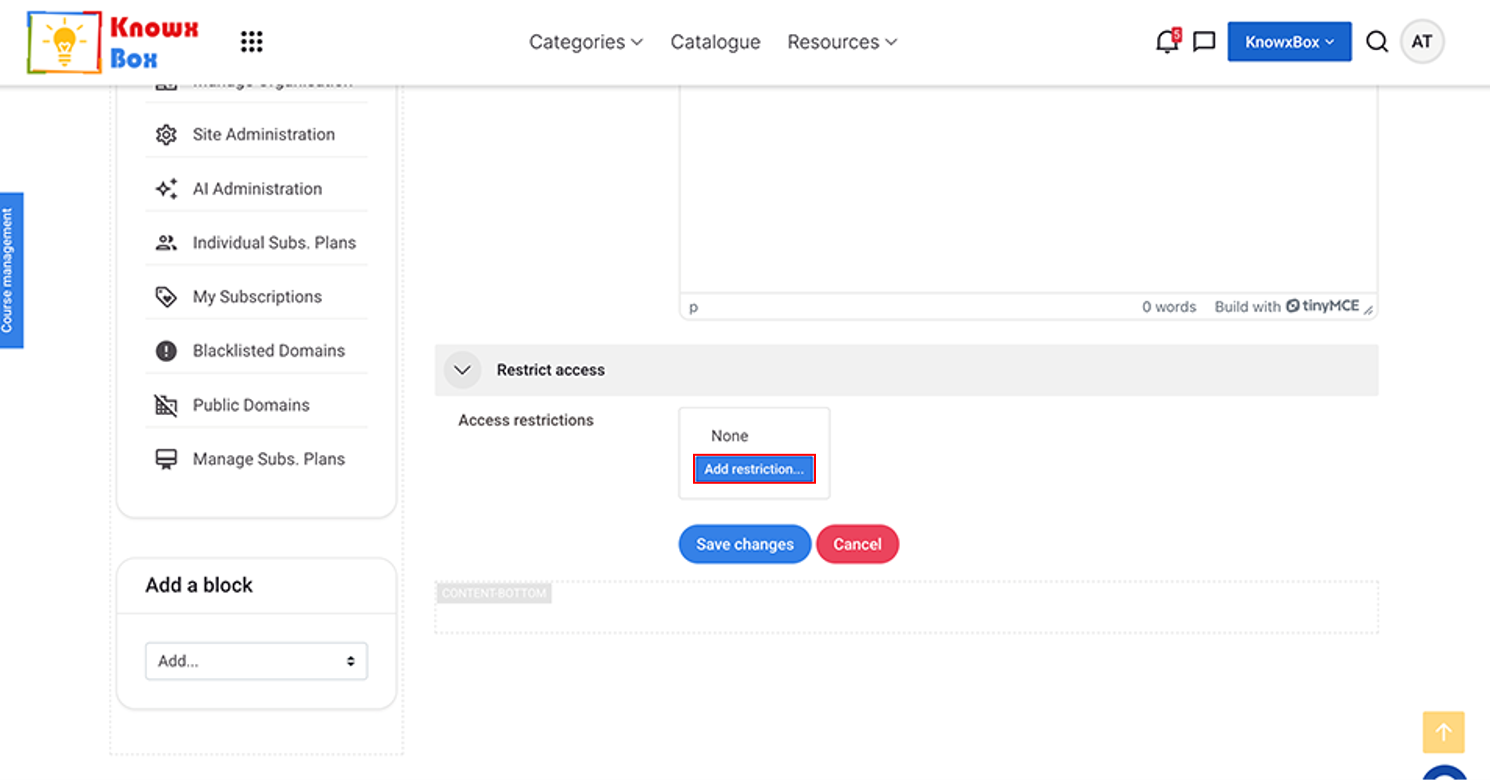
Select Restriction Access dropdown and Click Add Restriction.
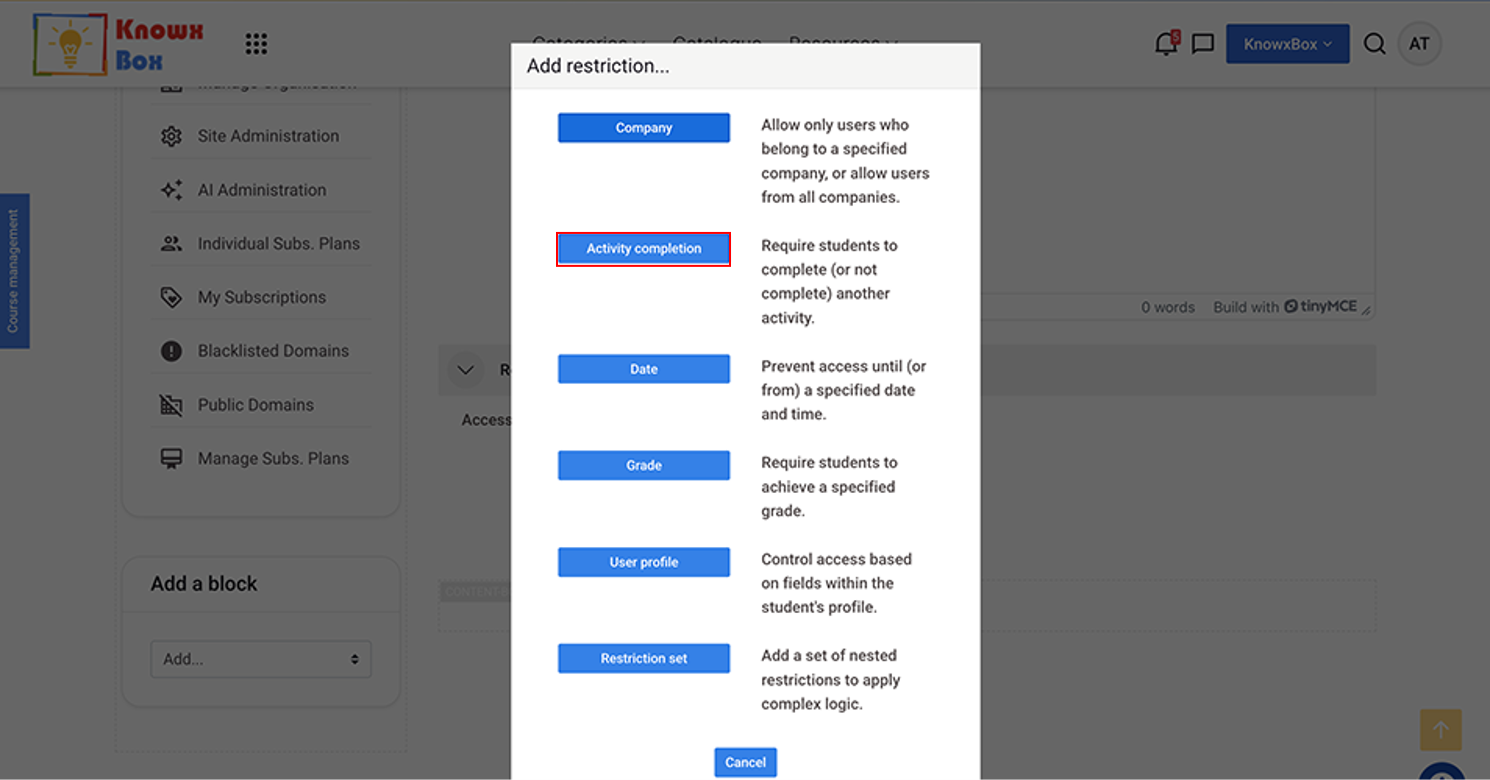
Click Activity Completion.
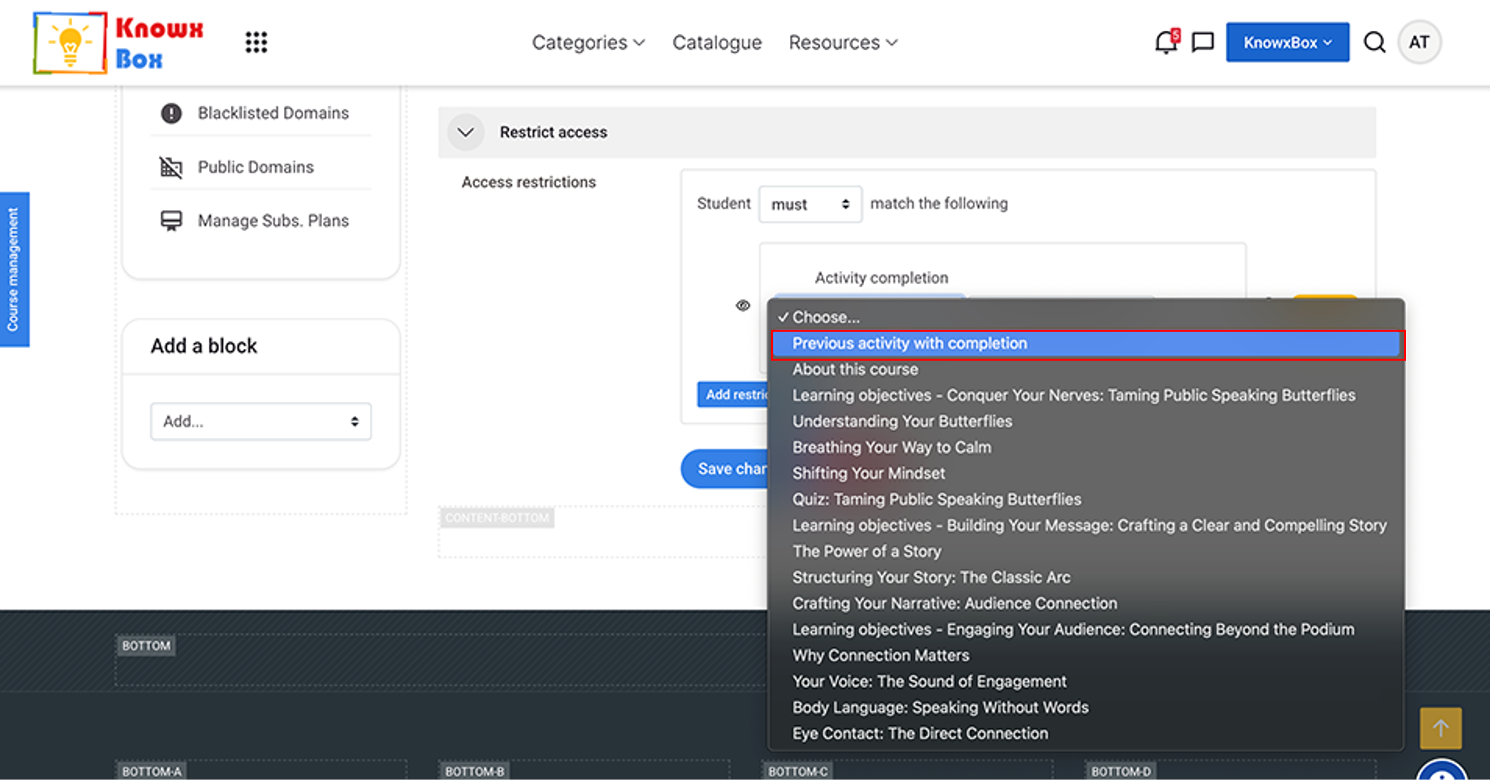
Click on choose dropdown and Select Previous Activity with Completion.
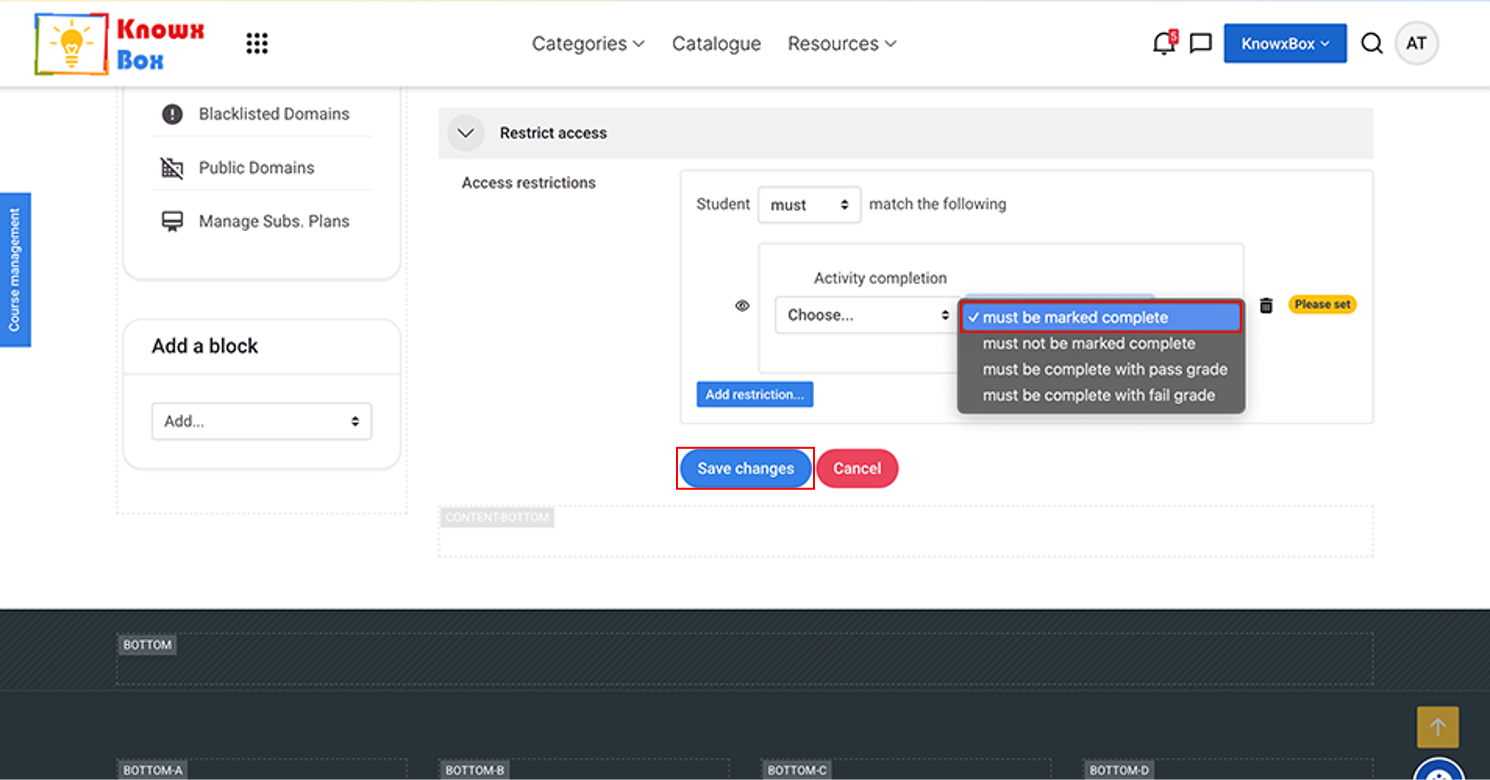
Previous activity with completion must be marked complete.
Click Save changes and return to the course.
7. Setting up Restriction Access to each Activity
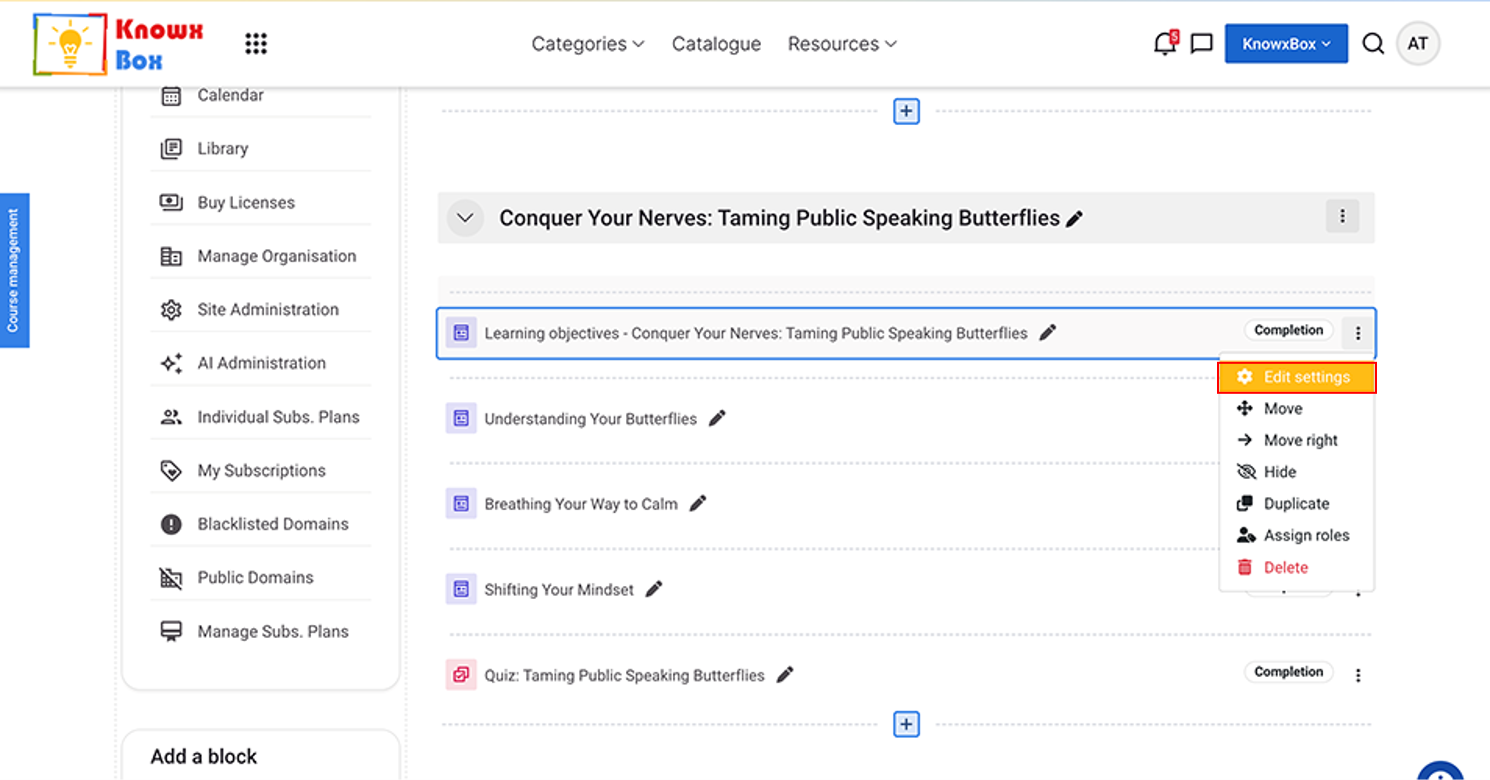
Go to the course, select the activity and click on Edit setting.
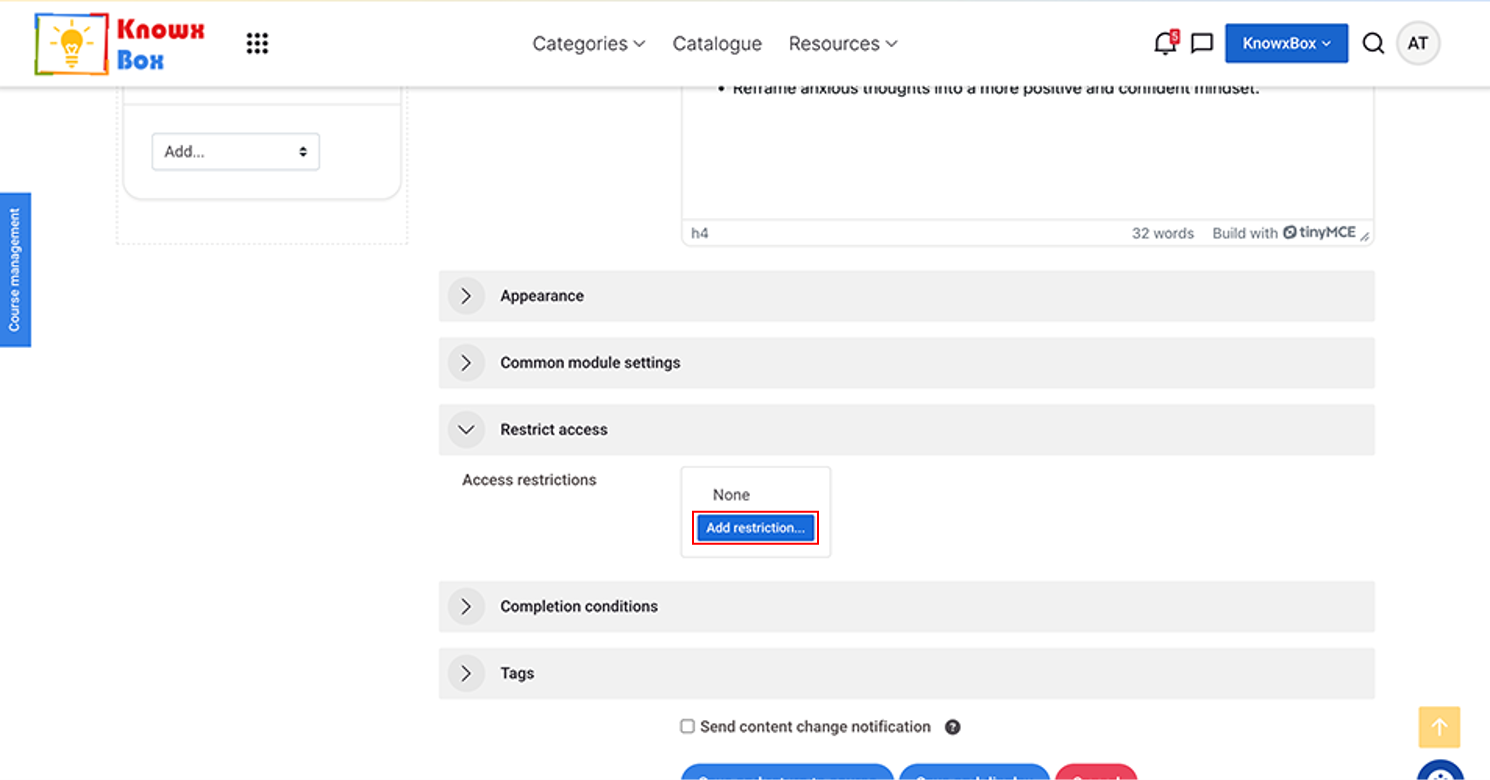
Select Restriction Access dropdown and Click Add Restriction.
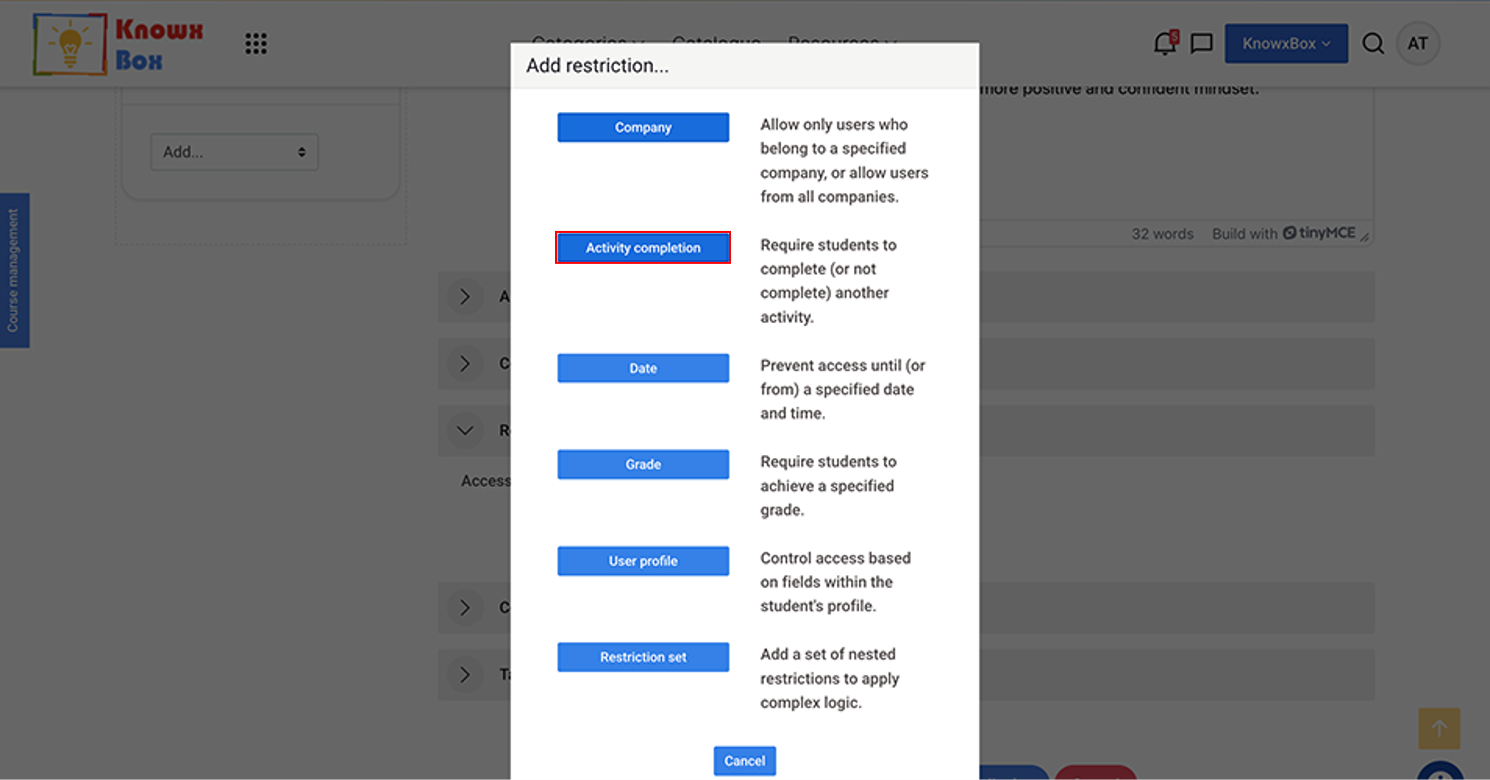
Click Activity Completion.
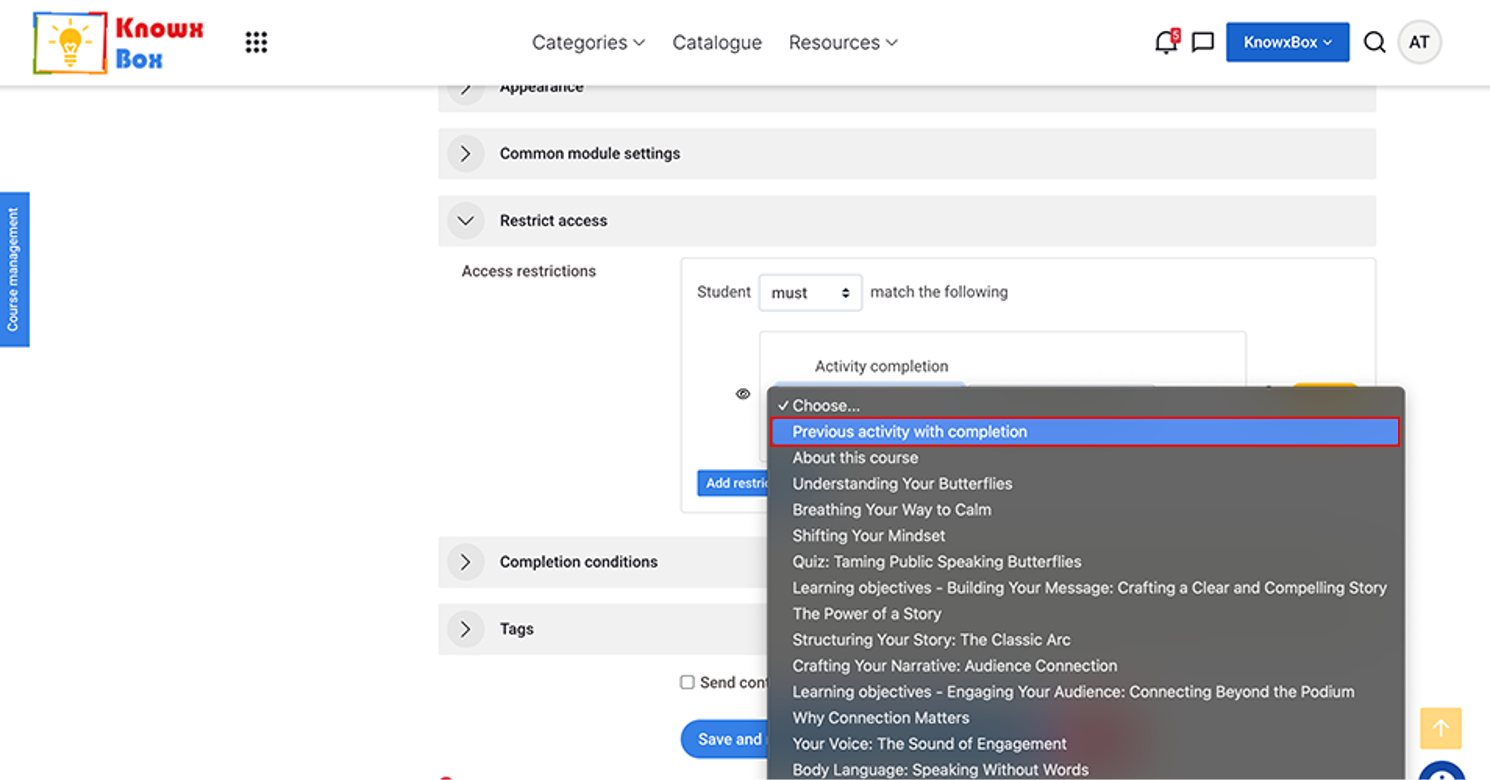
Click on choose dropdown and Select Previous Activity with Completion.
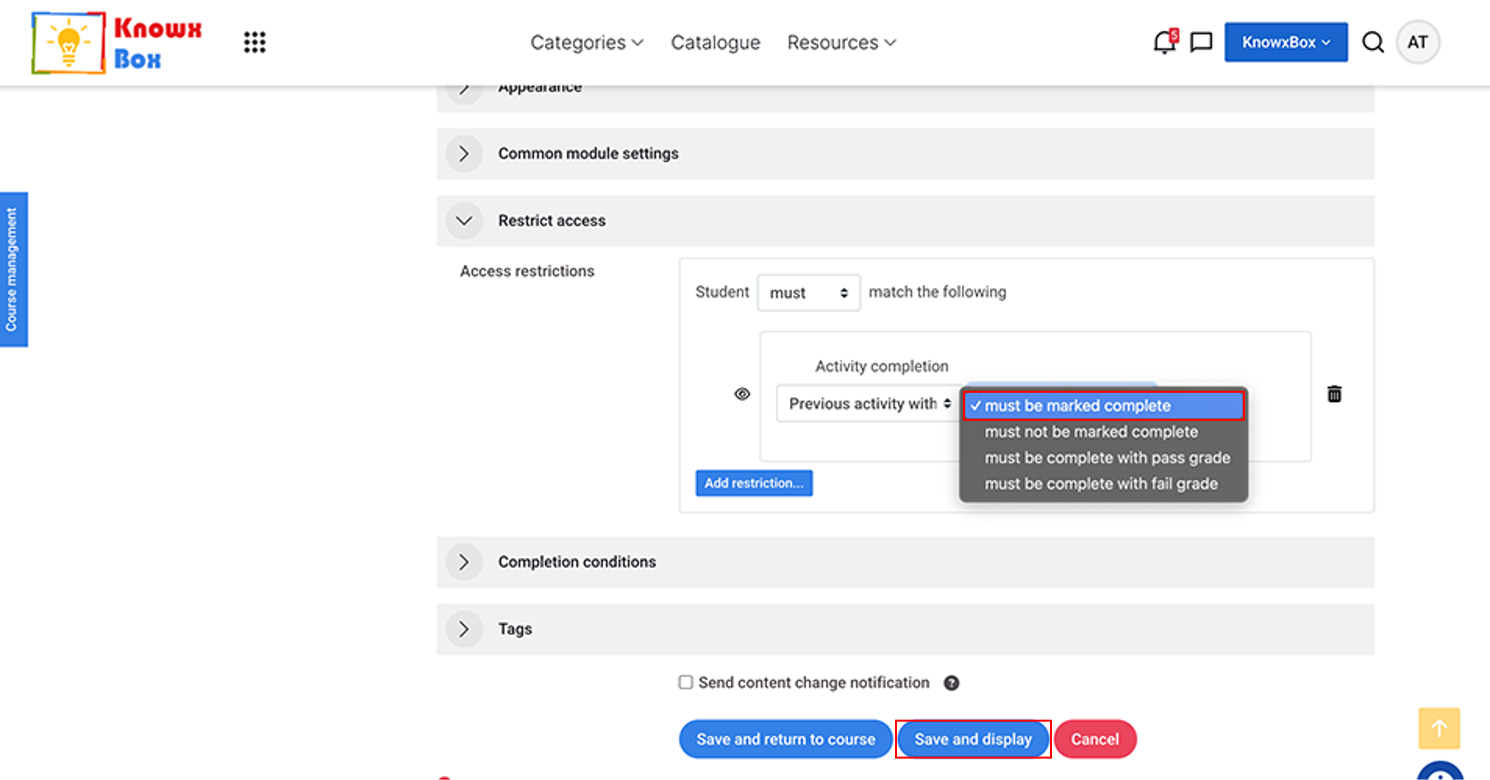
Previous activity with completion must be marked complete.
Click Save changes and return to the course.
8. Add a Certificate in the Course
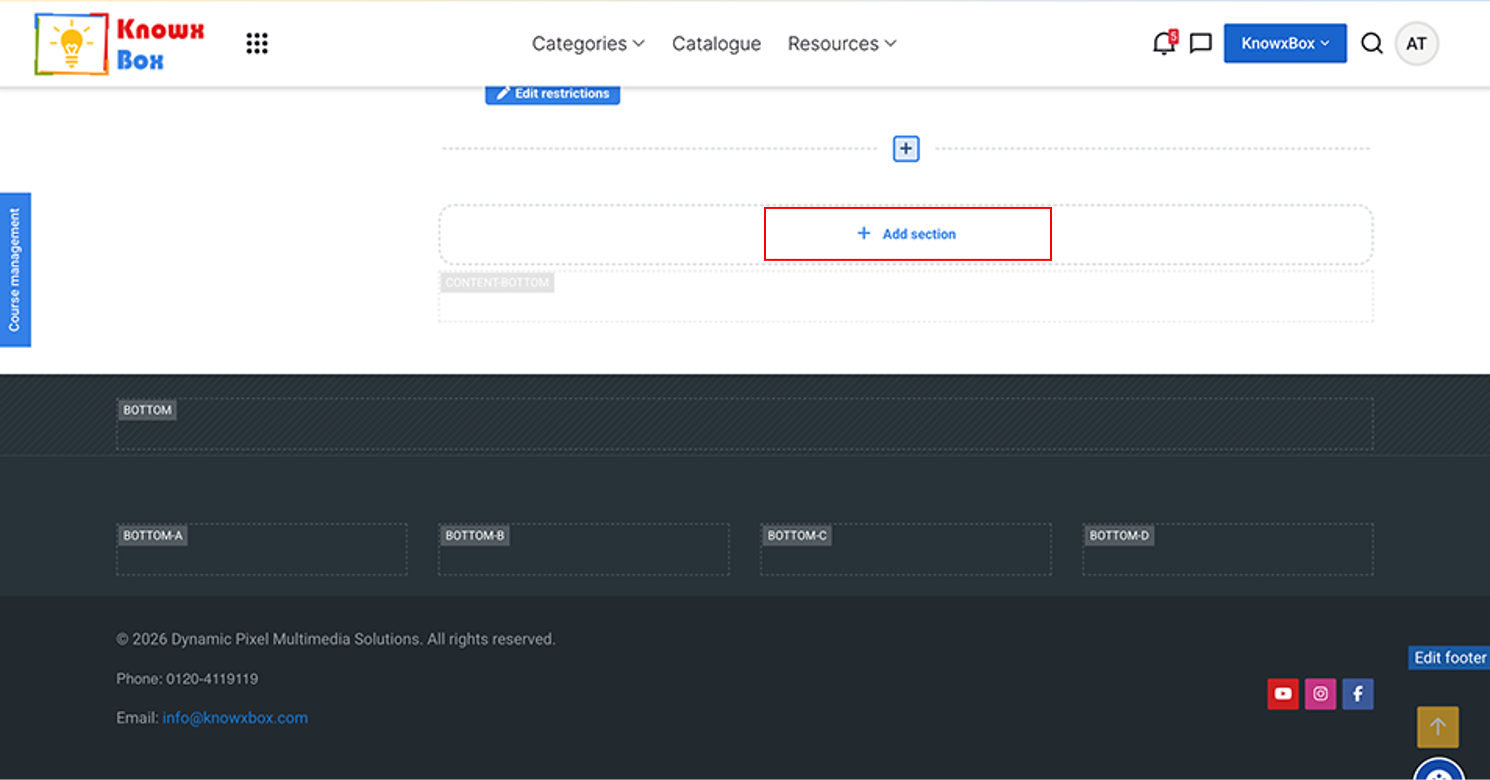
Now, click on Add section to add a new section.
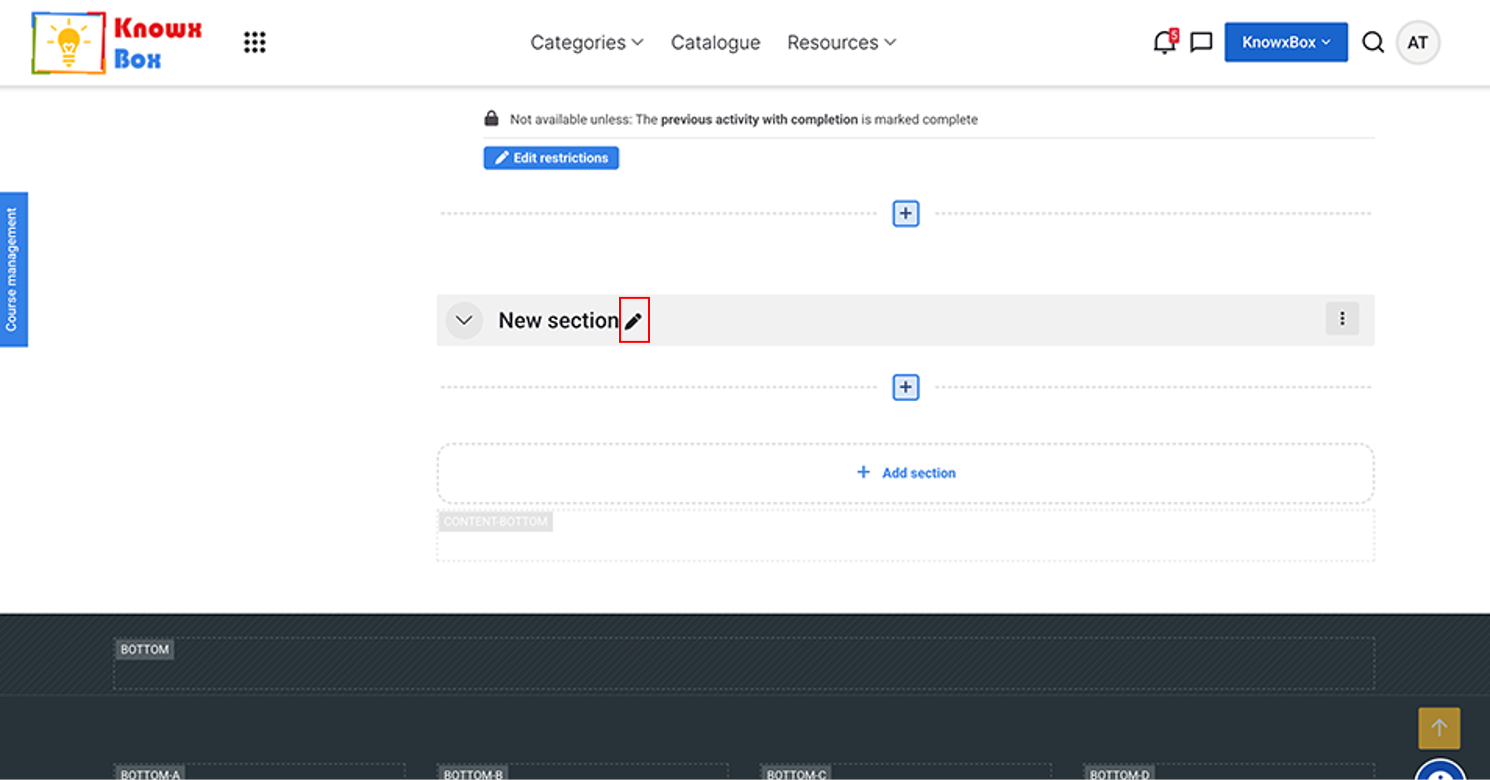
Clink on edit icon to name it.
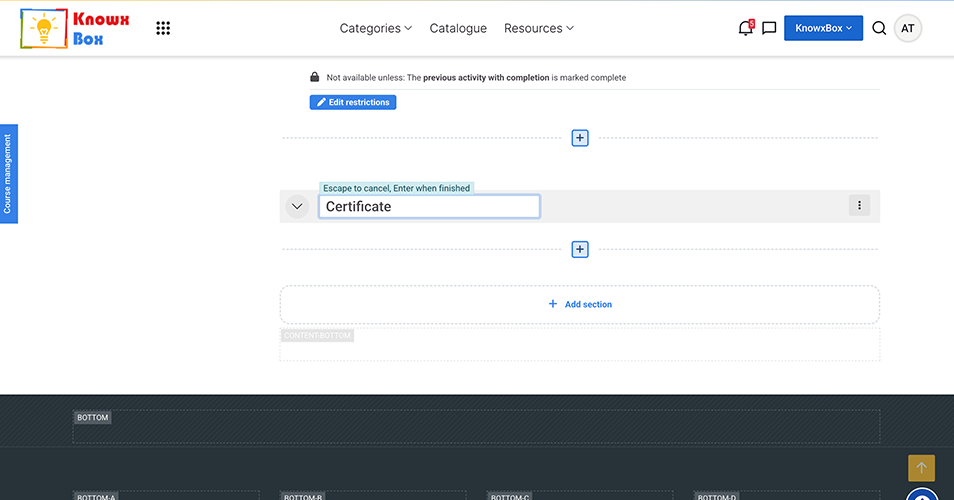
Type Certificate in the field.
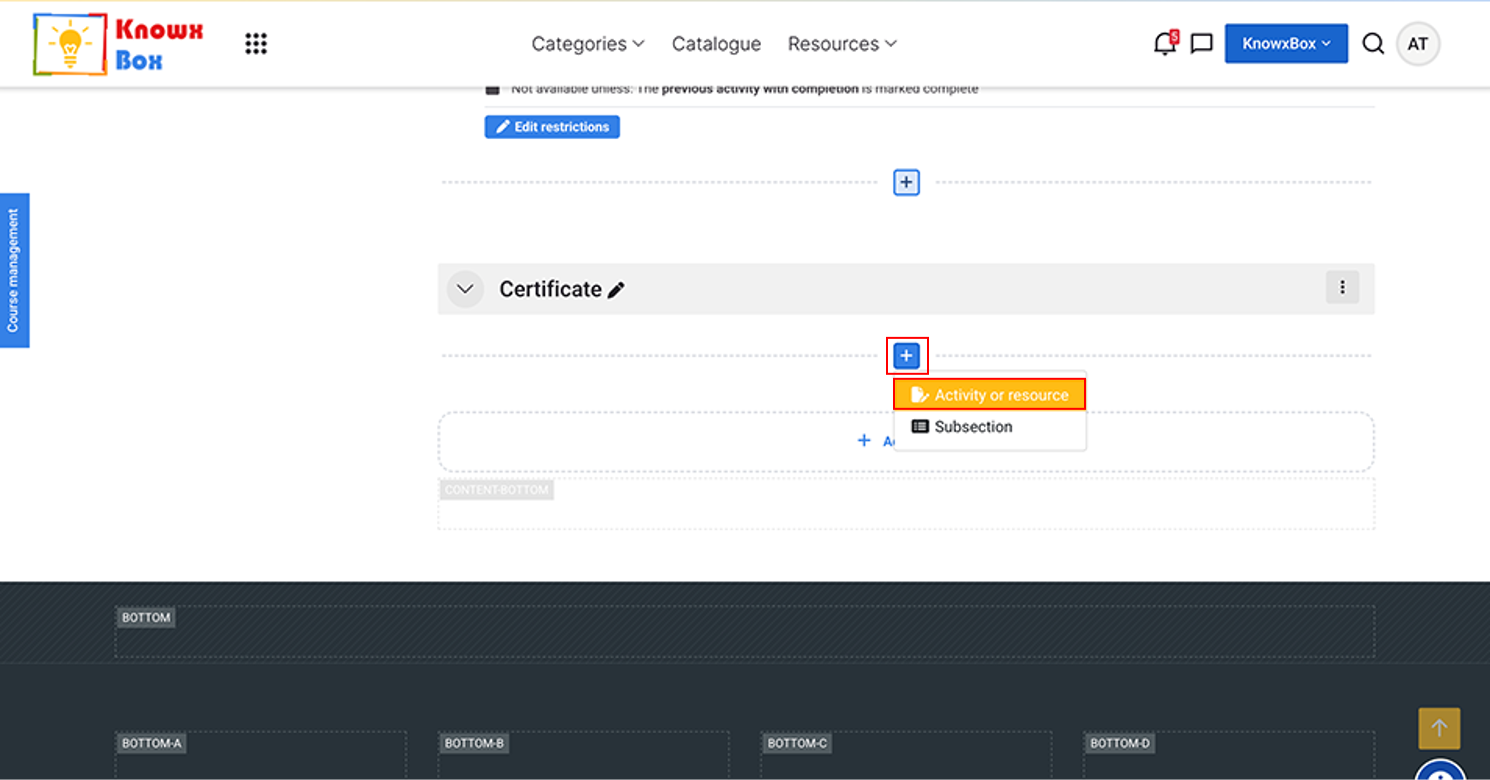
To add the certificate, click on plus sign and select Activity or resource from dropdown.
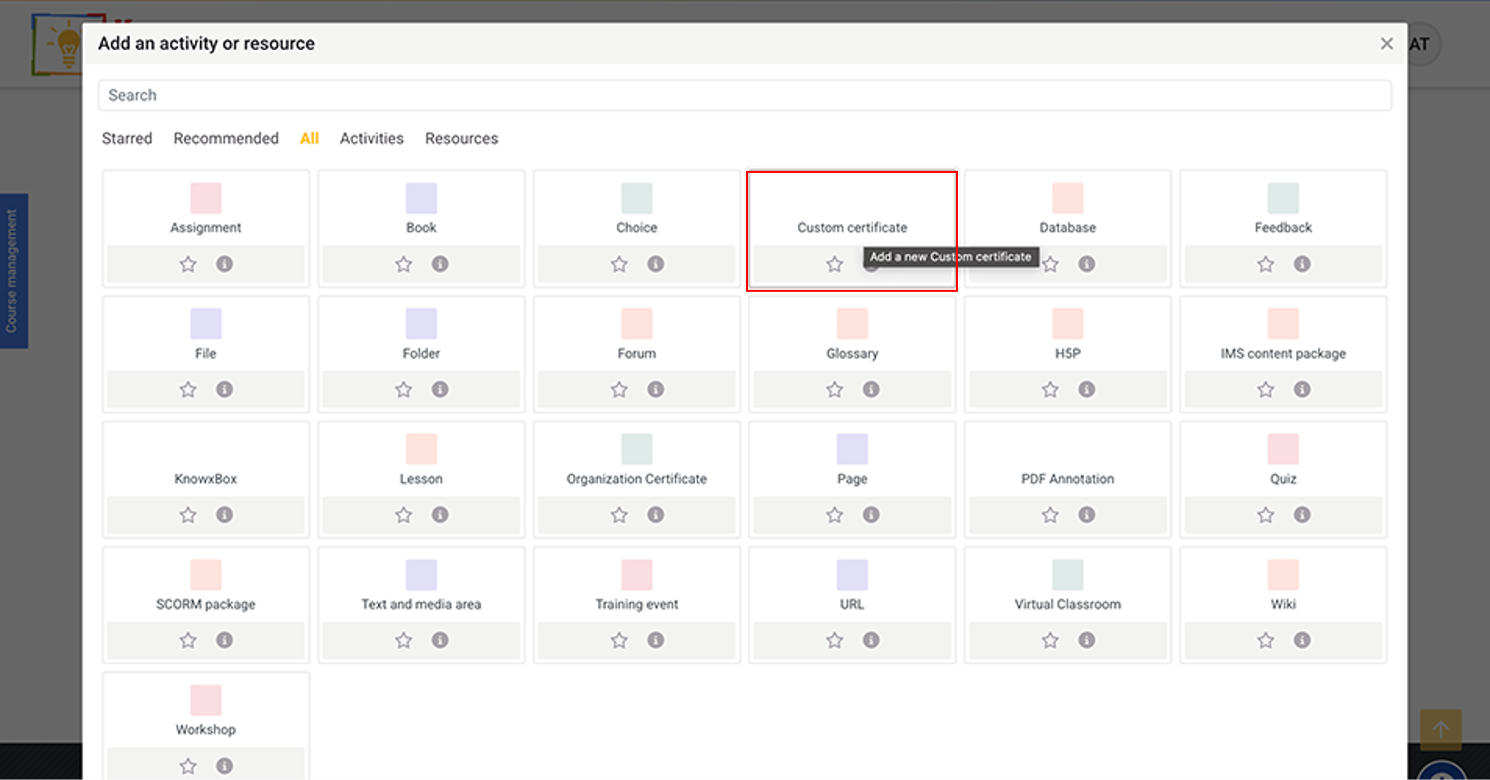
Click on Custom certificate.
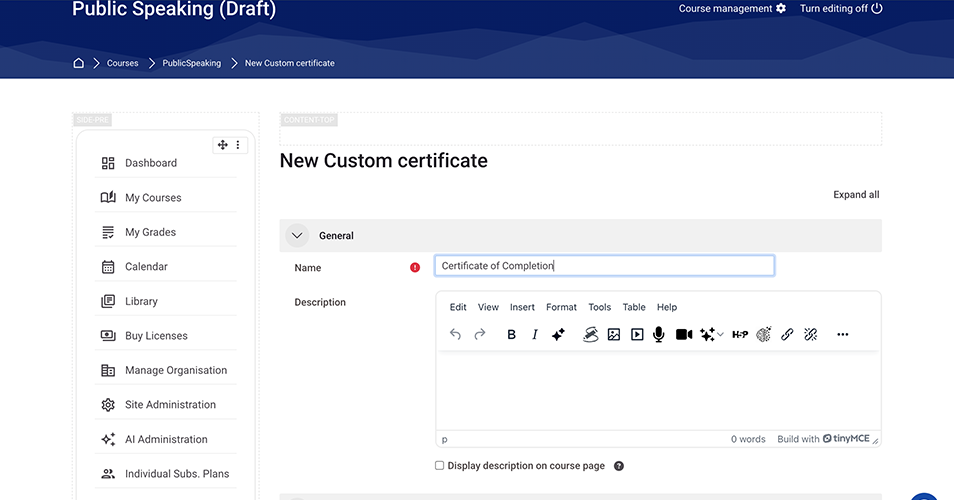
Now, fill the general details.
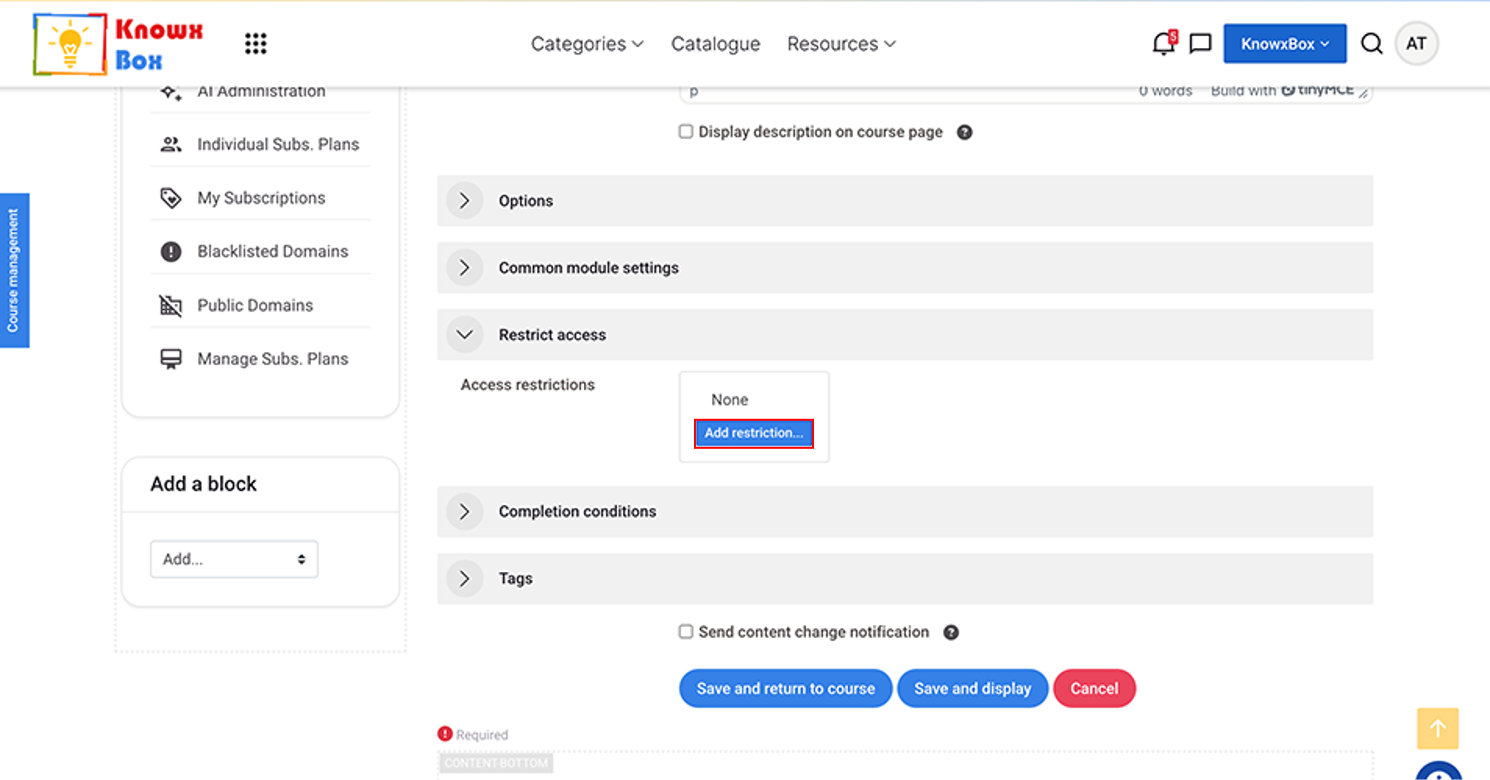
Select Restriction Access dropdown and Click Add Restriction.
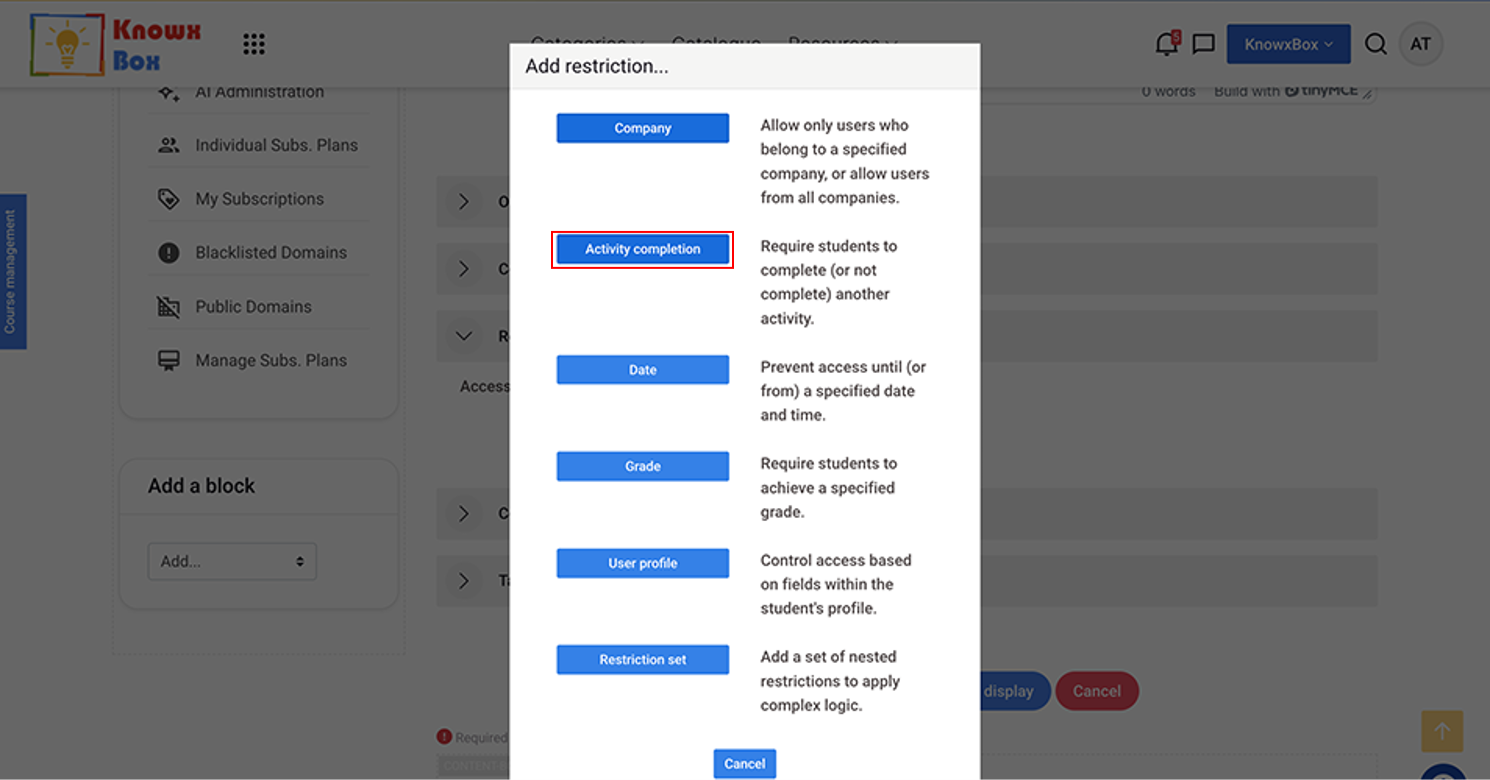
Click Activity Completion.
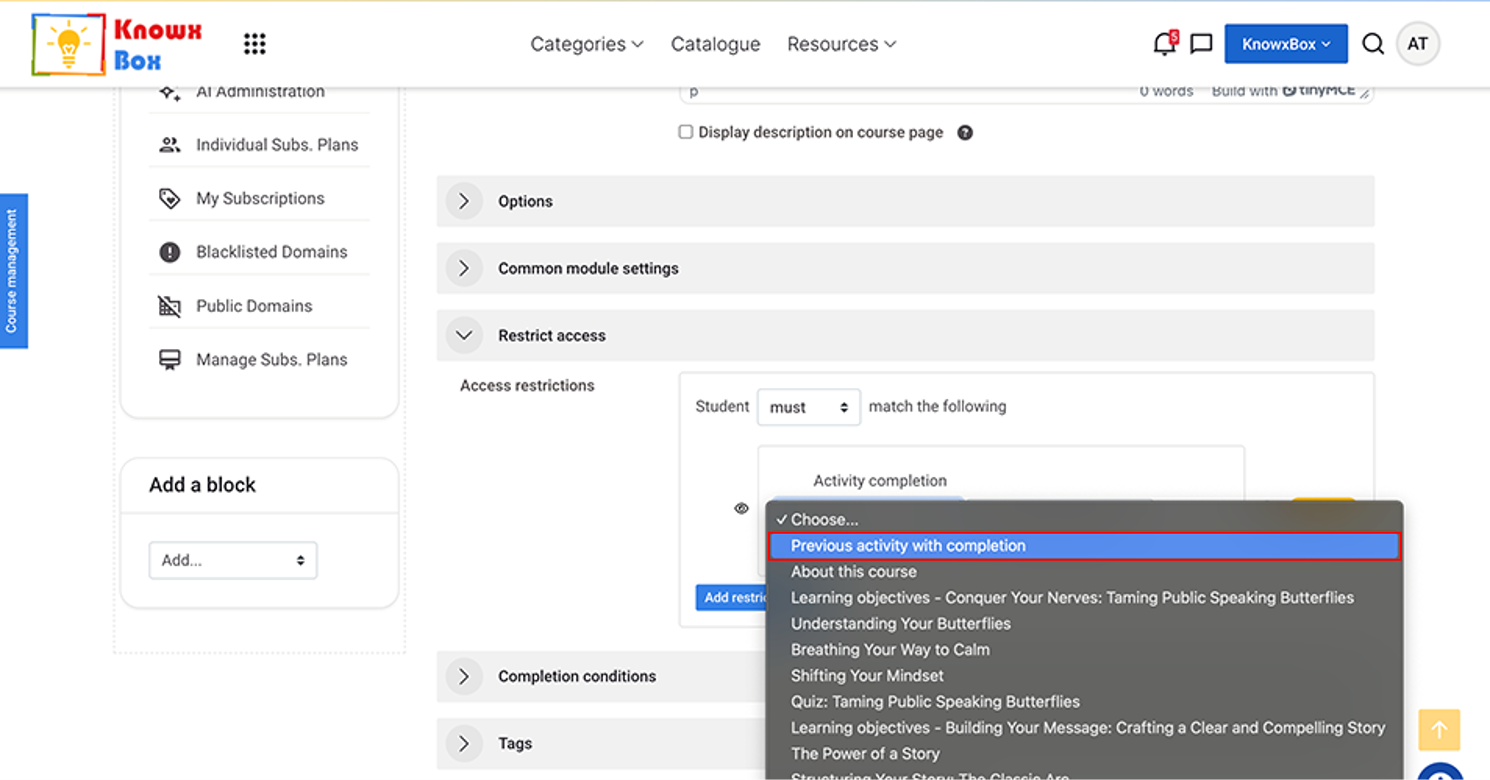
Click on choose dropdown and Select Previous Activity with Completion.
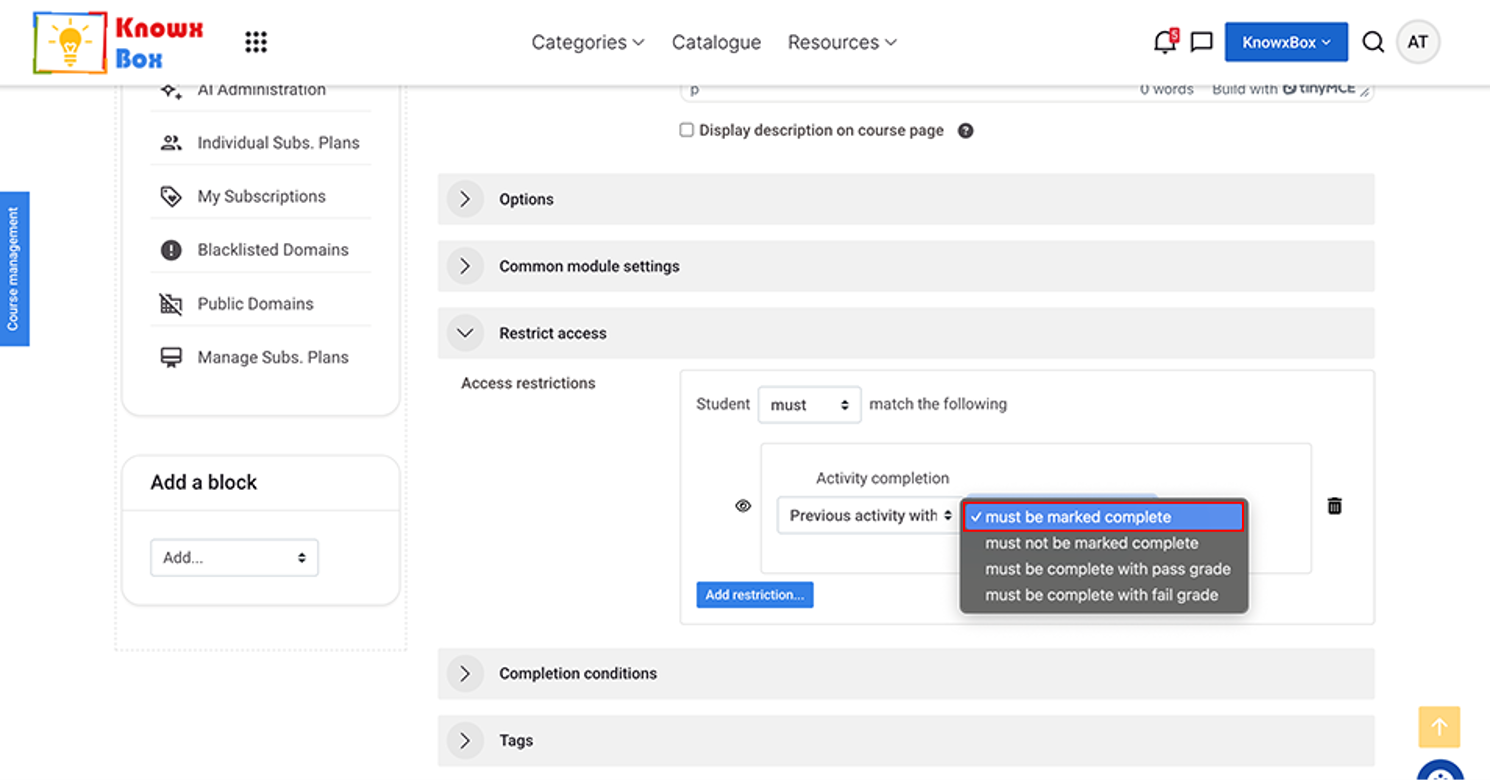
Previous activity with completion must be marked complete.
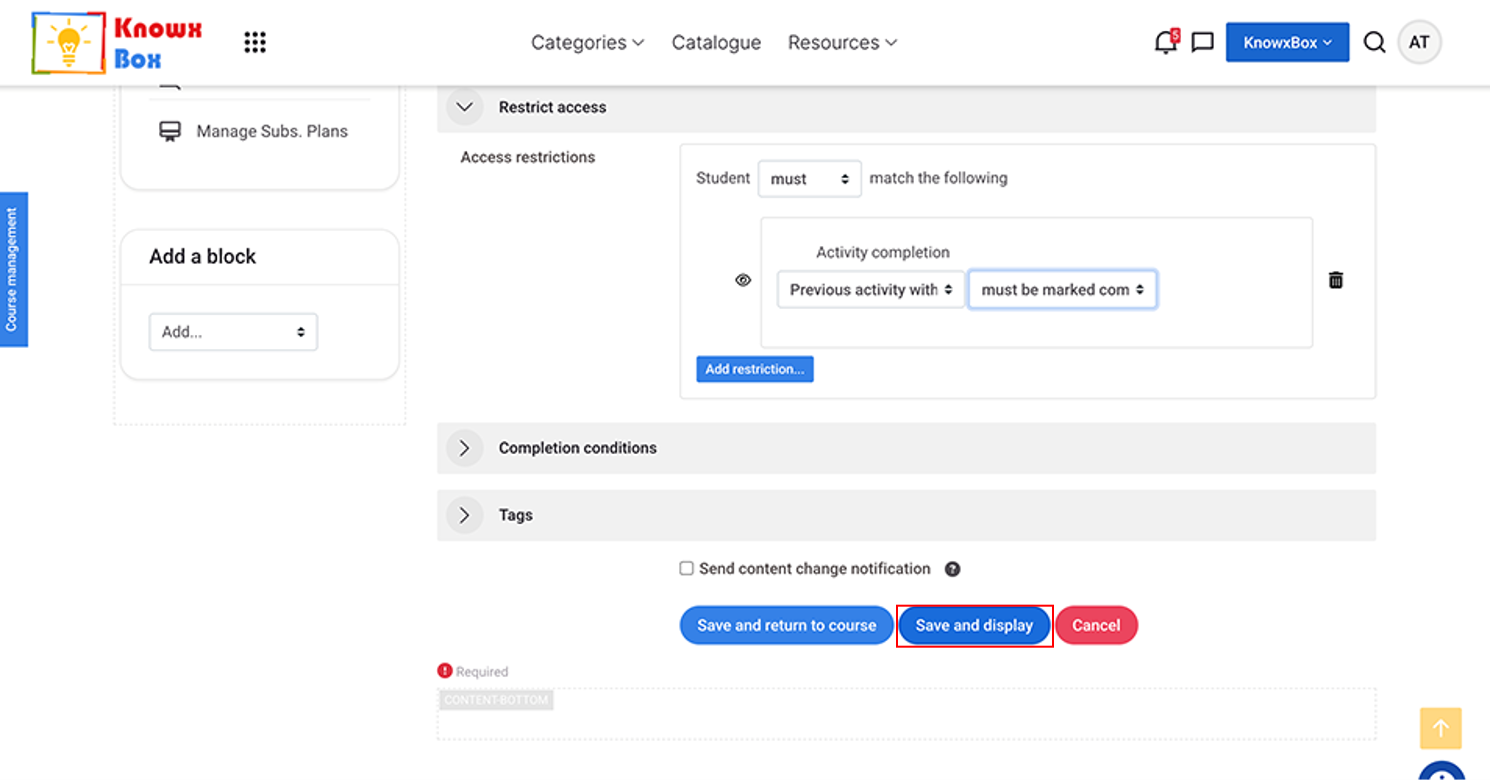
Now, Click Save and display.
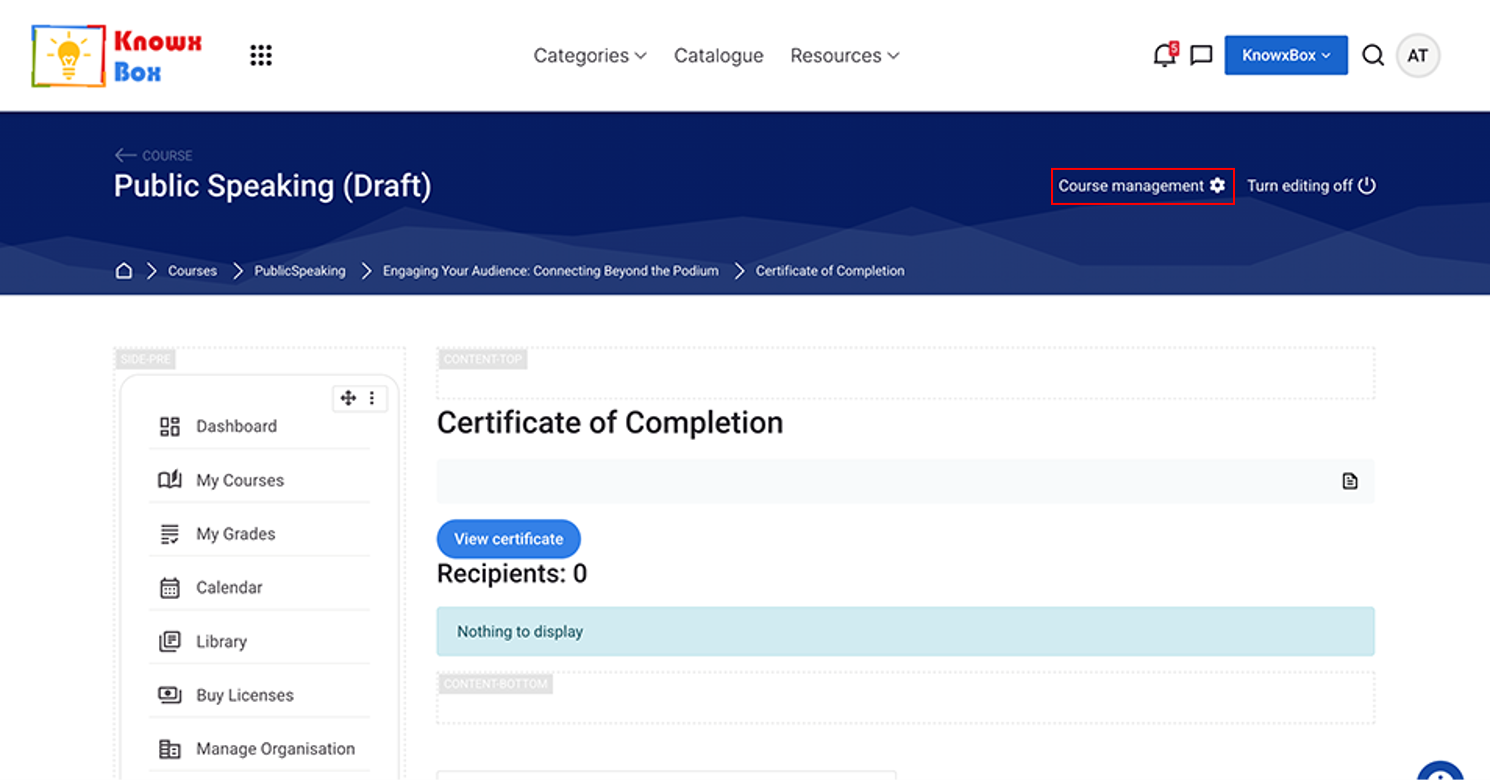
Click on Course management.
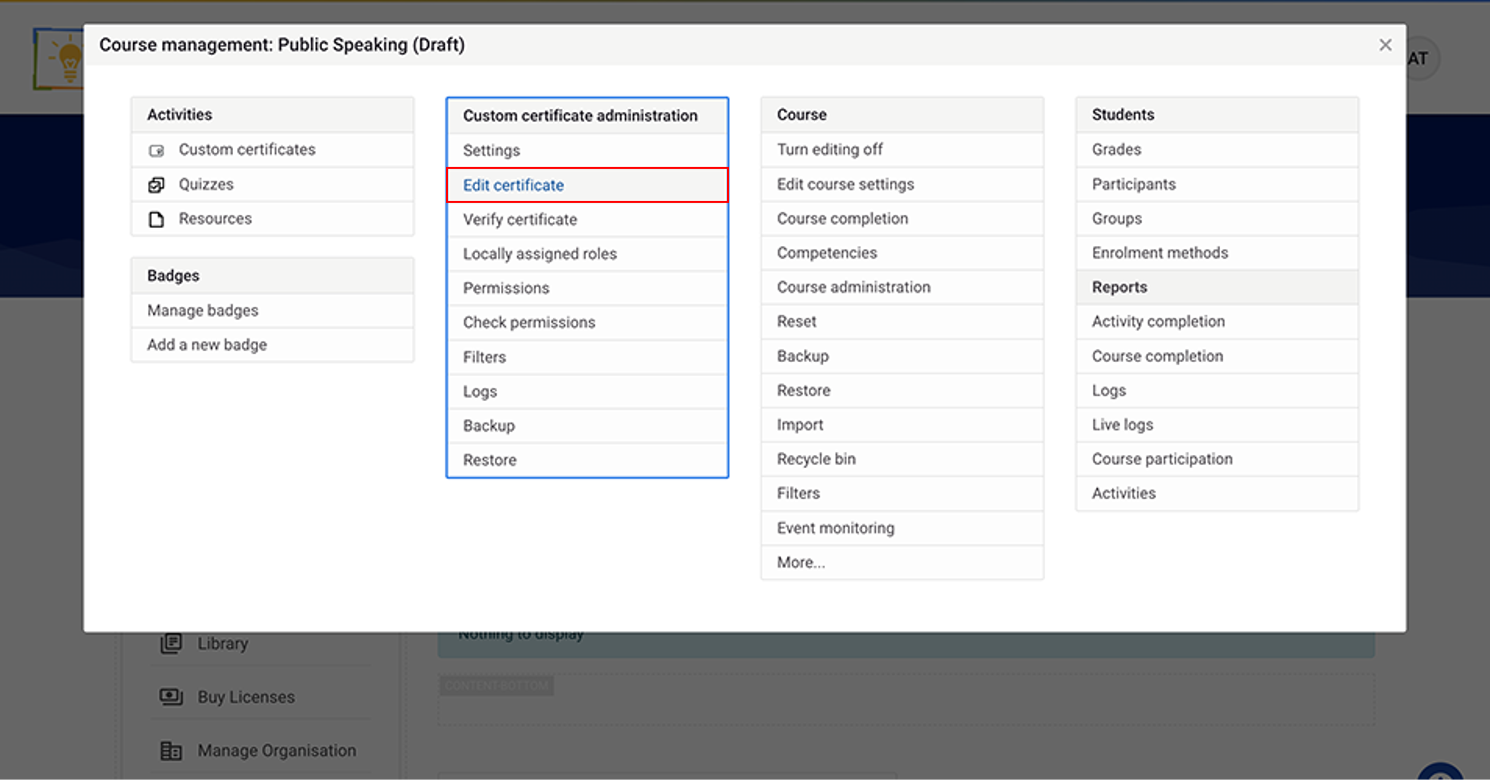
Select Edit certificate.
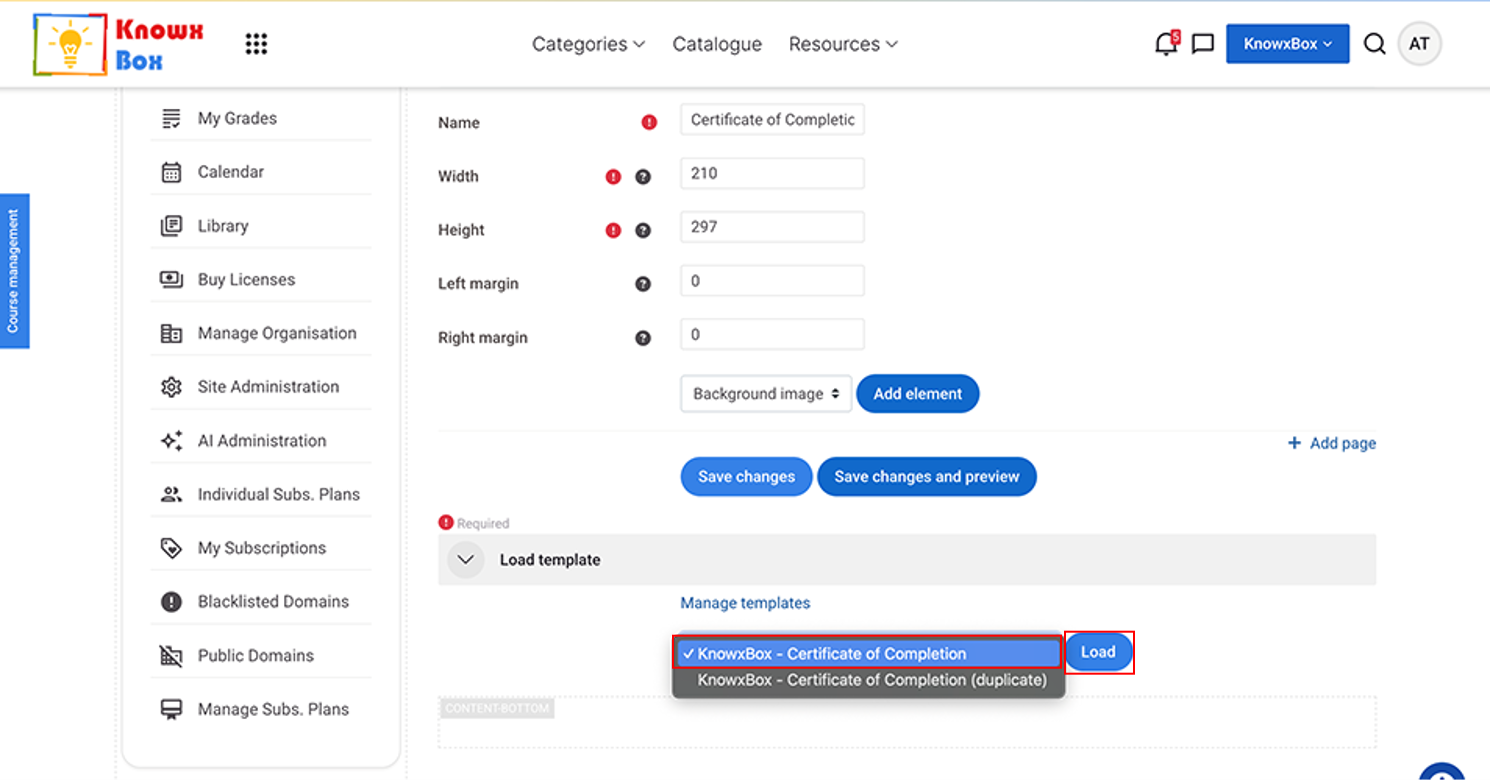
Load the template now.
Select Knowxbox- Certificate of Completion from the dropdpwn then click Load.
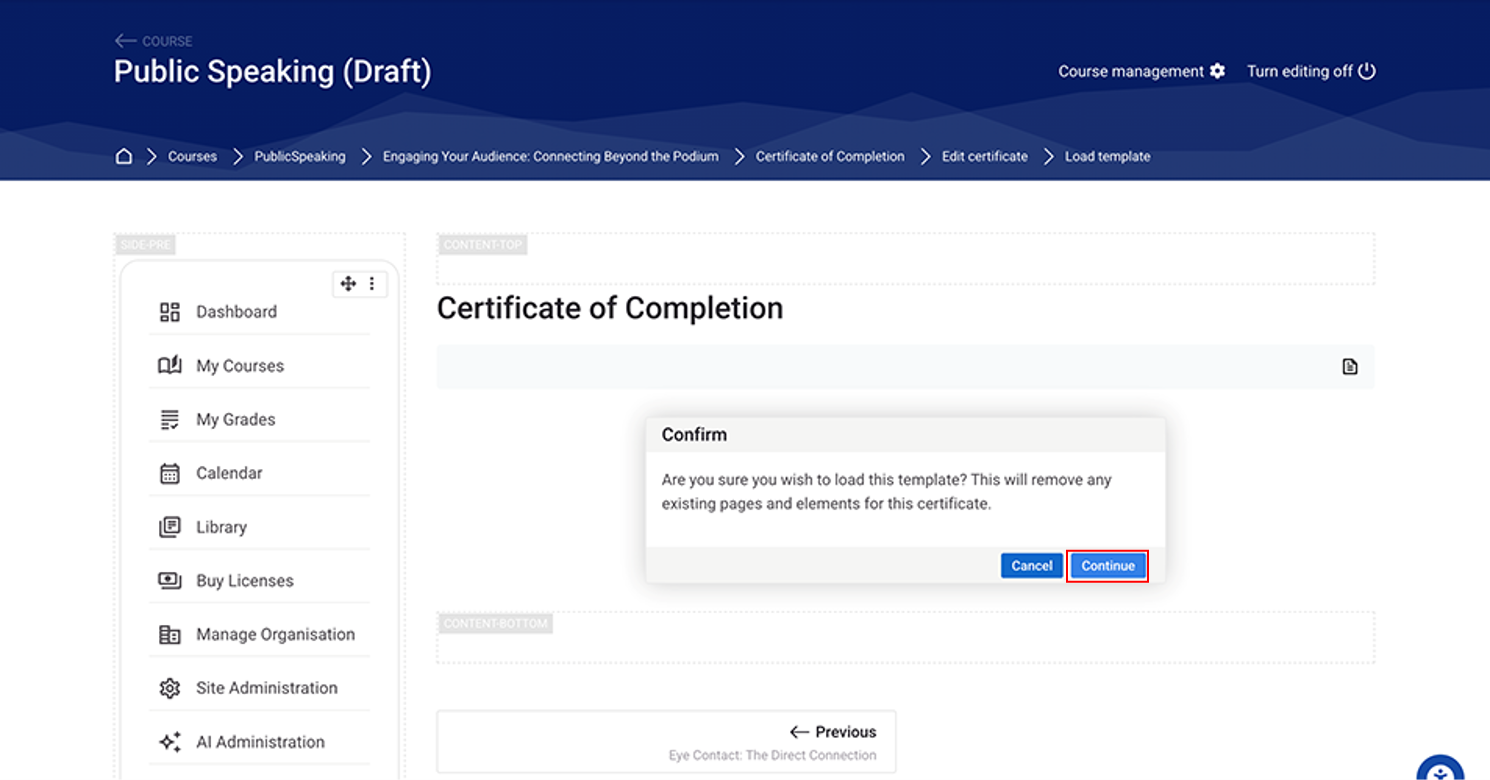
Click Continue to proceed.
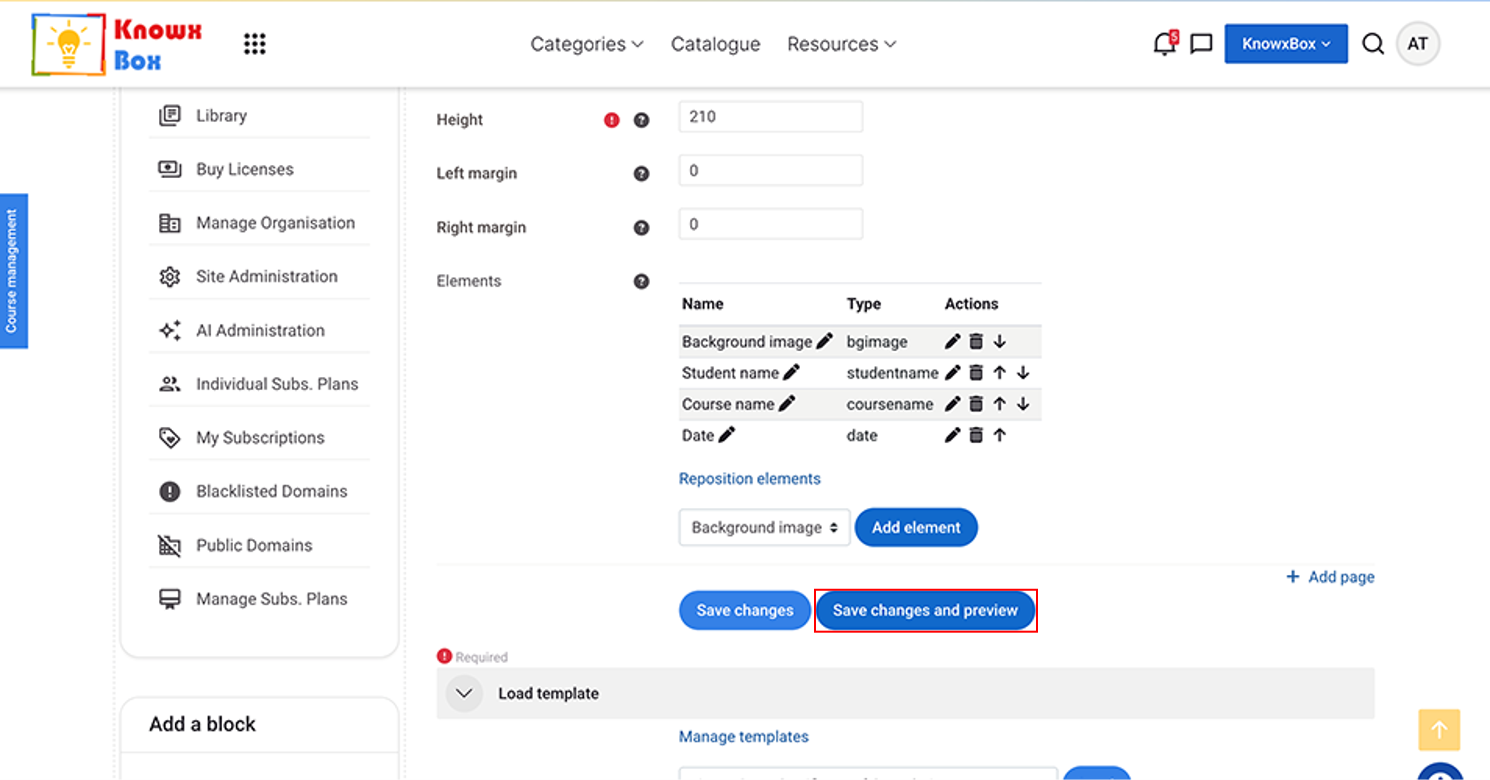
Then, Click on Save changes and preview.
9. Course Settings for Frontend before Go-Live
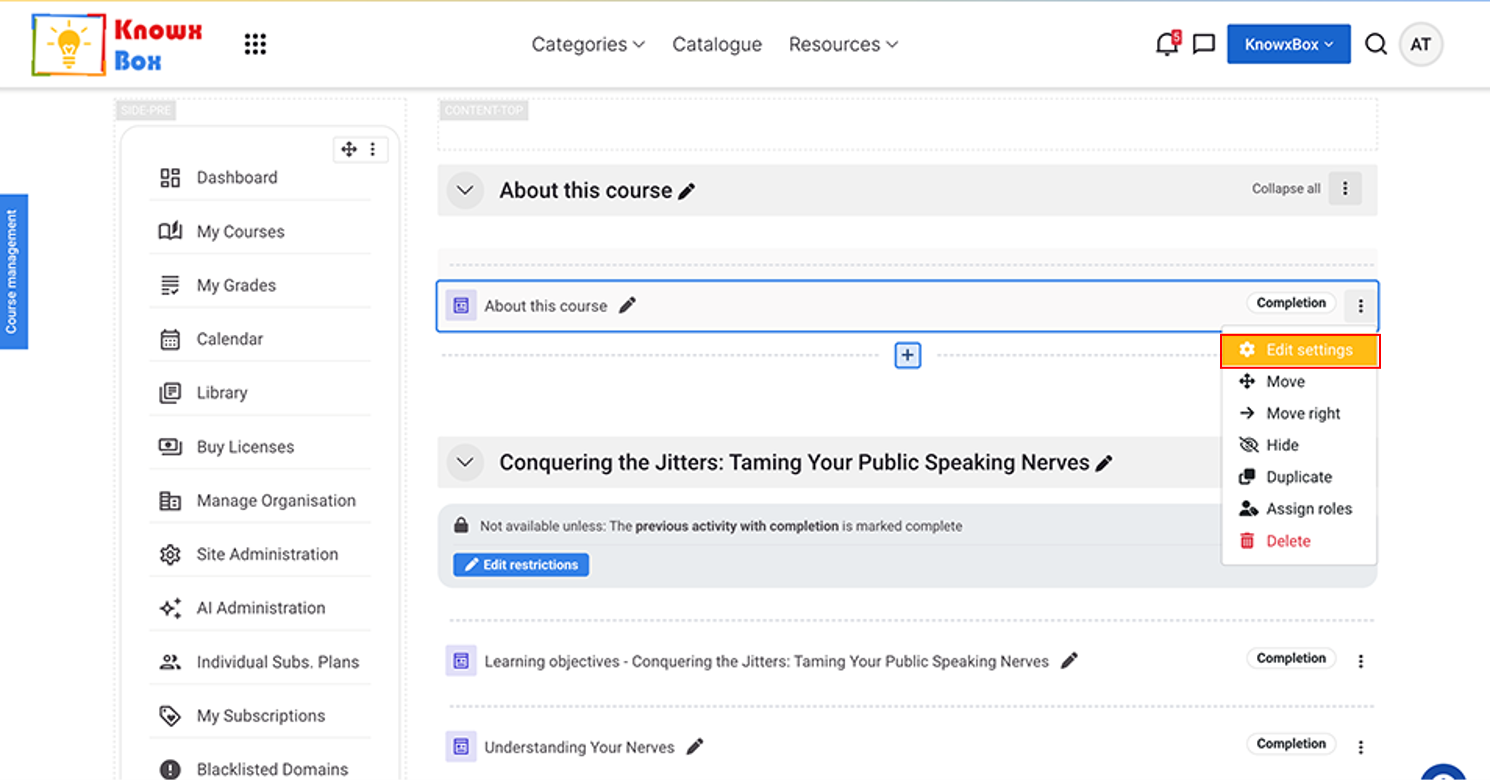
Click on Edit setting from dropdown.
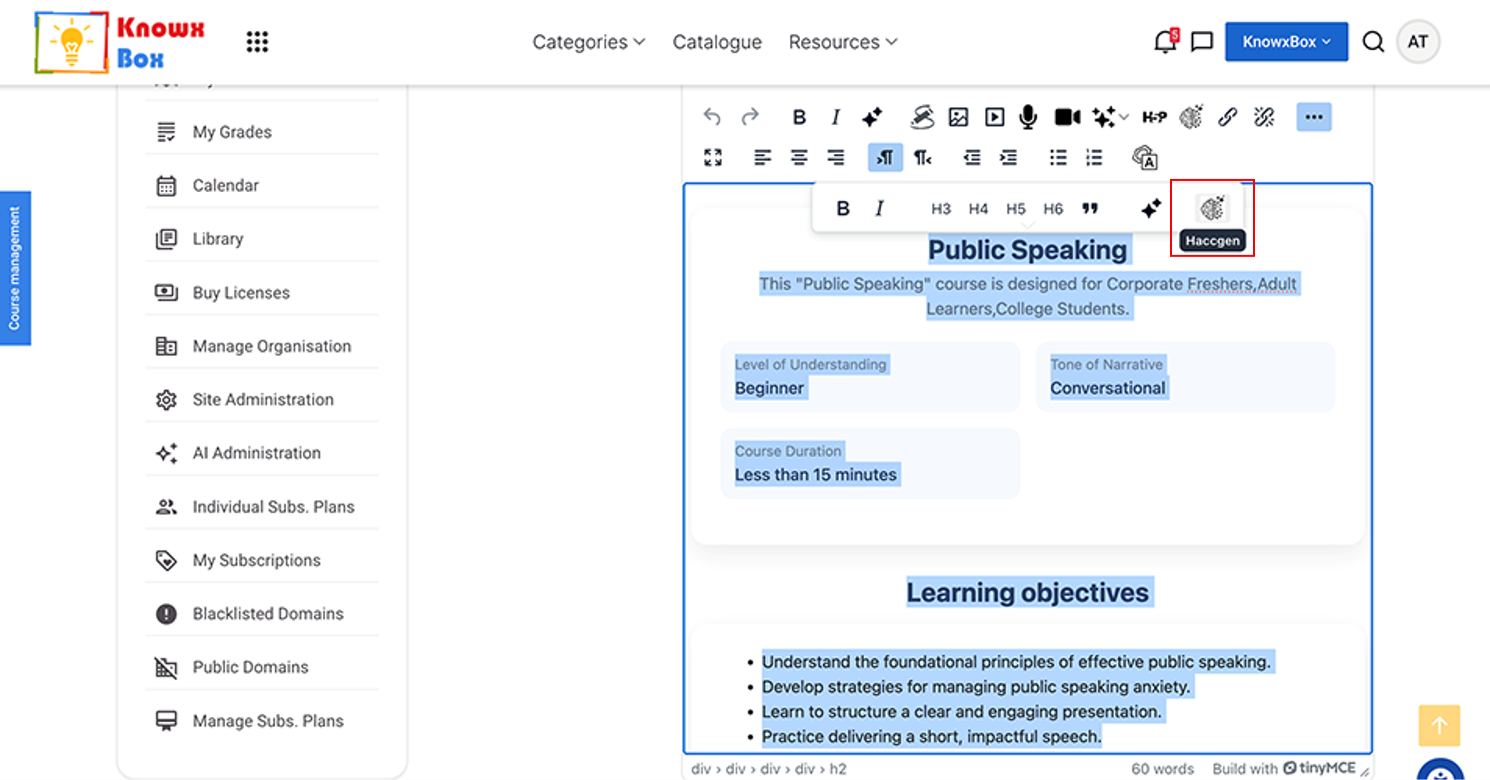
Go inside the settings of About this Course.
Select All content and click on HACCGen Extender.
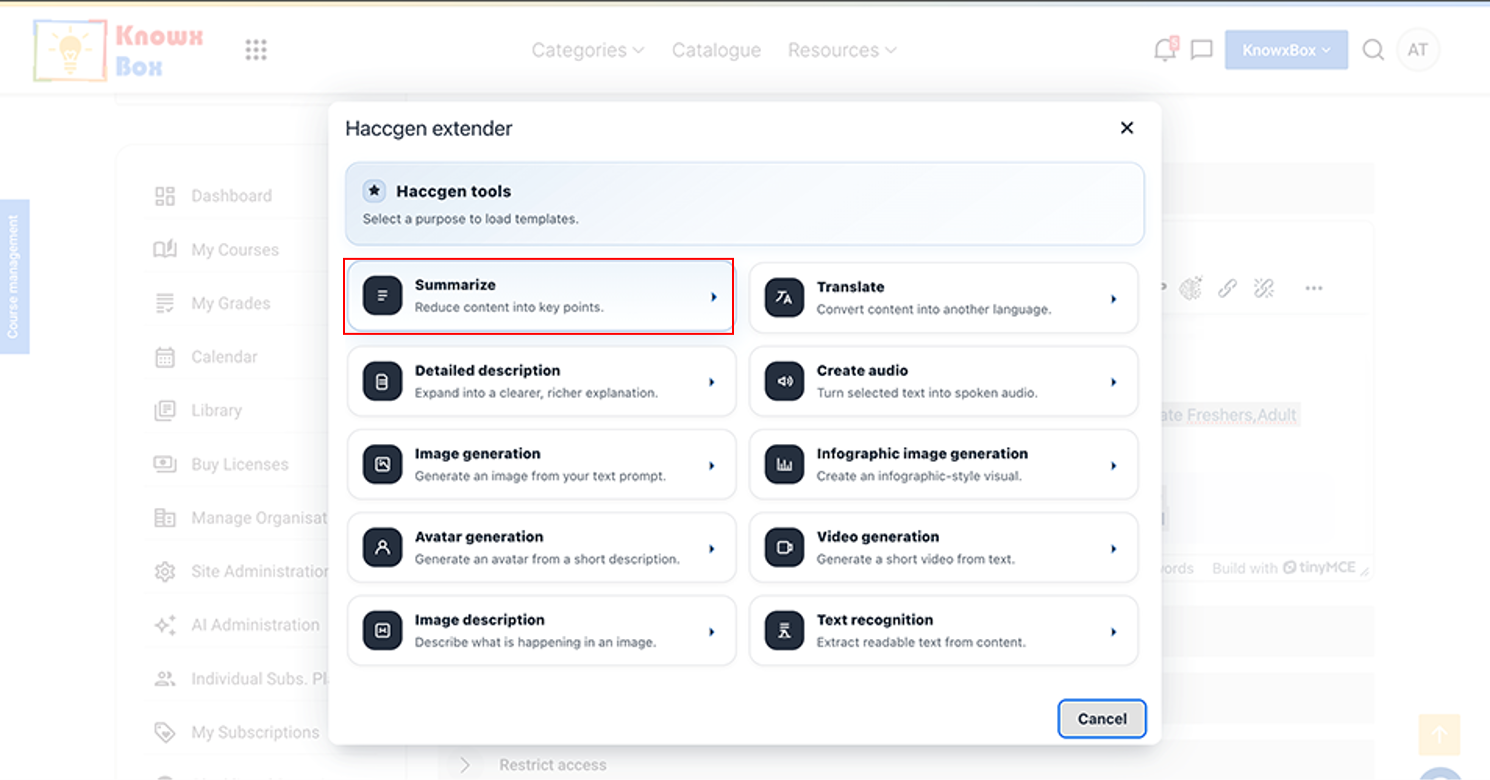
Select Summarize option out of these.
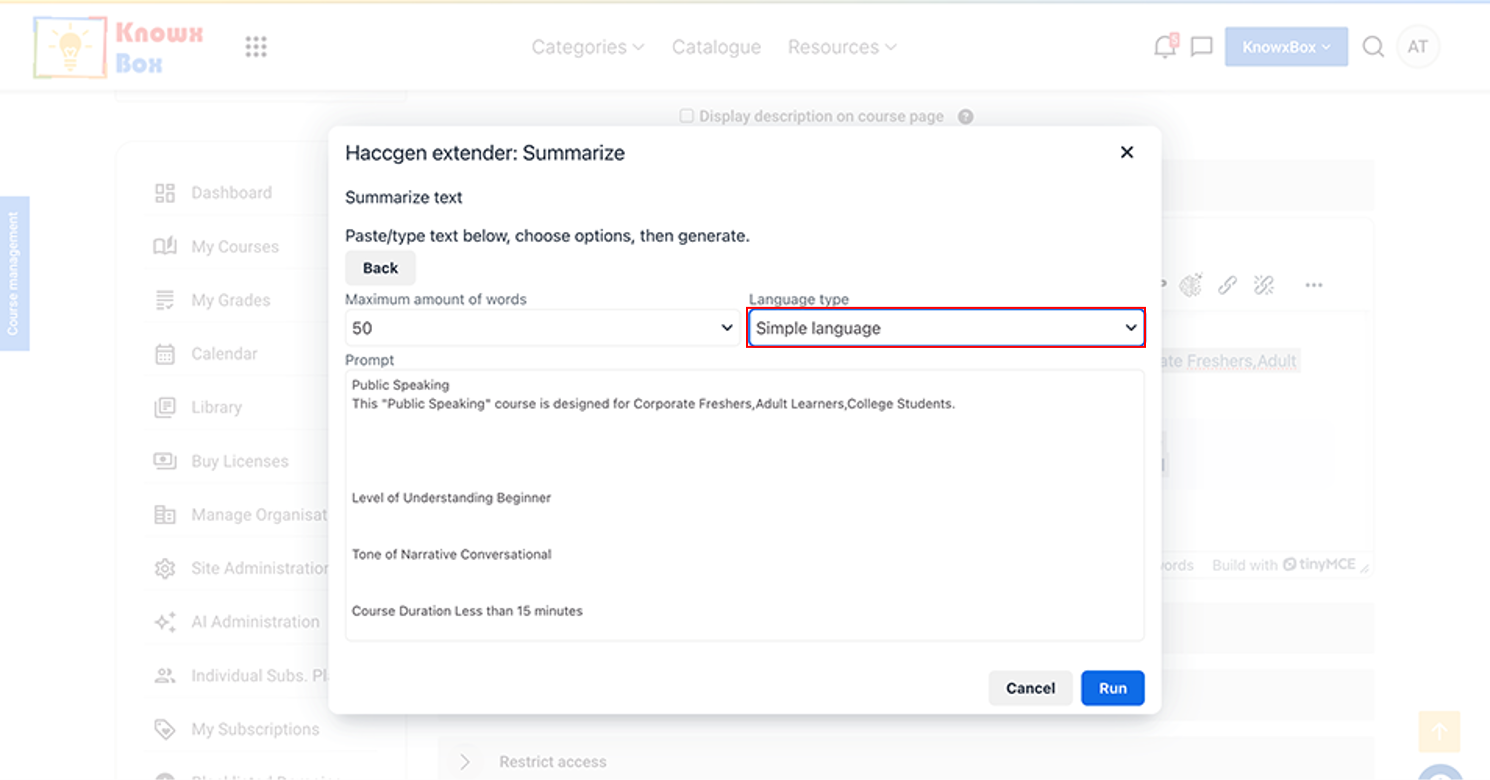
Select the language type to Simple Language from drop down and click Run.
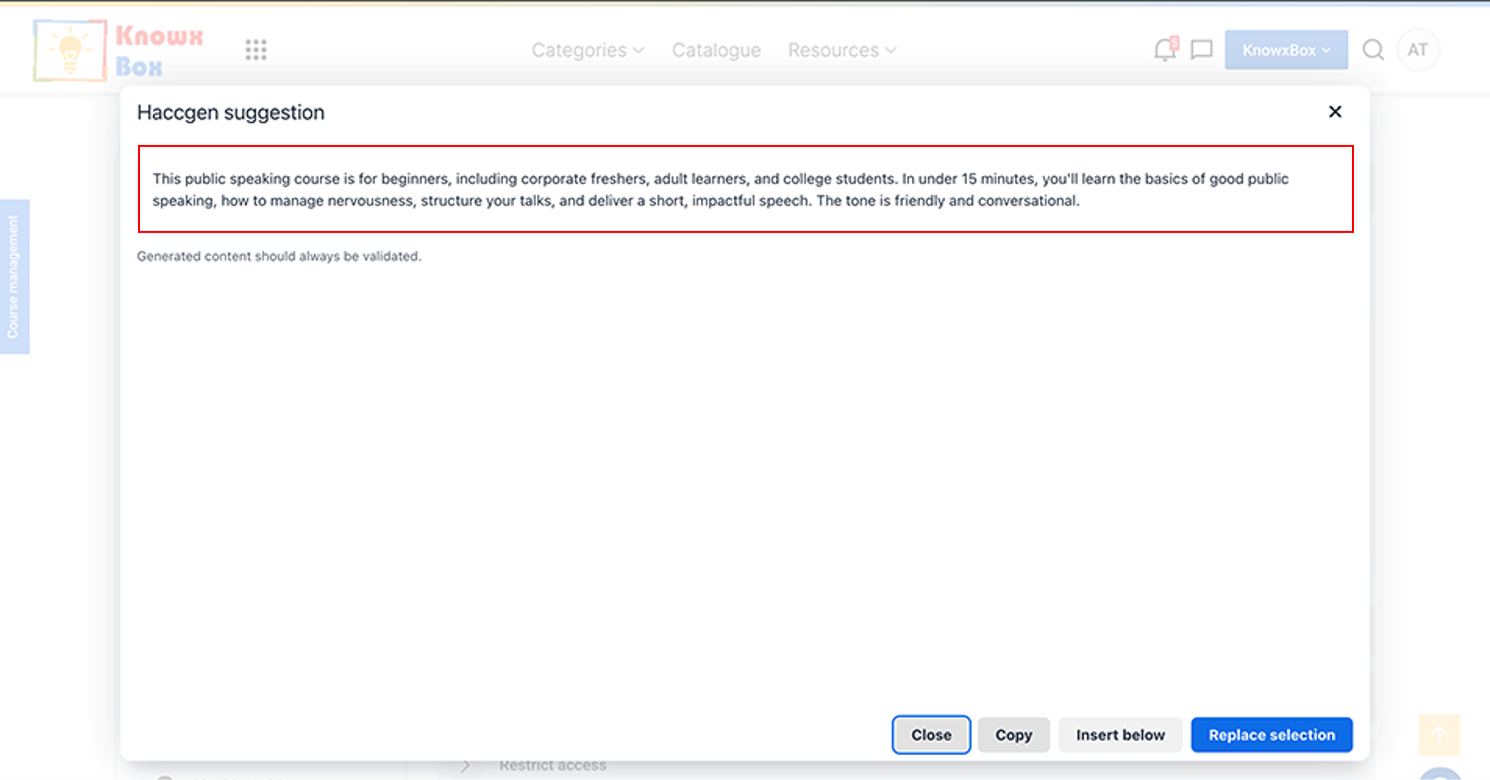
Copy the content from here and paste it in the Course Summary.
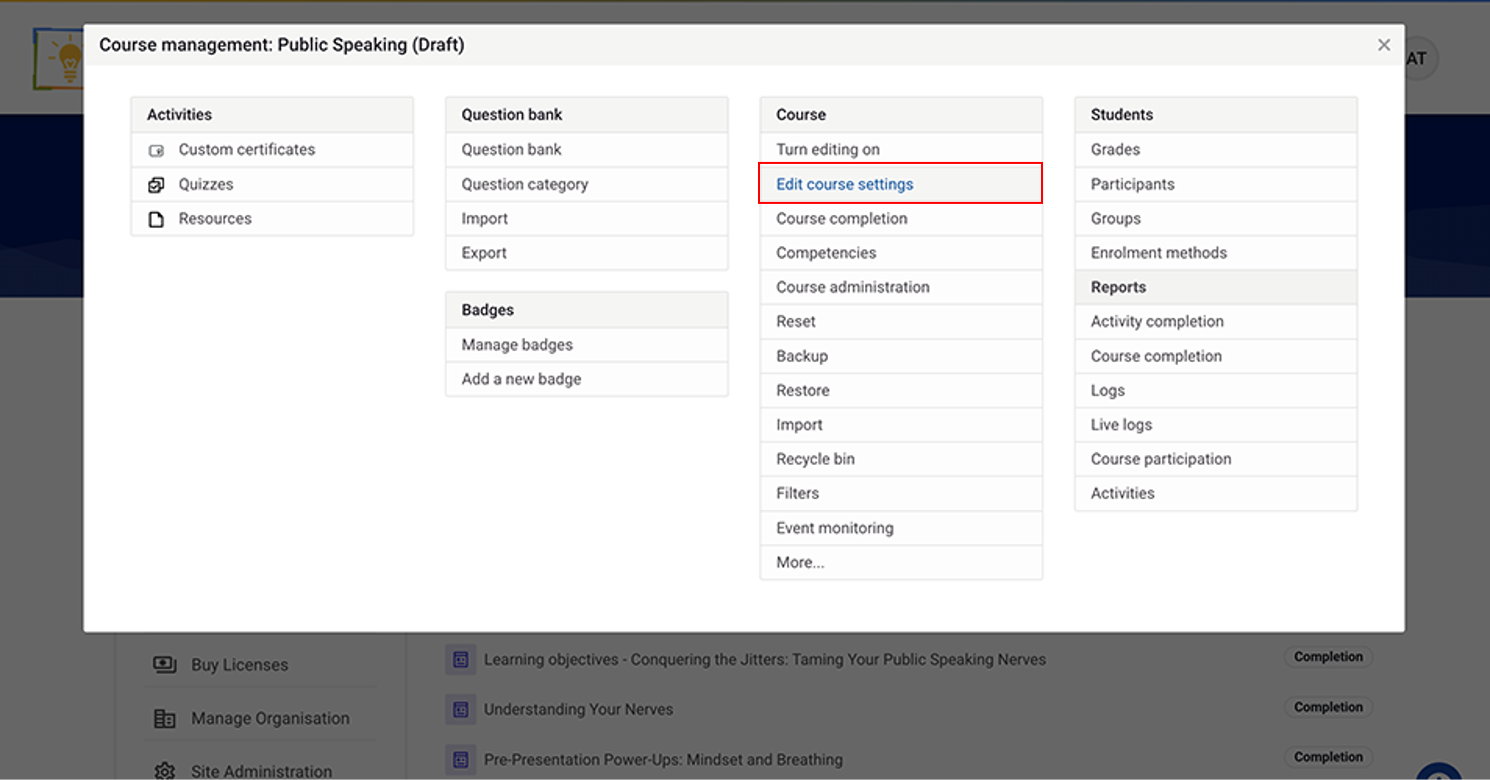
Again, click on Edit course setting.
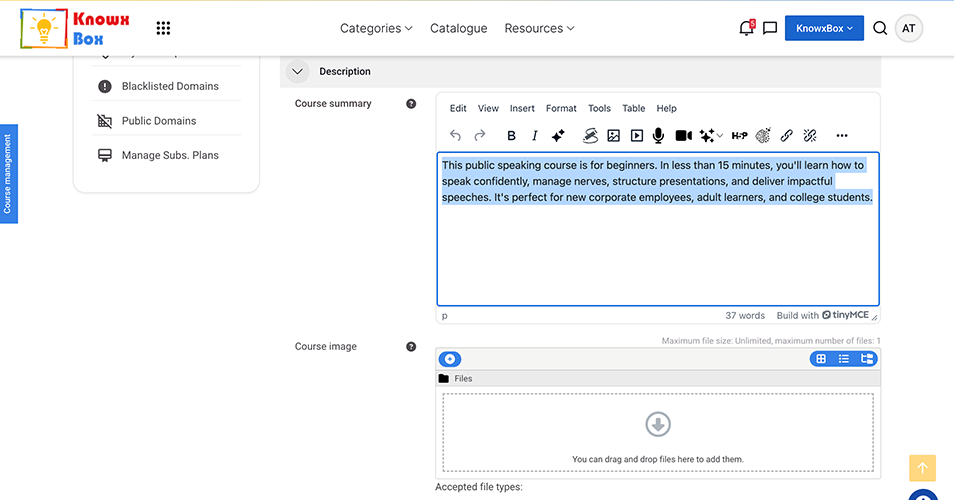
Paste the copied content in the Course Summary.
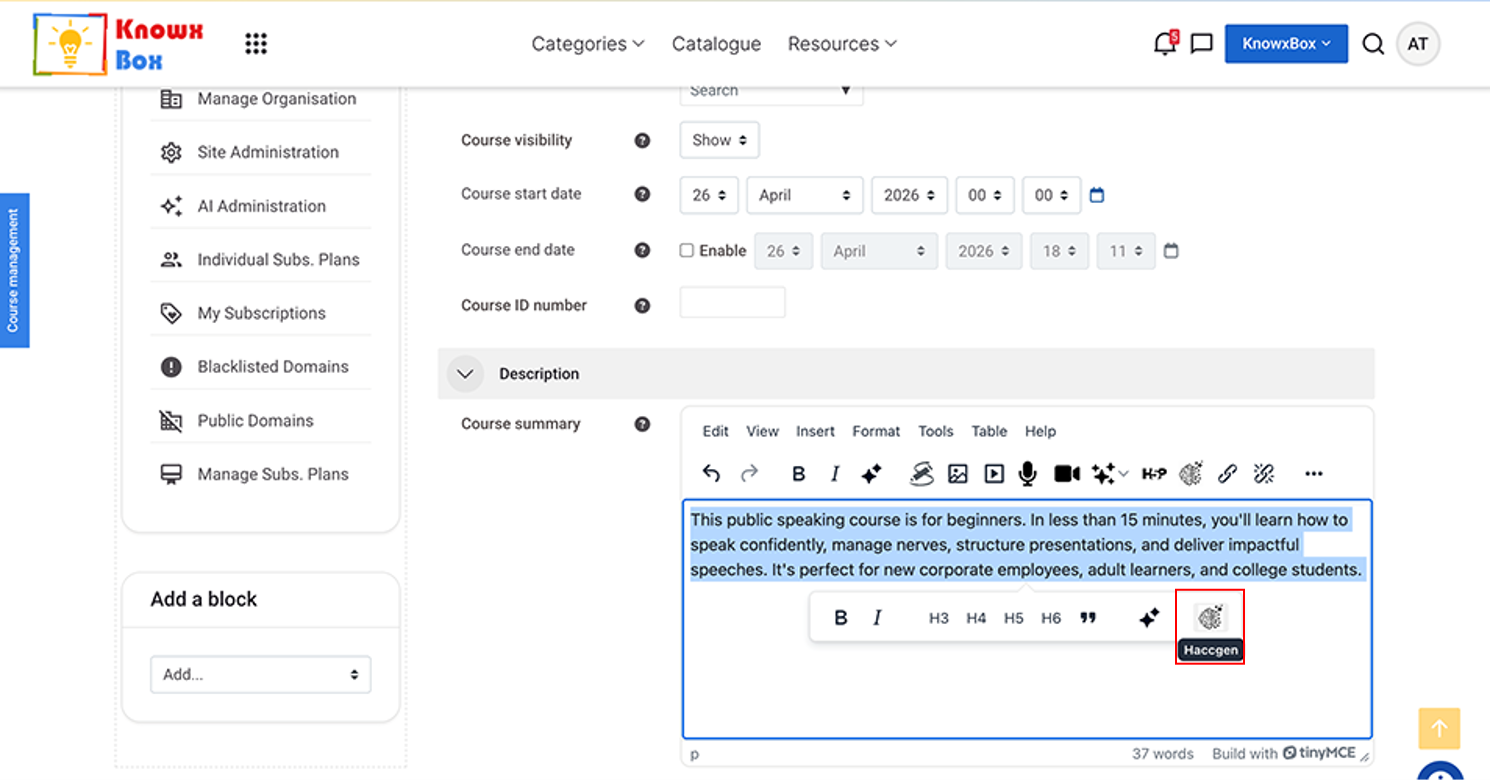
Select All content and click on HACCGen Extender.
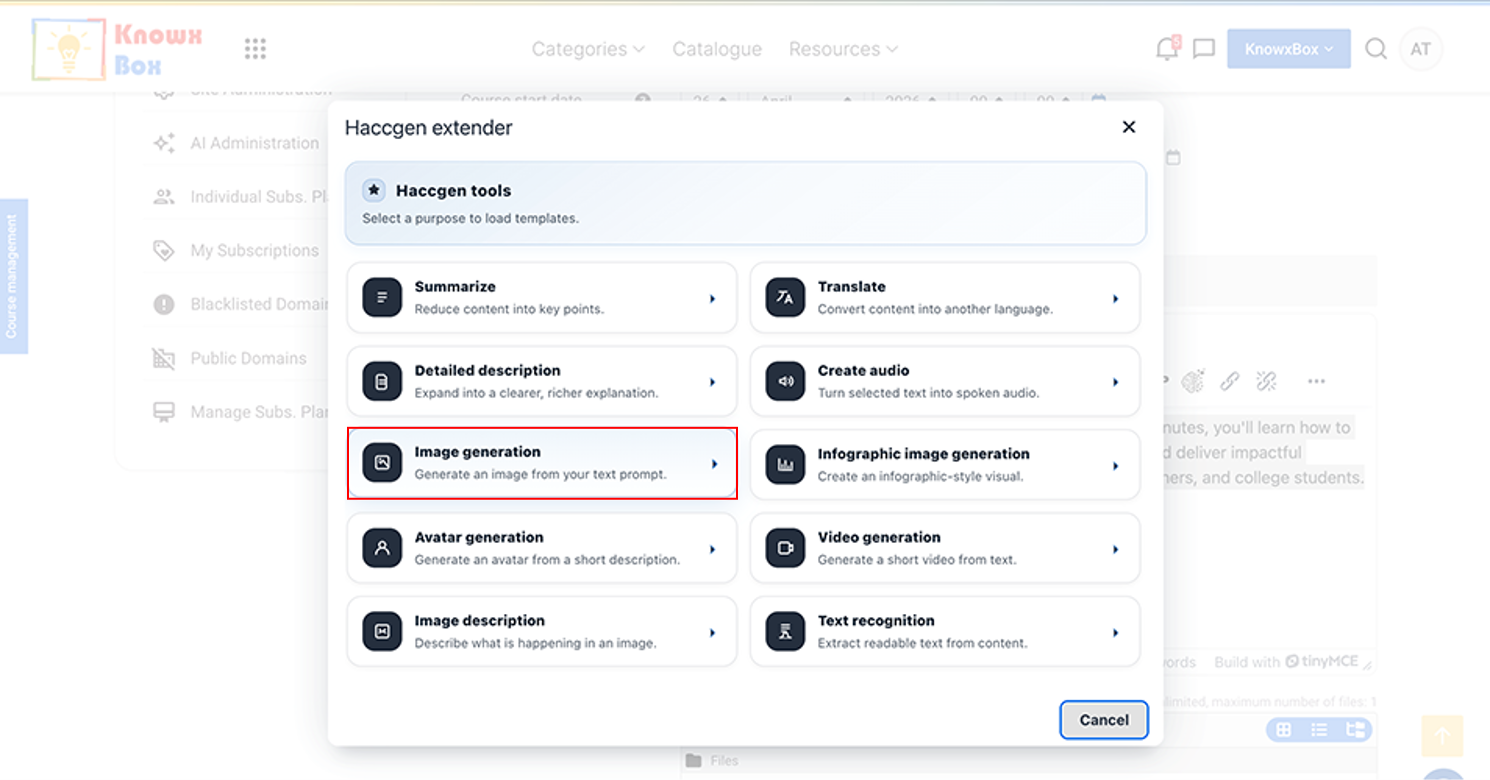
Now, Select Image generation option then click Run.
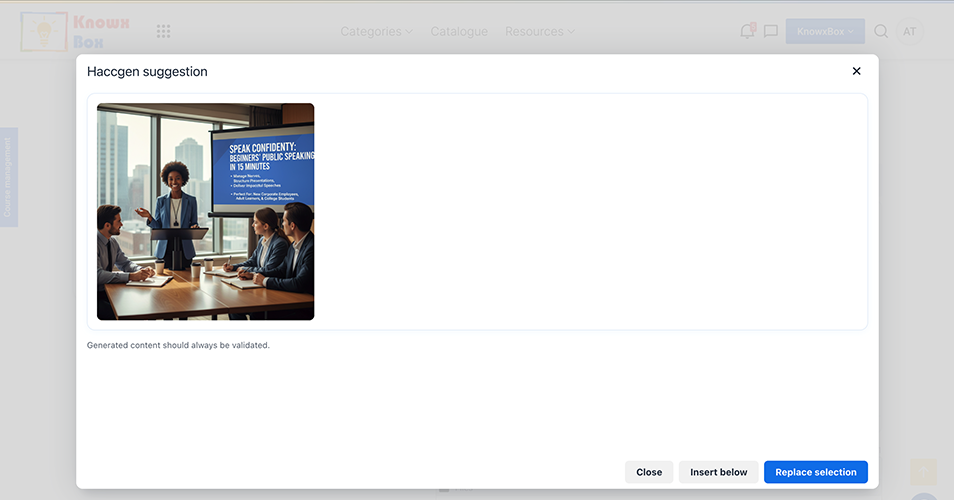
Image is ready. Now, click Insert below.
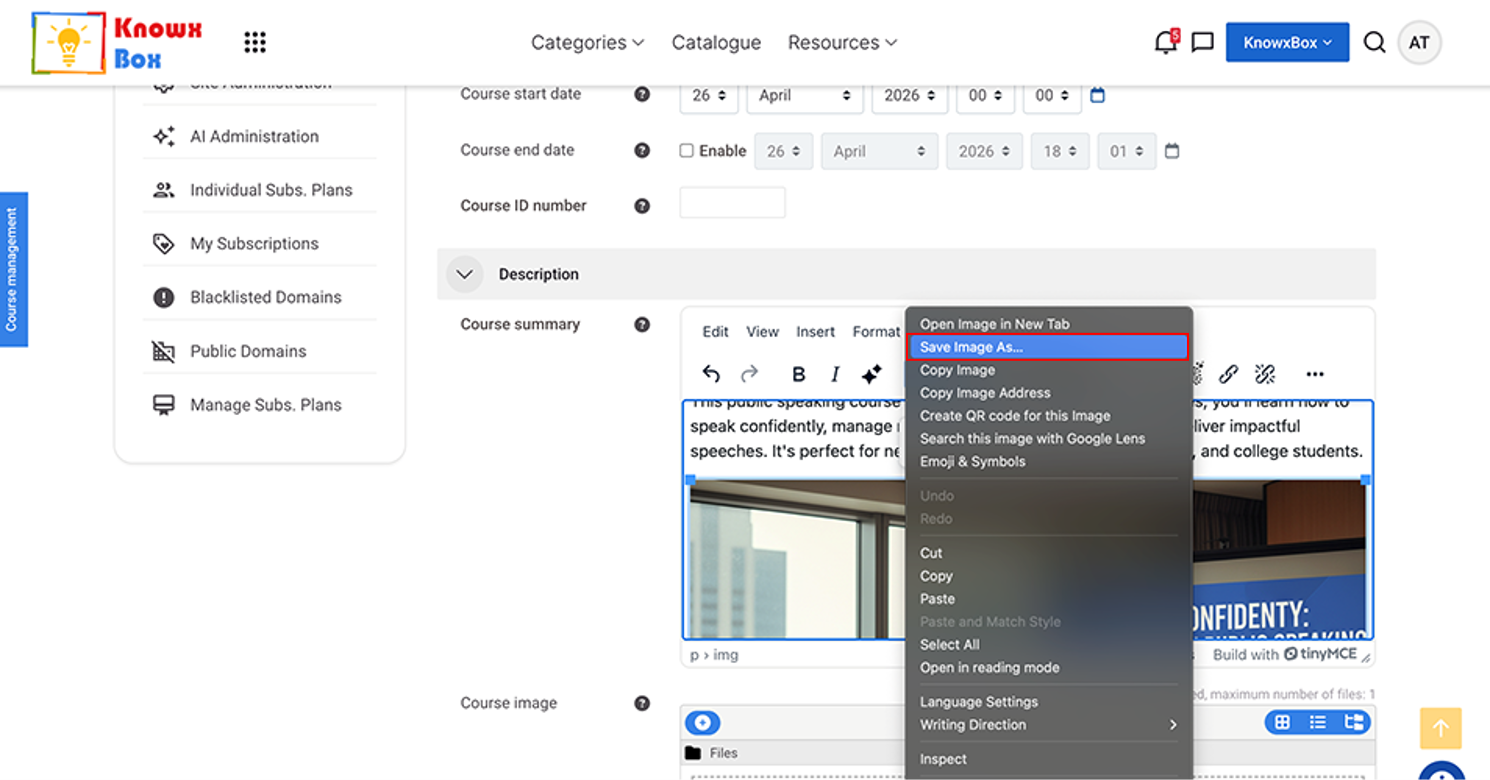
Now save the Image here or Cut it and past under Course image section.
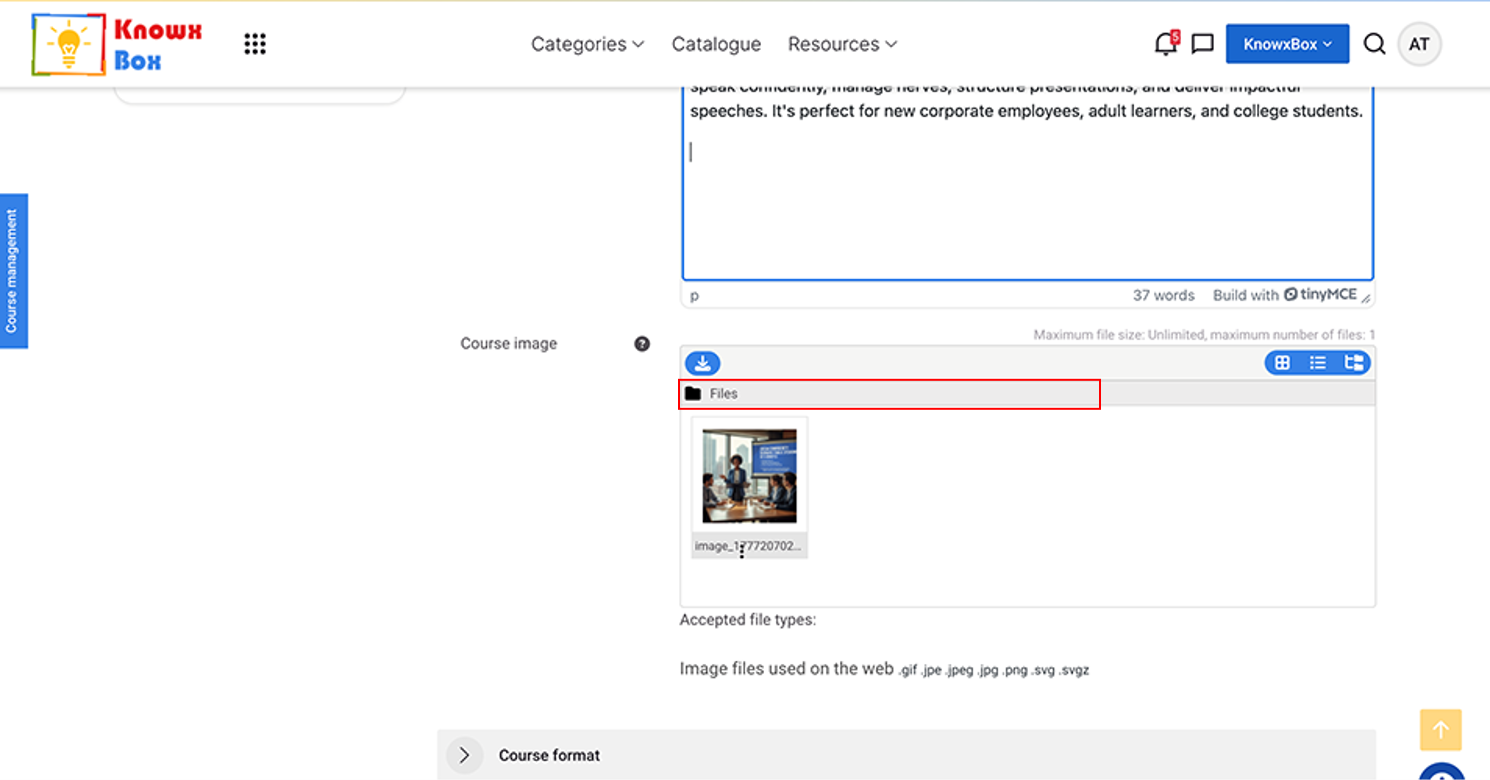
Add Course image.
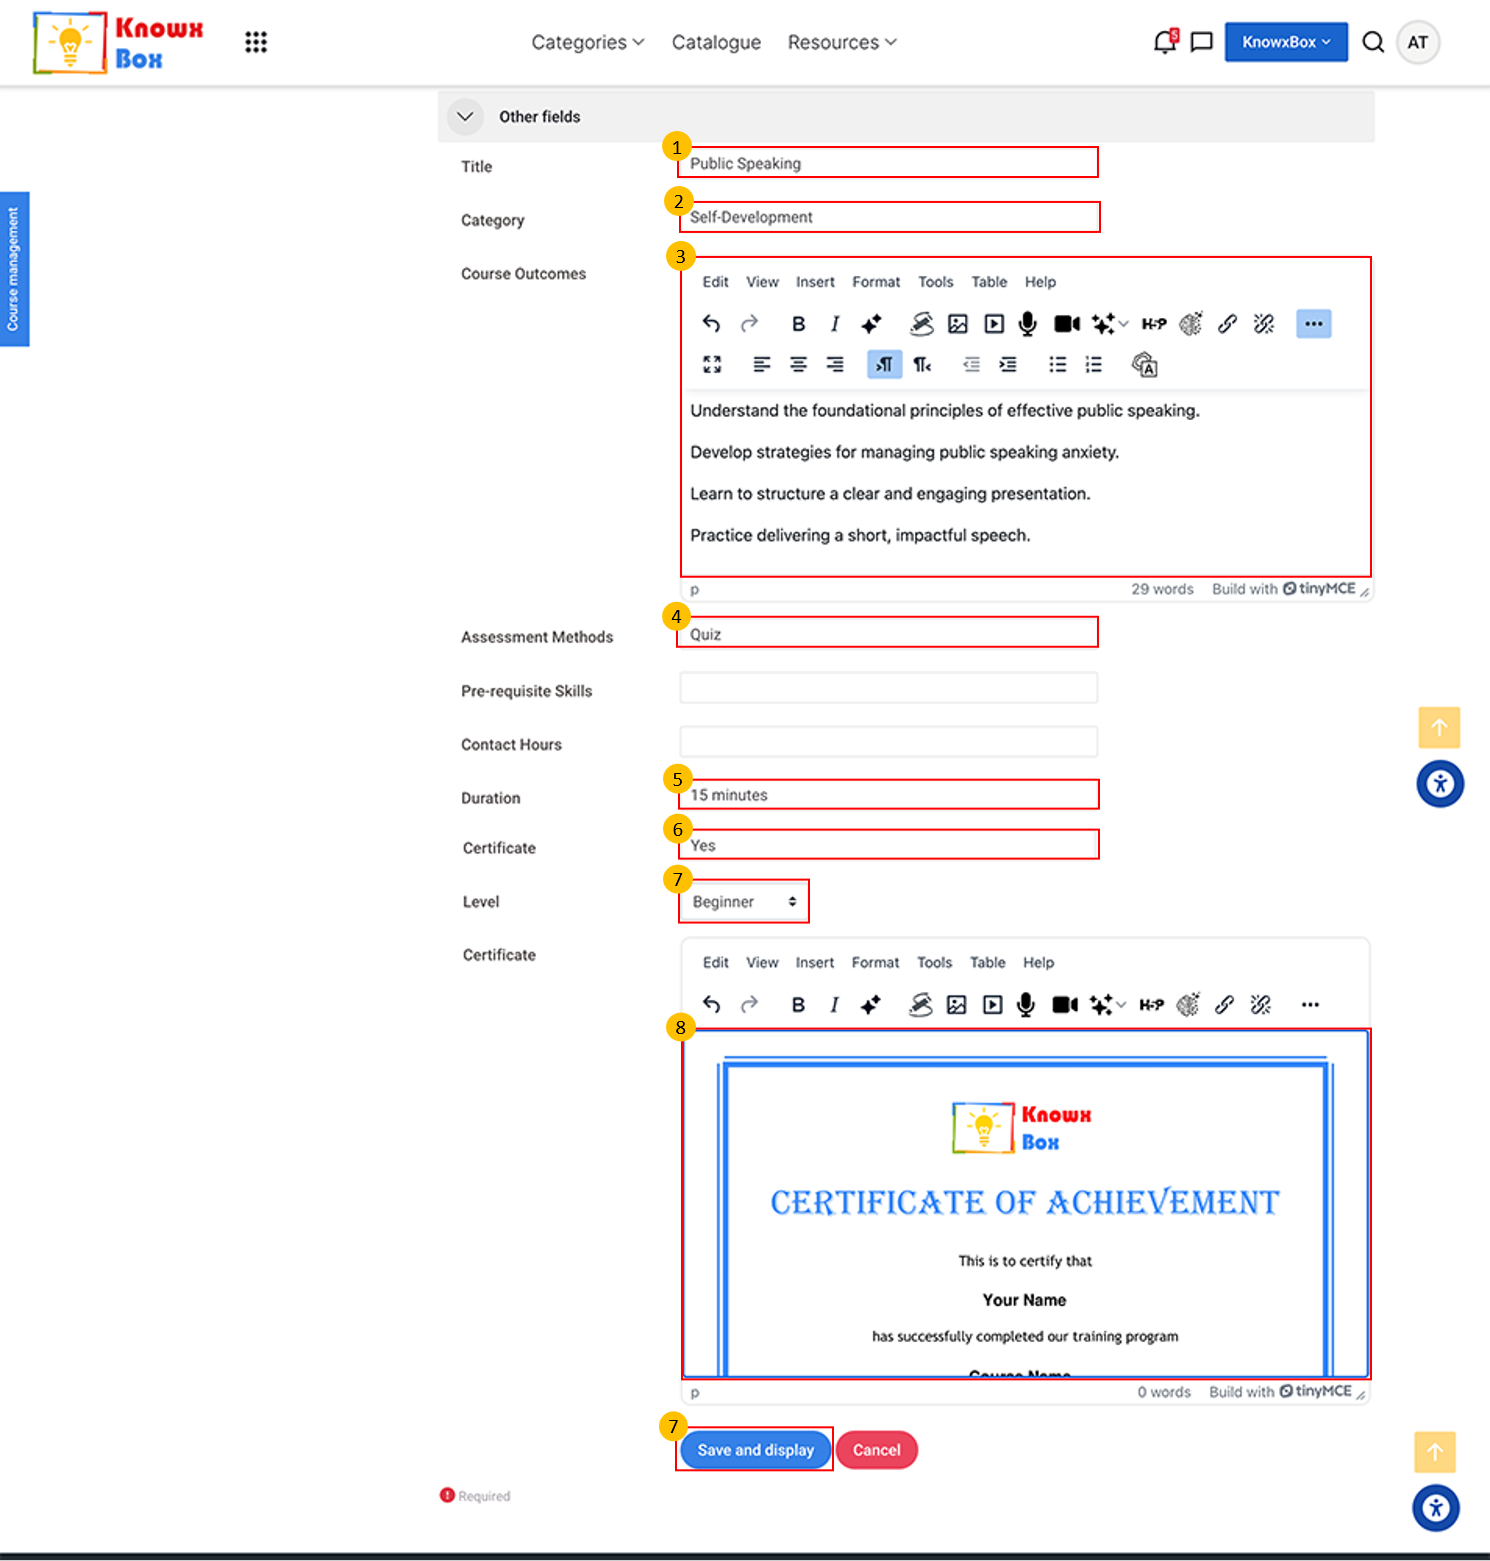
Fill all other details and click Save and display.
10. Course Enrolment Options before Go-Live
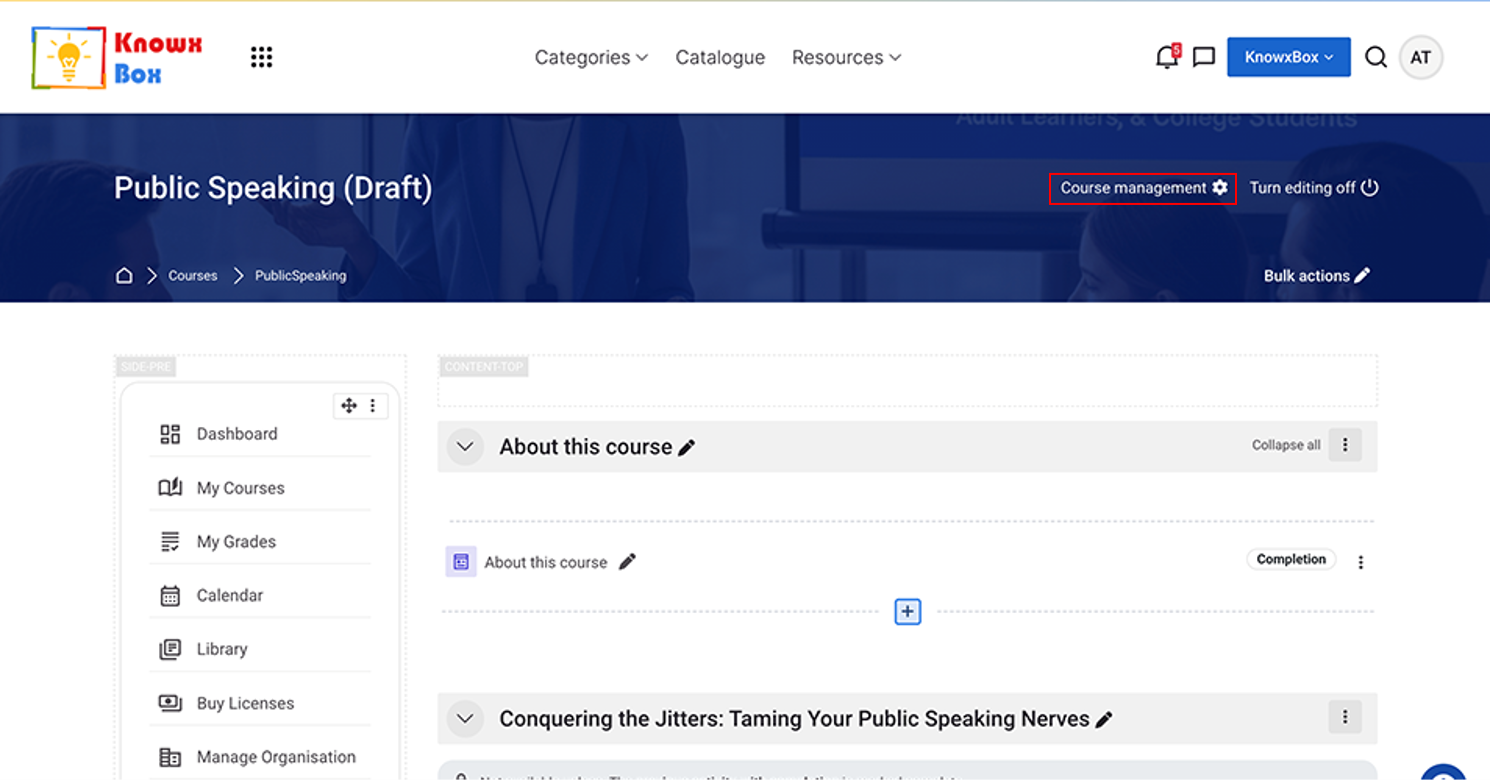
Click on Course management.
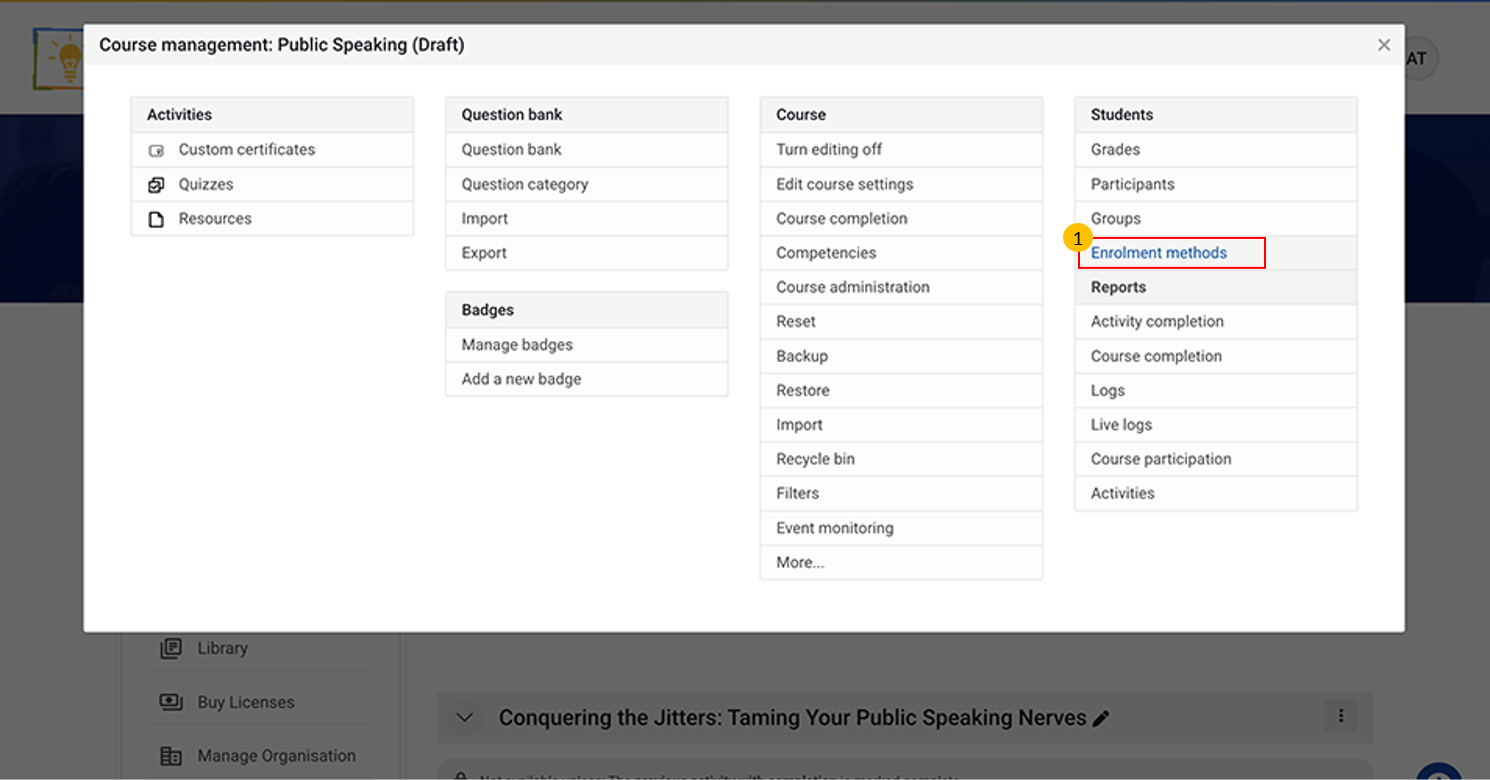
Click on Enrolment methods.
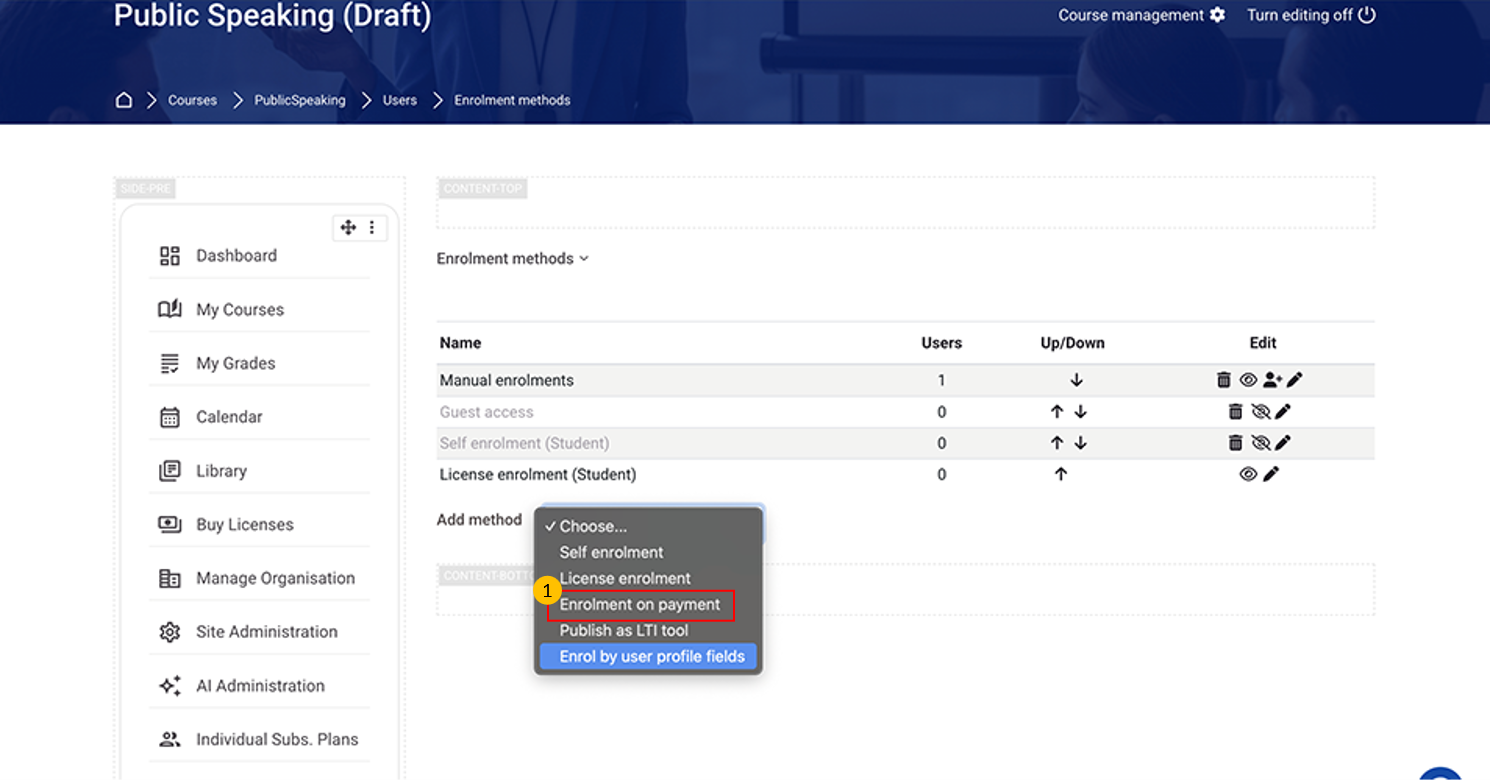
Select Enrolment on payment from dropdown.
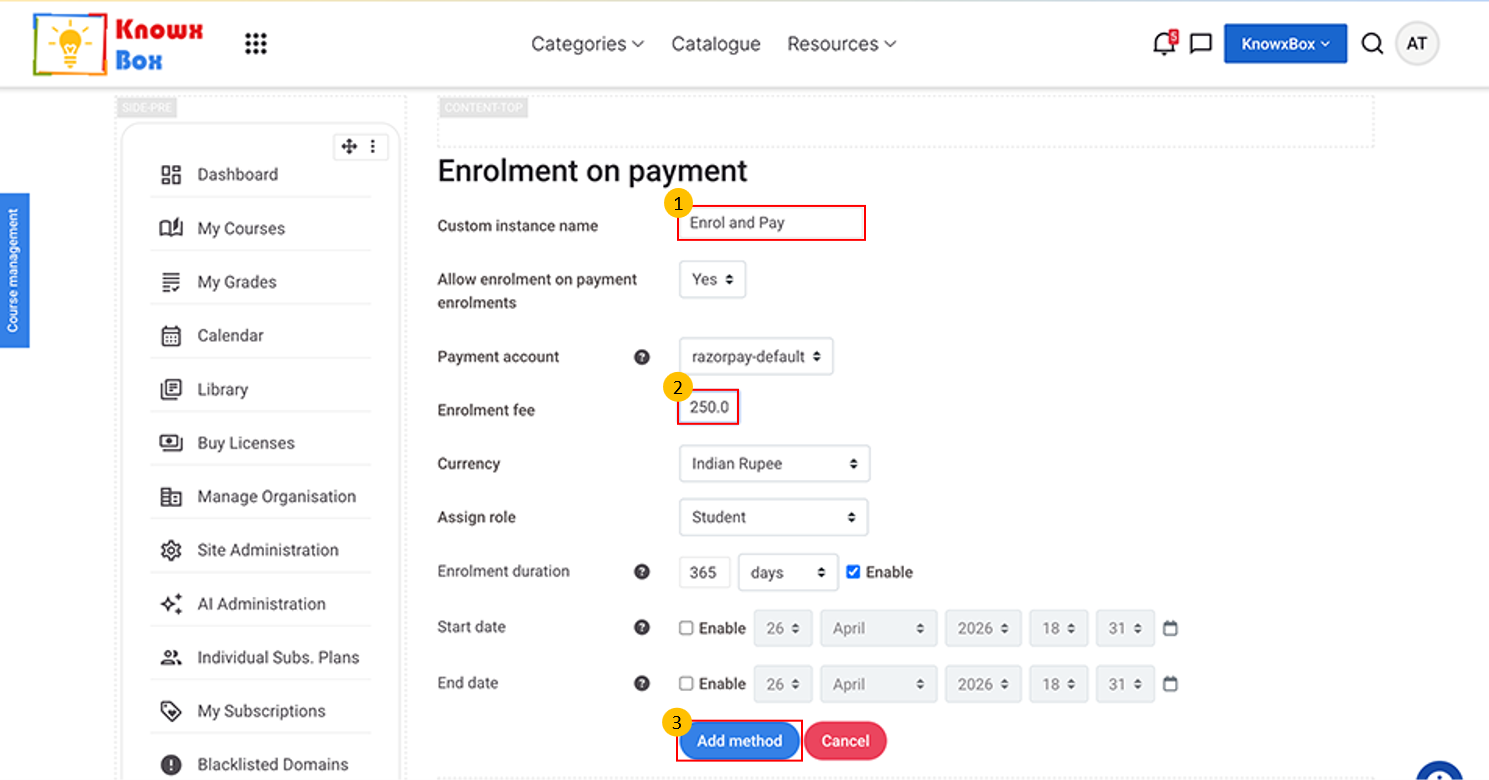
Fill the Custom instance name and Enrolment fee then click on Add method.
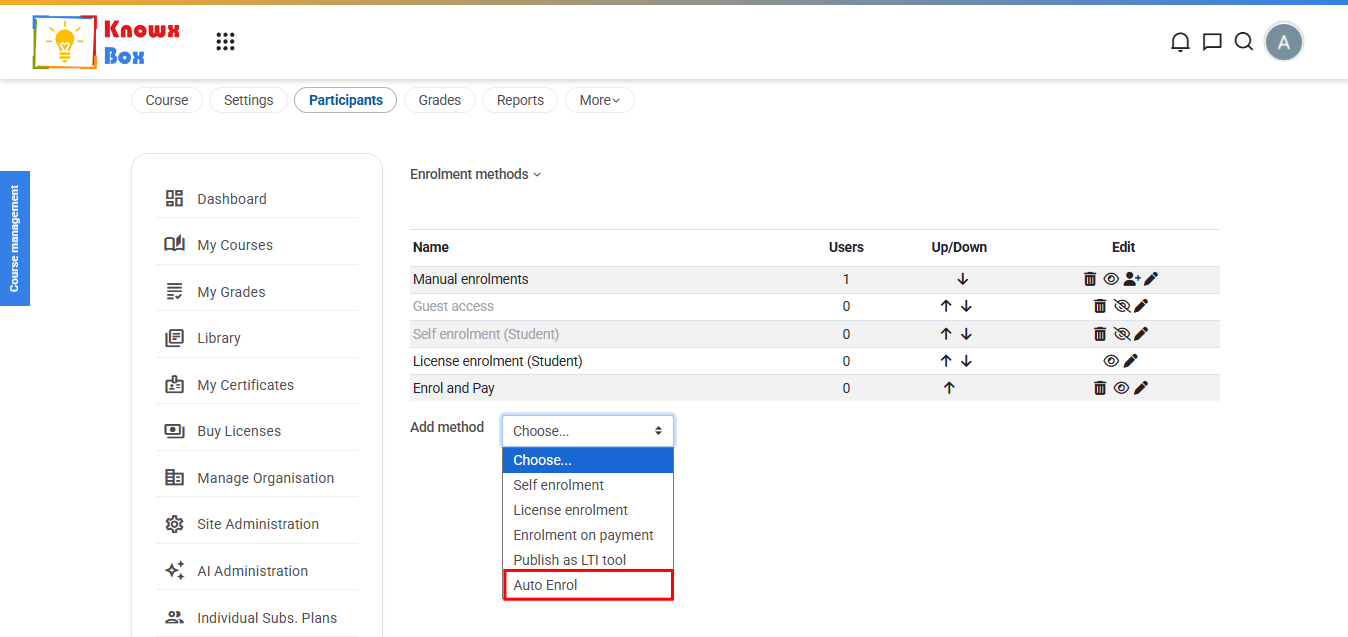
You can also select Auto Enrol option from add method dropdown.
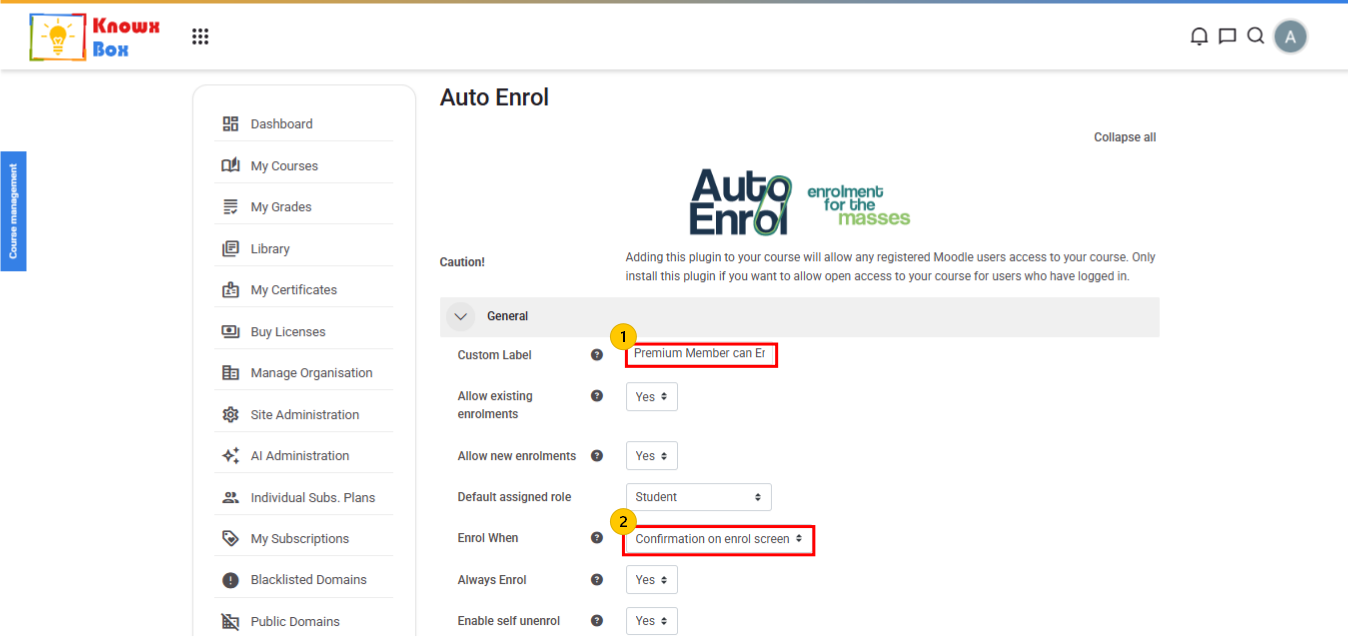
- Add Custom Label for Auto Enrol method.
- Set Enrol When to Confirmation on Enrol Screen.
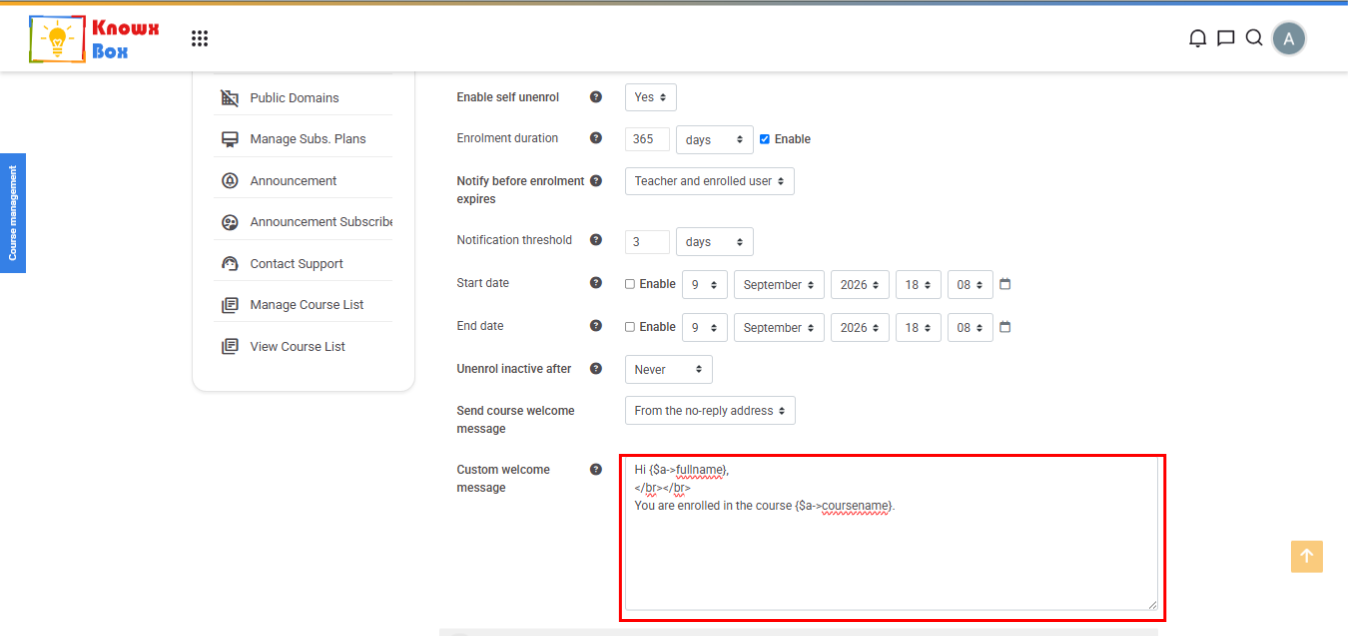
Provide Custom Welcome Message for the users.
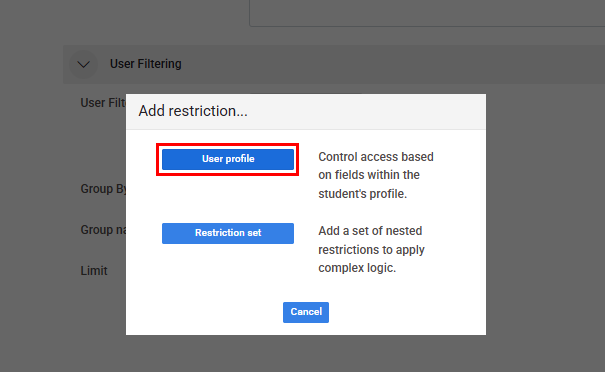
In User Filtering Field, add restriction in User Profile.
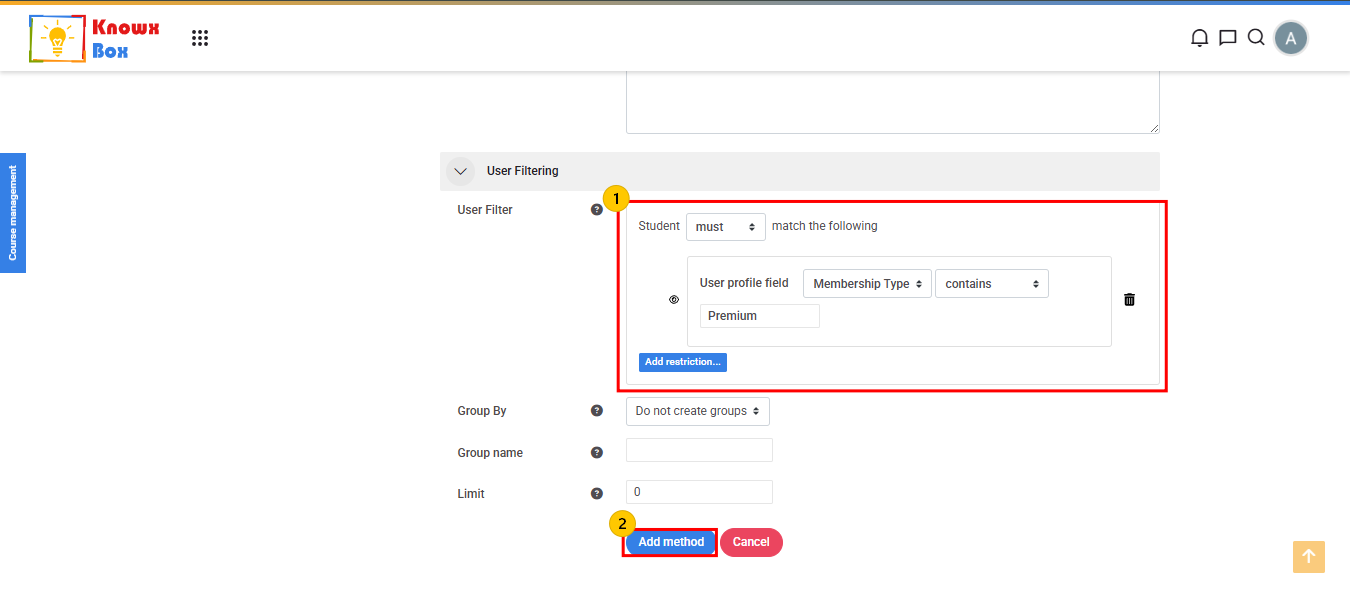
- Set the required restrictions for Premium Users.
- After setting up restriction, click on Add Method.
11. Make the Course Public
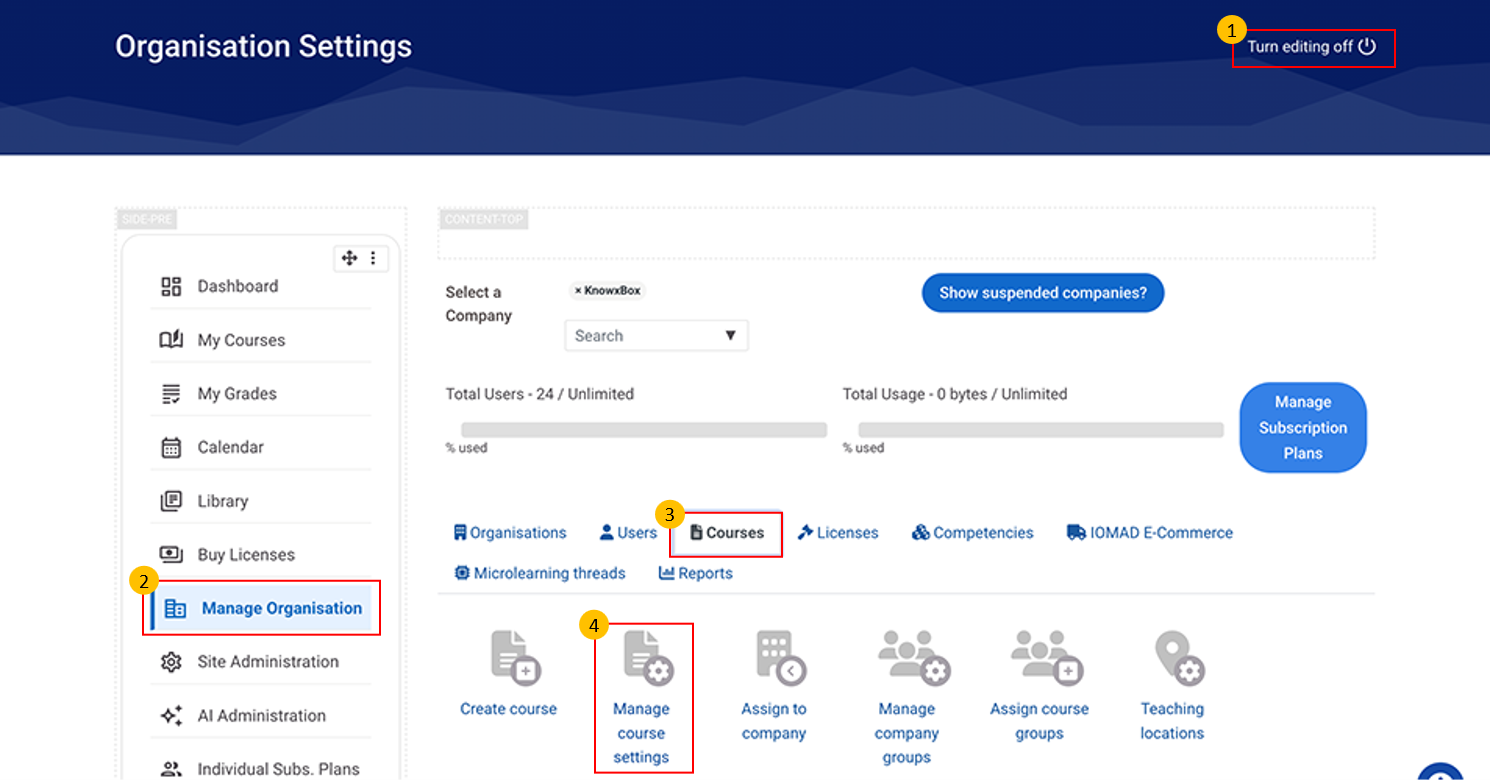
- Now, Turn editing on
- Click on Manage Organisation.
- Click on Courses
- Then, click on Manage course setting.
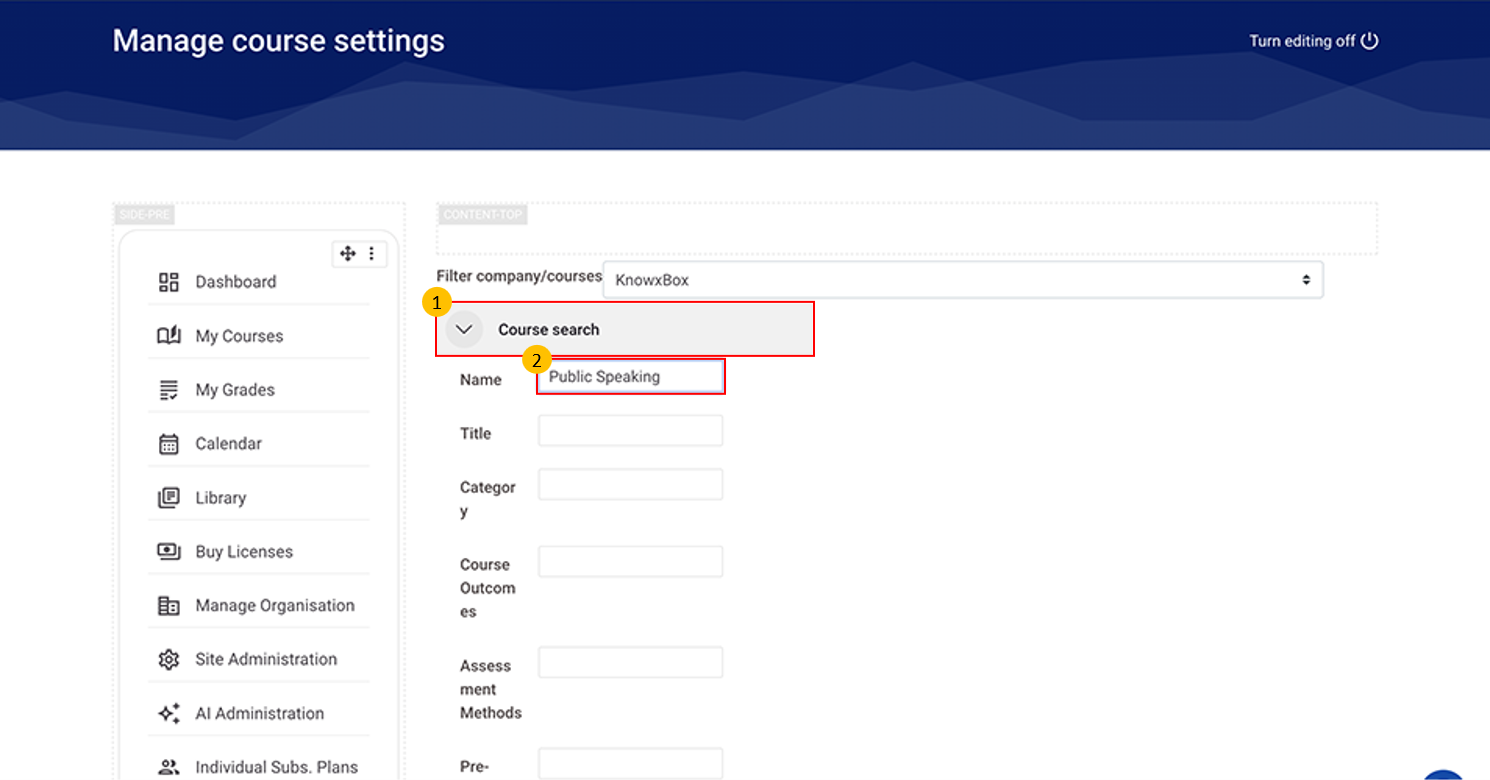
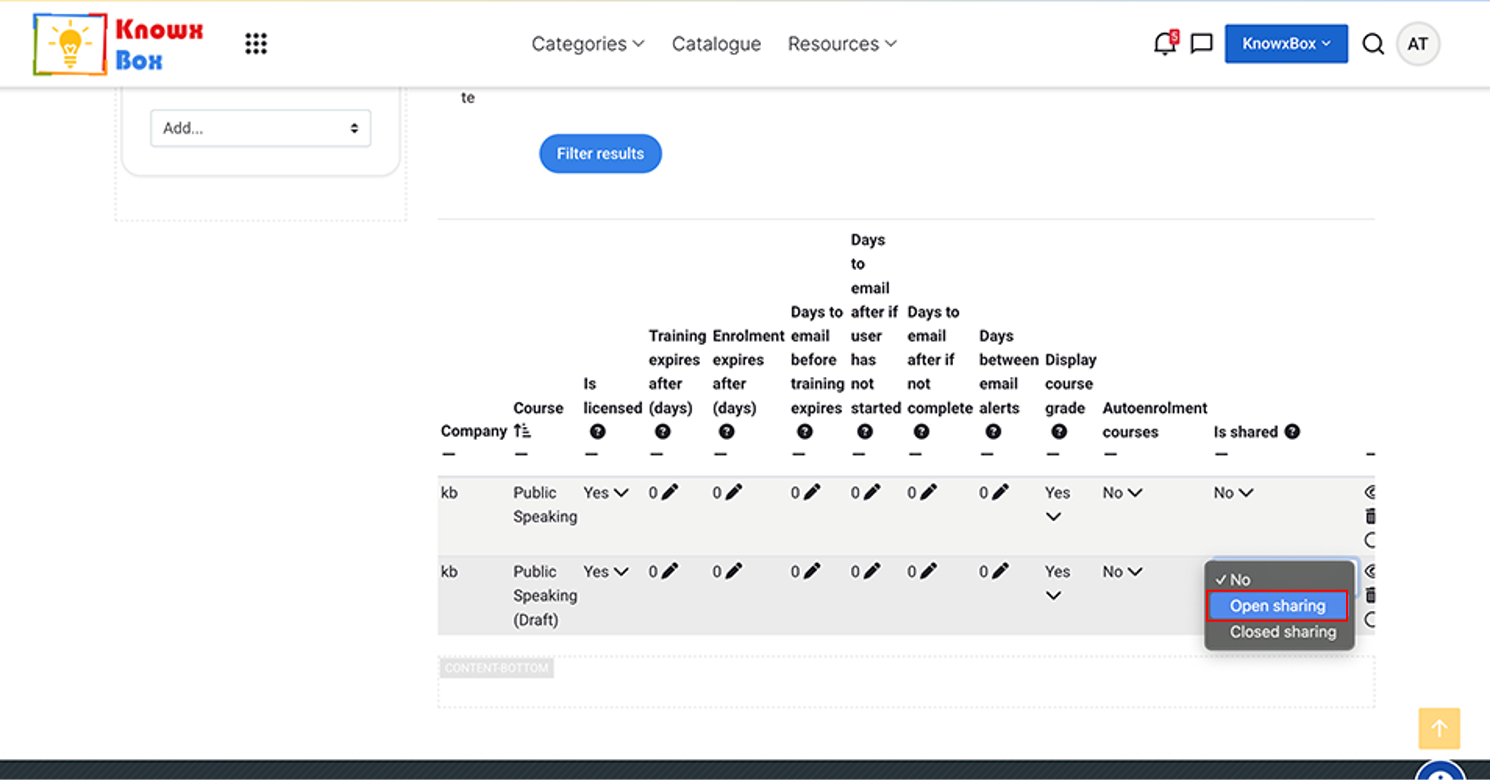
- Select Open sharing from dropdown for the selected course.
- Now your course is Live on KnowxBox.