Teacher: User Manual
| Site: | Dynamic Pixel Demonstration Environment |
| Course: | Moodle Documentation for Teacher |
| Book: | Teacher: User Manual |
| Printed by: | Guest user |
| Date: | Thursday, 23 July 2026, 2:56 AM |
Table of contents
- 1. Introduction to Moodle
- 2. Home Page
- 3. Logging In
- 4. Understanding the Dashboard
- 5. My Courses
- 6. Course Navigation and Structure
- 7. Understanding Course Sections and Activities
- 8. Adding Activities and Resources
- 9. Managing Course Participants and User Enrolment
- 10. Grade
- 11. Course Setting
- 12. Profile Management & Logout
1. Introduction to Moodle
Welcome to the Moodle Teacher User Manual. This guide helps teachers understand how to use Moodle’s management features for course management, including adding and modifying activities, managing users, configuring assessments, and monitoring learning activities.
About This Manual
This manual provides step-by-step instructions with screenshots to help teachers perform essential tasks in Moodle, such as logging in, using the dashboard, managing courses, adding or modifying activities, enrolling users, configuring assessments, and monitoring learning activities.
Teacher Role Overview
The Teacher role allows you to manage and deliver course content within your assigned courses. Teachers can add and modify activities, enrol or manage students in their courses, configure assessments such as quizzes and assignments, and monitor student learning progress and participation.
2. Home Page
When you access the Moodle site, the Home page introduces the platform and its key offerings, including featured learning solutions. You can quickly Login or Register and explore courses, updates, and platform features from this central dashboard.
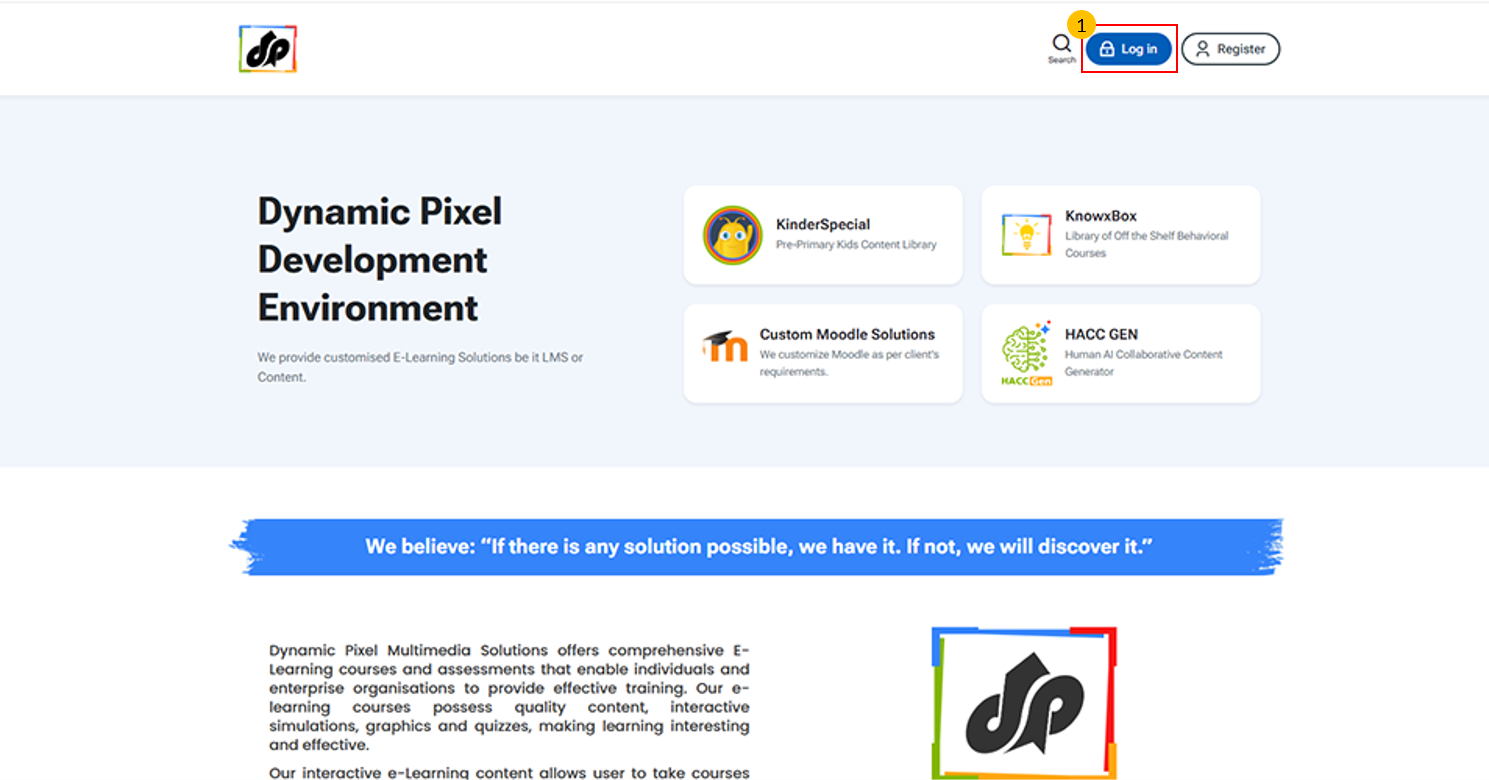
Once you reach the home page, click the Login button to access your account and learning dashboard.
3. Logging In

- Enter your Registered Username/Email and Password in the respective fields.
- Click this link if you have forgotten your login credentials. It will guide you through the process to reset your username or password.
- Click on the login button to submit your credentials and access your account.
- If you are a new user, click create new account button to register yourself.
4. Understanding the Dashboard

- Navigation Panel (Left Menu)
- This section provides quick access to key features of the platform:
- Dashboard – View overall summary and activity
- My Courses – Access courses assigned to you
- My Grades – View grading details
- Calendar – Check scheduled events and deadlines
- Course Library – Browse available courses
- This section provides quick access to key features of the platform:
- Course Analytics Section
- This section displays a summary of your course activity:
- Teaching – Number of courses you are teaching
- Enrolled as Student – Courses where you are enrolled as a learner
- Overall Progress – Completion percentage across courses
- Completed – Number of completed courses
- This section displays a summary of your course activity:
- Top Navigation Icons
- These icons provide quick access to important options:
- Notifications – View recent alerts and updates
- Messages – Access communication with users
- Profile/Search Icons – Manage account or search content
- These icons provide quick access to important options:
- Edit Mode Toggle
- Use the “Edit mode” button to enable or disable editing on the dashboard or course pages.
- Turn ON to make changes (e.g., add or modify the layout of Home page)
- Turn OFF to view content normally
5. My Courses
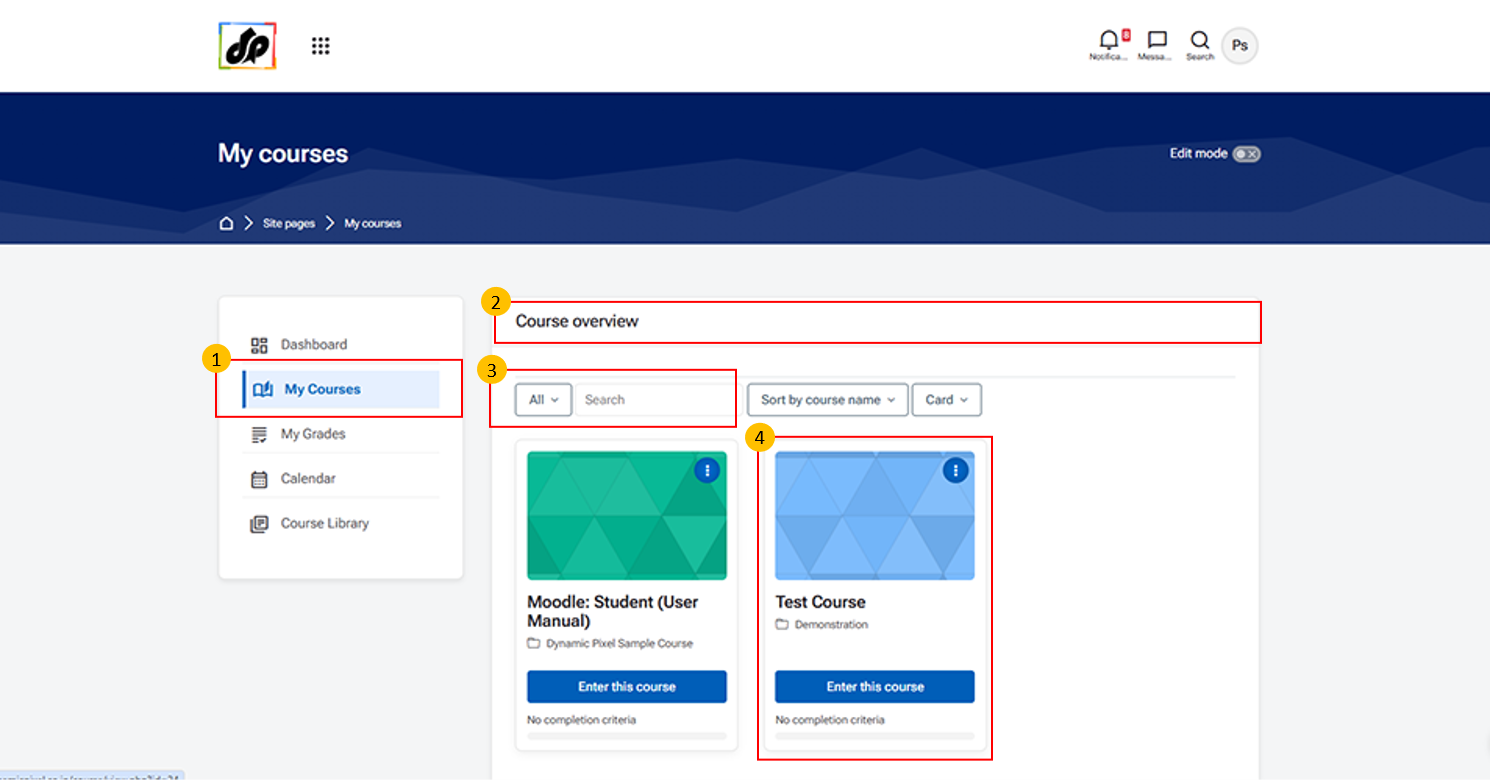
Navigation Path: Dashboard → My courses
This screen shows all courses where you are enroled as a teacher or manager. You can access course content, participants, and settings from here.
- My Courses (Navigation Panel)
-
Click on “My Courses” from the left navigation panel to view all the courses assigned to you.
-
- Course Overview Section
-
This section displays the Course Overview, where all your enroled or assigned courses are listed.
-
- You can also use filters and search options to find specific courses.
-
Course Cards
- Each course is displayed as a course card showing: Course name
-
Click on “Enter this course” to open and manage the selected course.
6. Course Navigation and Structure
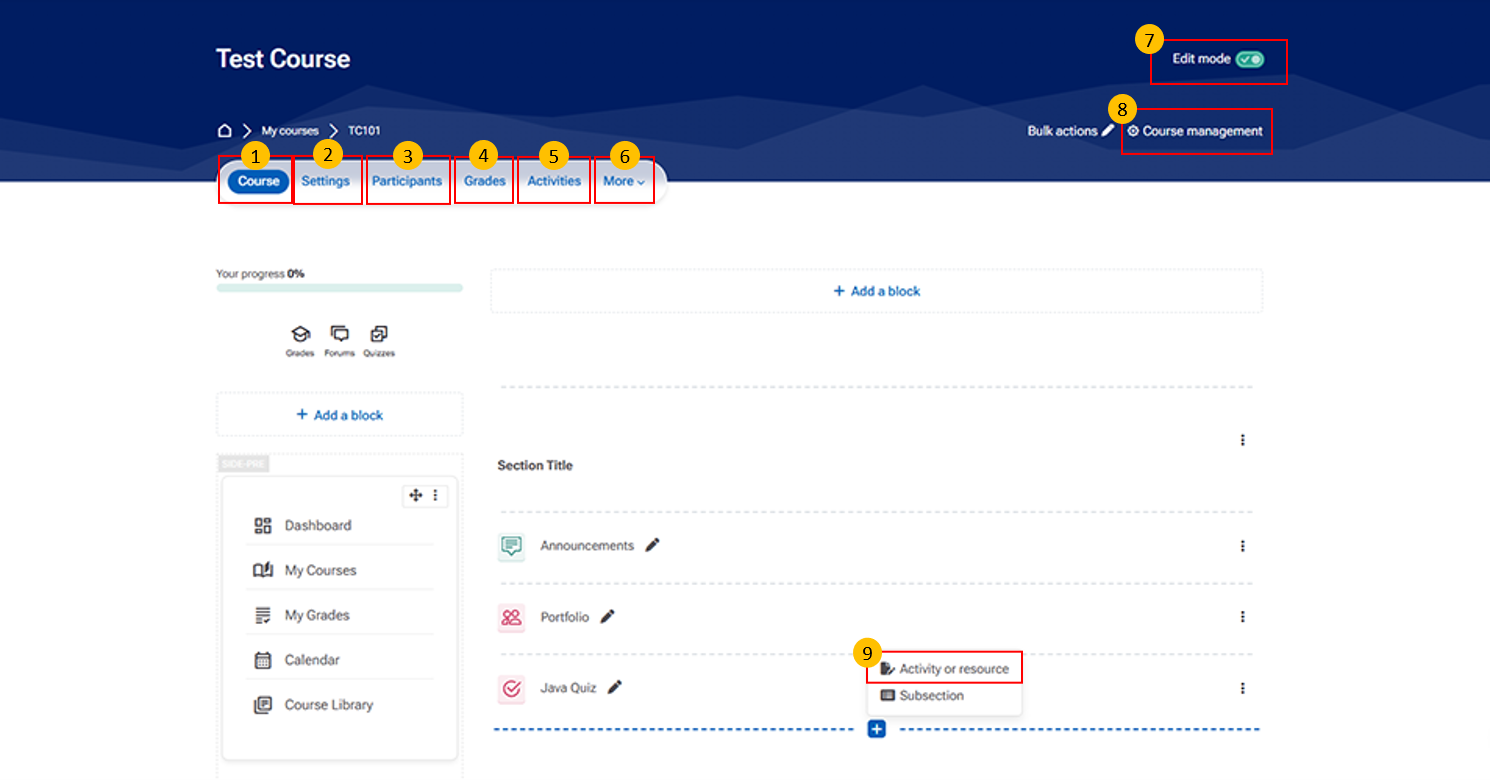
- Course Tab This tab provides access to the main course page.
- Settings Tab
-
Use this tab to edit course details such as the course name, summary, enrolment methods, and other settings.
-
- Participants Tab This tab displays all enroled users in the course.
-
Grades Tab This tab provides access to the course gradebook.
It may include items such as:
-
Student grades for assignments and quizzes
-
Overall course performance
-
Options to export or configure grading methods.
-
- Activities Tab
-
Use this tab to view all course activities, including quizzes, assignments, and forums.
-
- More Tab
-
Use this tab to access additional course management options such as Reports, Competencies, and Course Reuse tools.
-
- Edit Mode Toggle
-
Use this option to enable or disable editing. Once enabled, you can add/remove sections, rearrange activities, and update labels and descriptions.
-
- Course Management Section
This section provides key administrative tools for managing and maintaining the course.
It includes important options such as:
-
Edit course settings – Modify course name, summary, and format
-
Participants – View and manage enrolled users
-
Enrolment methods – Add or manage user enrolment
-
Grades / Gradebook setup – Configure and manage grading
- Course completion – Track course progress and completion criteria
-
Reports – View course activity and participation reports
-
Question bank – Manage questions for quizzes and assessments
- Use this section to efficiently manage course settings, users, and performance tracking.
-
- Add Activity or Resource / Add Subsection
-
Use this option to add new activities or resources and create subsections to organize course content.
-
7. Understanding Course Sections and Activities
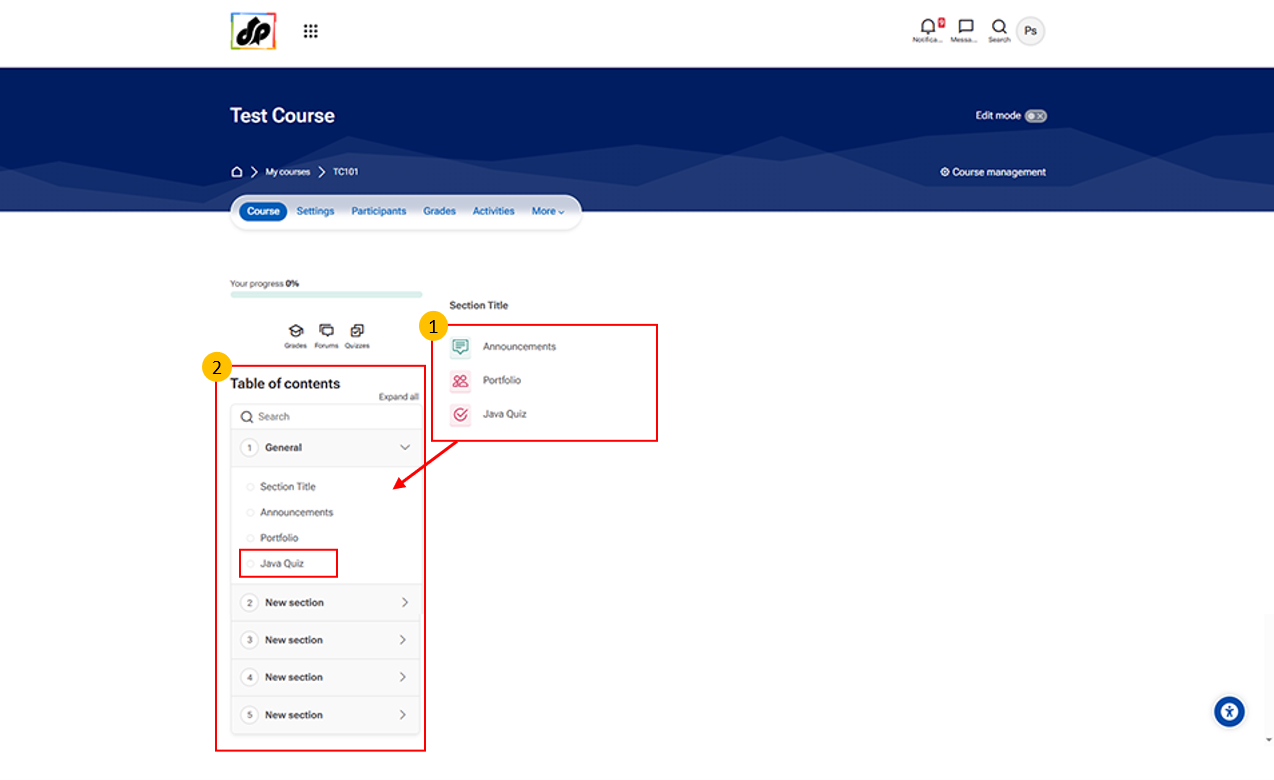
- Section Content Area
- This area displays the content within a selected section of the course.
- It may include items such as:
- Announcements
- Portfolio
- Quizzes or other learning activities
- Click on any item to open and view its details.
8. Adding Activities and Resources
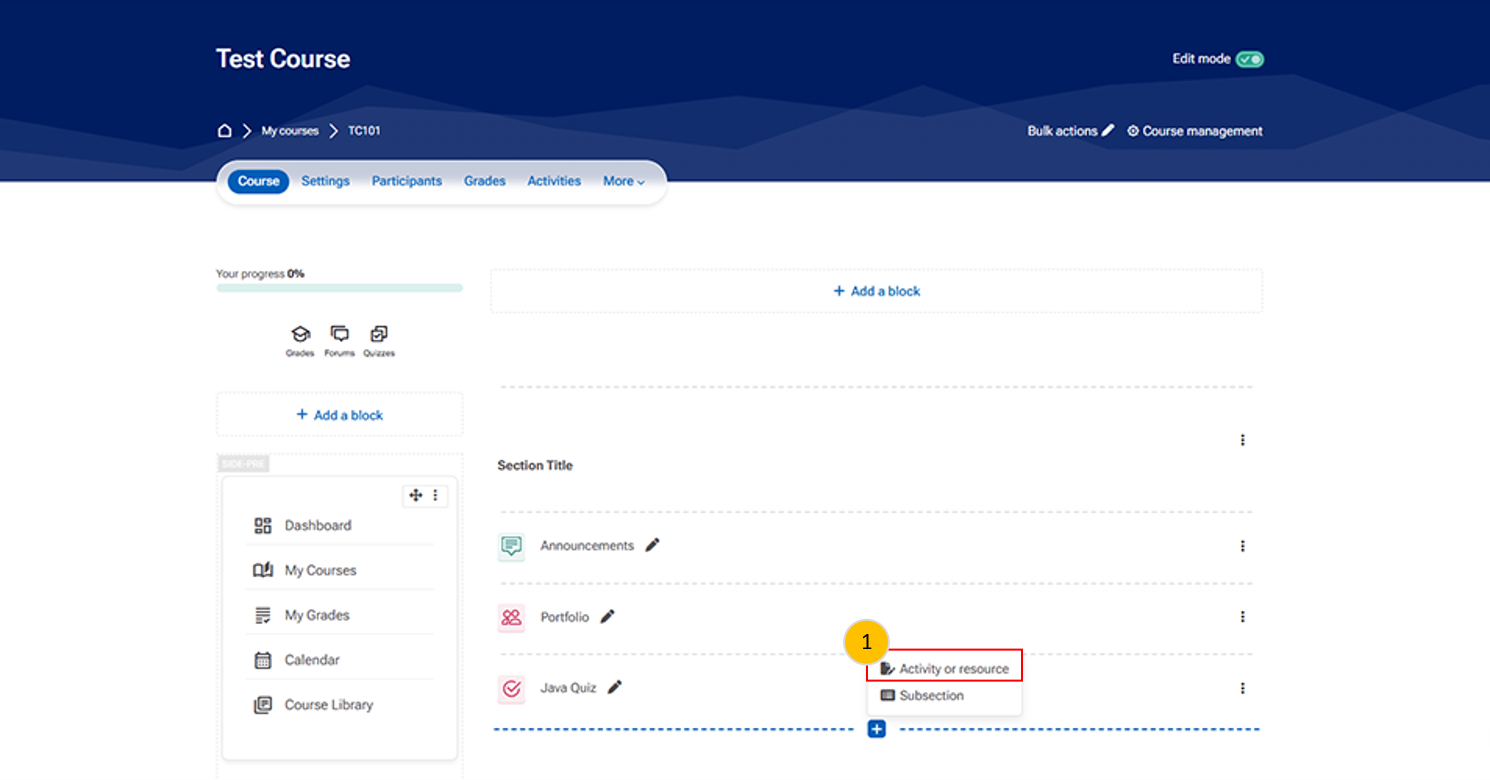
- Use this option to add new activities or resources and create subsections to organize course content.
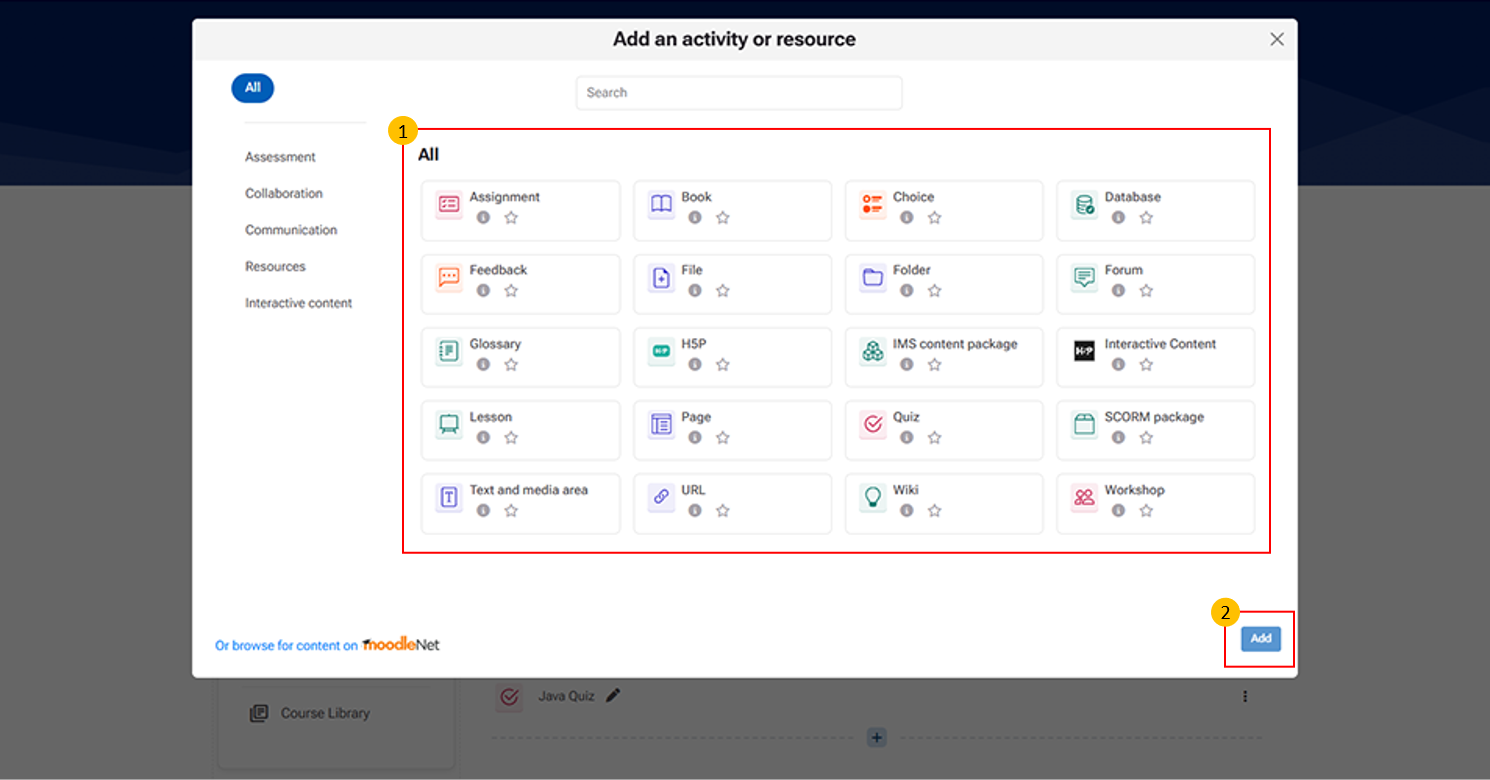
- Activity/Resource Category Tabs
- This section allows you to filter available activities and resources by category.
- It may include categories such as:
- Assessment (e.g., Assignment, Quiz, Workshop)
- Collaboration (e.g., Wiki, Database, Glossary)
- Communication (e.g., Forum, Choice, Feedback)
- Resources (e.g., File, Folder, Page, URL)
- Interactive Content (e.g., H5P, Lesson, SCORM package)
- Add Button
- This button confirms your selection and adds the chosen activity or resource to the course section.
8.1. Assignment
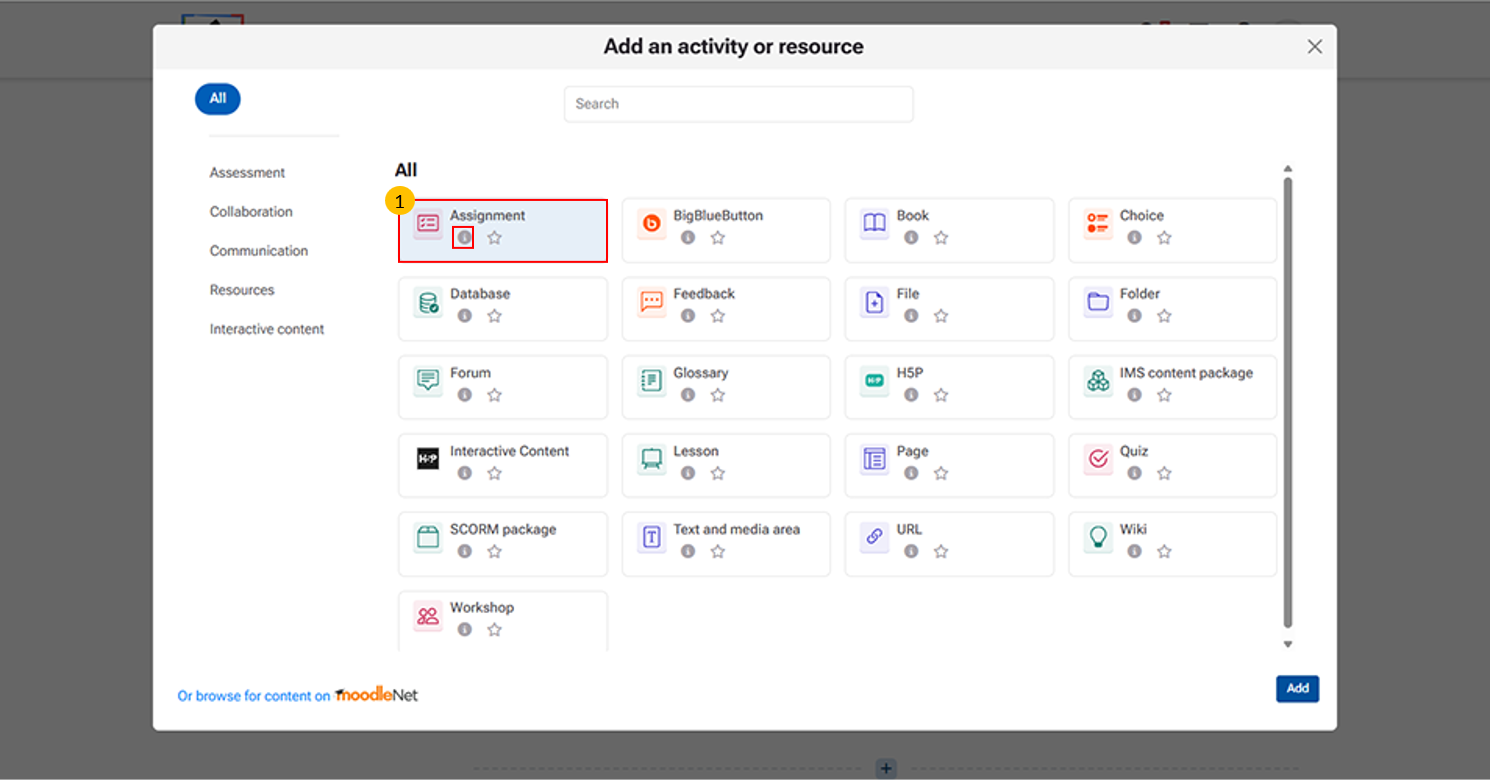
Assignment activity allows instructors to collect work from students, review it, and provide feedback.
“i” icon provides quick access to additional information about each activity or resource. It may include:
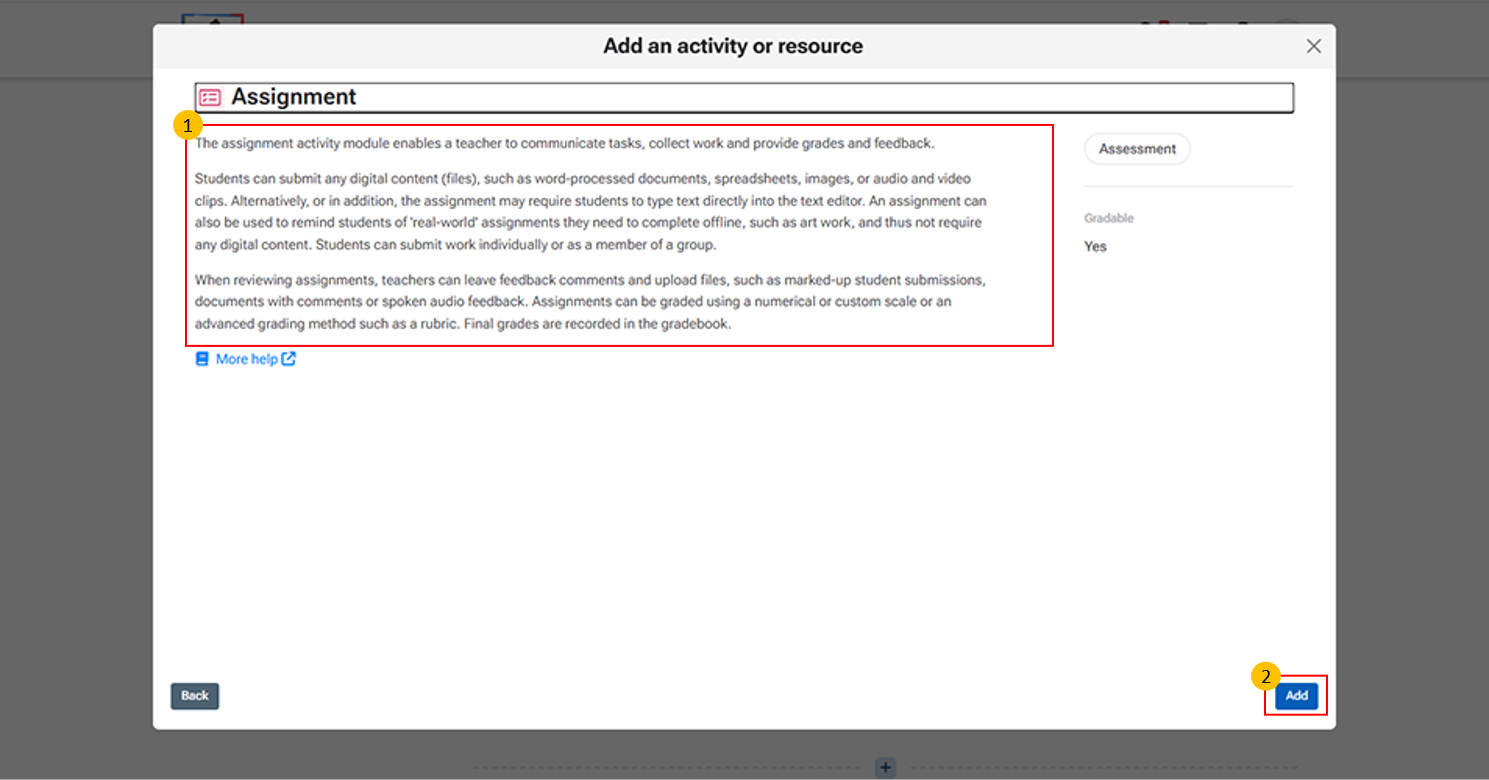
This section provides detailed information about the Assignment activity module in Moodle.
Add Button: This button is used to confirm the selection of an activity or resource and insert it into the course.
Click "More help" to open the official Moodle LMS help page with detailed information on the Assignment activity, including its features and settings.
- Assignment Creation Form
- This section provides detailed information about the Assignment activity module in Moodle.
- This section is used to configure all assignment details.
- Enter the Assignment Name and add a Description or instructions.
- Use Additional Files to upload reference materials.
- Set Availability dates such as start date, due date, and cut-off date.
- Choose Submission Types (file upload, online text, etc.).
- Configure Submission settings, Feedback, and Grading options as required.
- You can also set Restrictions, Notifications, and Completion conditions.
- Save and return to course – Saves and goes back to the course page
- Save and display – Saves and opens the assignment
- Cancel – Discards changes
8.2. Quiz
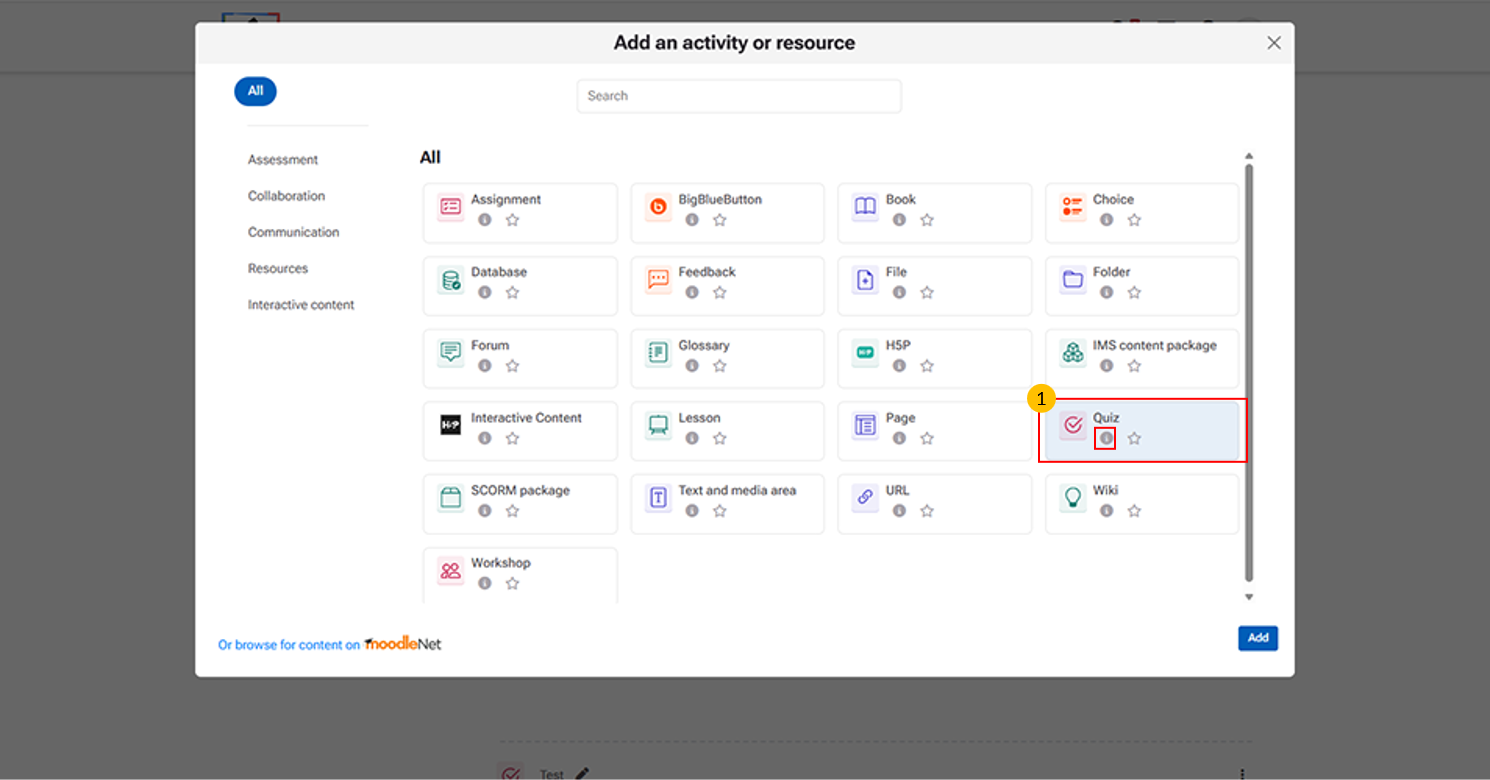
- Quiz Option This activity allows instructors to create online tests and assessments for students.
- “i” icon provides quick access to additional information about the Quiz activity.
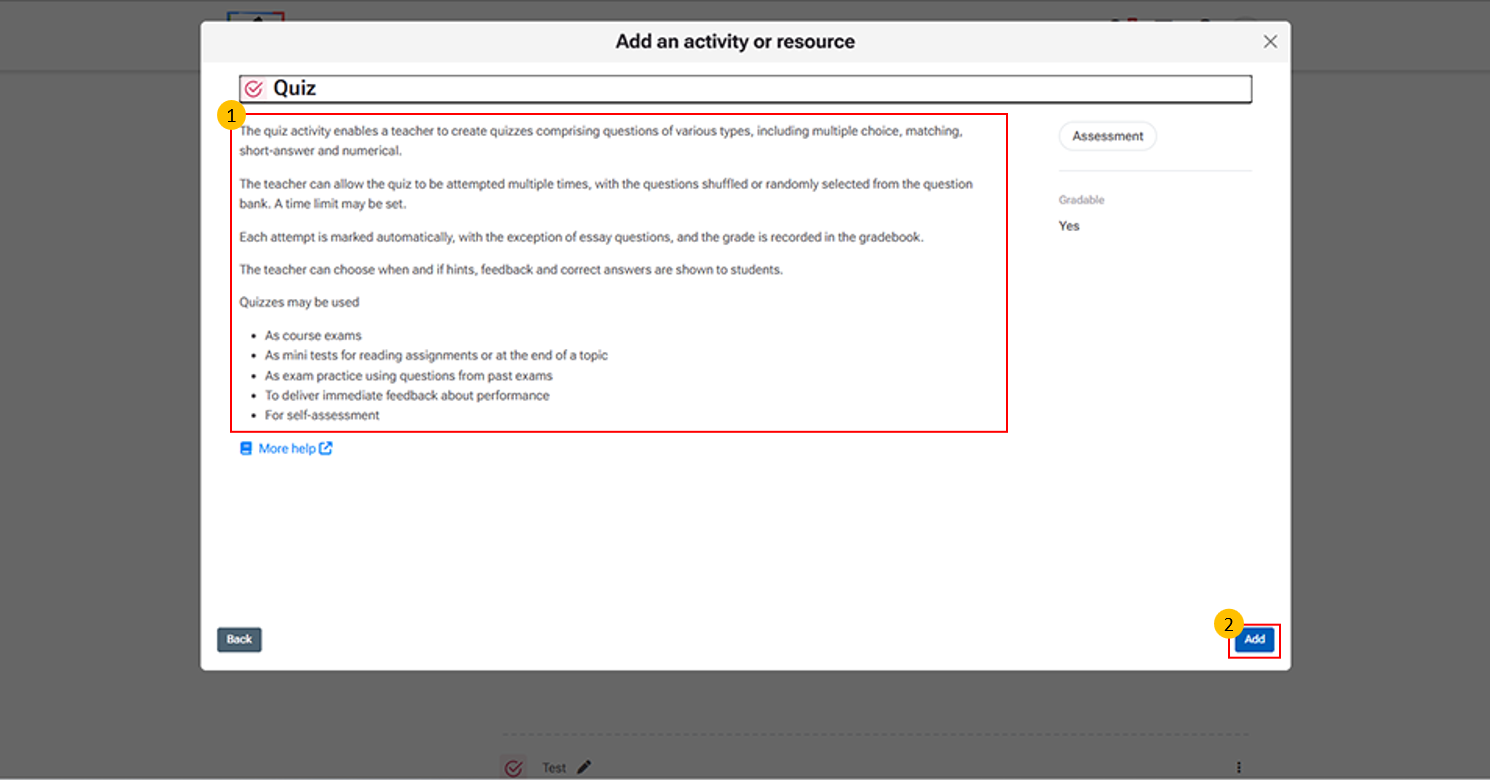
- Quiz Description Panel
- This section provides an overview of the Quiz activity:
- Purpose – Create quizzes with various question types (MCQ, short answer, etc.)
- Attempts & Randomization – Allow multiple attempts and shuffle/random questions
- Timing – Set time limits for quiz completion
- Grading – Auto-graded (except essays) and recorded in gradebook
- Feedback – Control when feedback and correct answers are shown
- Use Cases – Exams, practice tests, or self-assessments
- Add Button:
- This button is used to confirm the selection of an activity or resource and insert it into the course.
-
Click "More help" to open the official Moodle LMS help page with detailed information on the Quiz activity, including its features and settings.
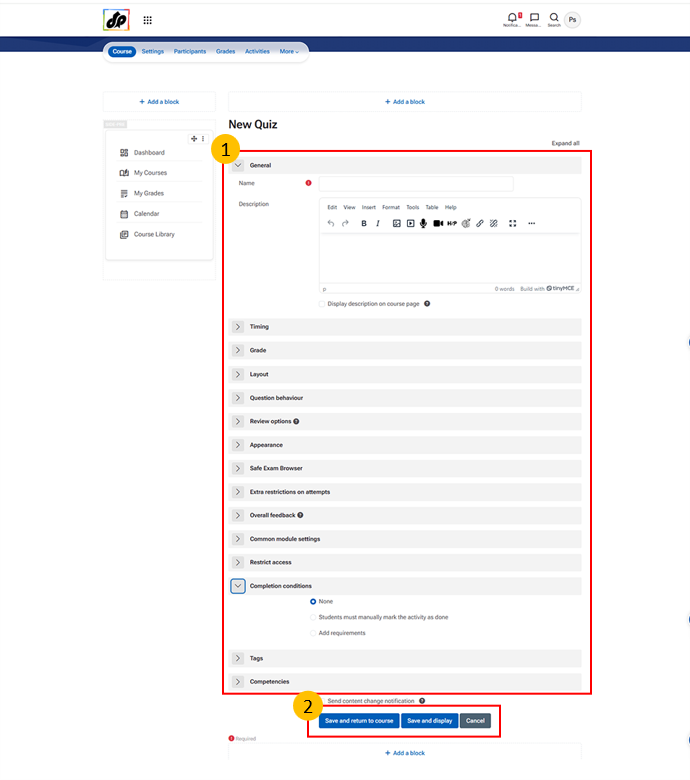
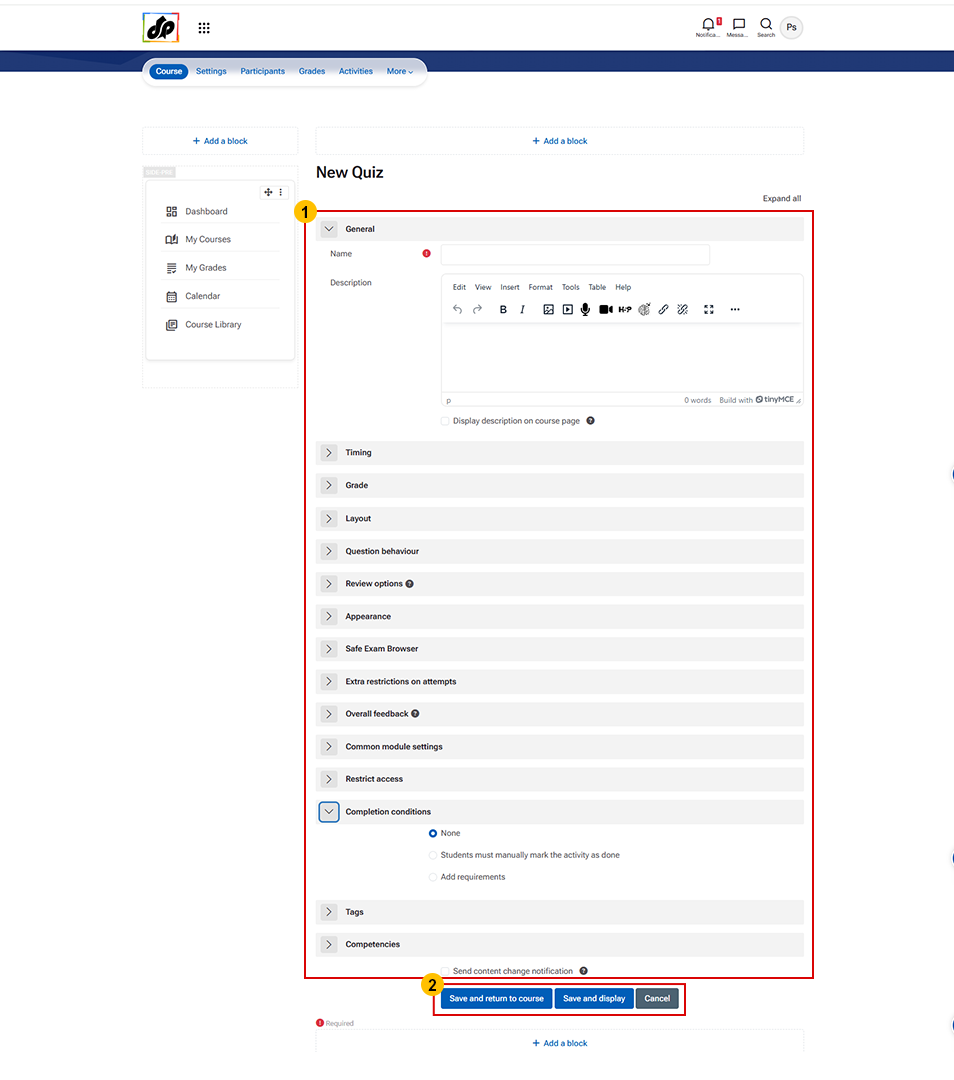
- General Section (Quiz)
- This section is used to define the basic details of the quiz.
- Name
- Enter the title of the quiz as it will be displayed to students.
- Description
- Provide instructions, guidelines, or any important information related to the quiz.
- Text Editor
- Use formatting options such as bold, italic, bullet points, and alignment to structure the content clearly.
- Display on Course Page
- Choose whether the description should be shown directly on the course page or only after opening the quiz.
- Save and return to course (saves the quiz and takes the instructor back to the course page)
- Save and display (saves the quiz and immediately opens it for further editing or preview)
- Cancel (discards changes and exits without saving)
8.3. Quiz Overview & Management
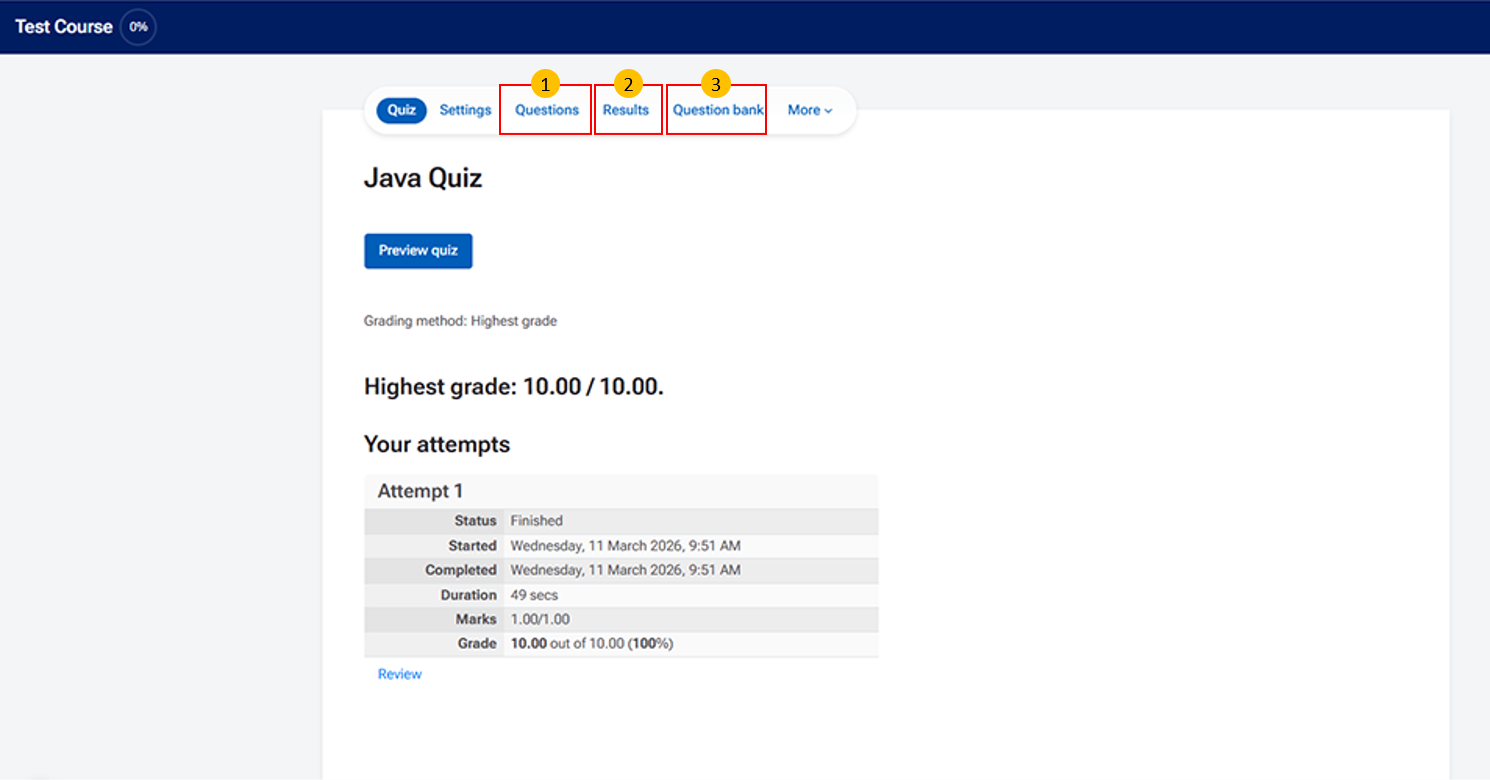
- Questions Tab This area displays the list of questions included in the quiz.
-
Results Tab This area provides a summary of student performance in the quiz.
-
Question Bank Tab This area stores all available questions for the course.
8.4. Page
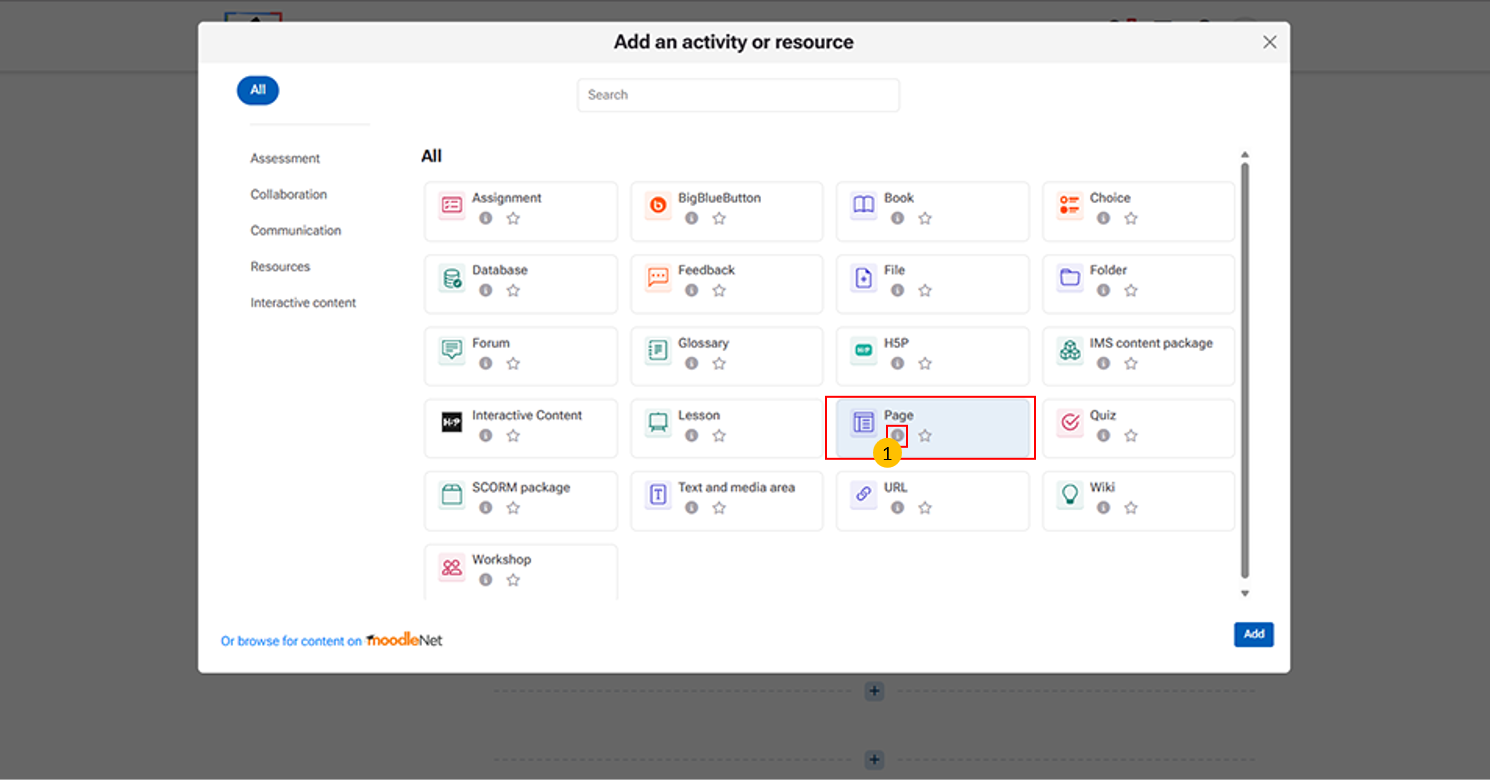
Page Activity: This resource allows instructors to create a single, scrollable page of content within a course.
“i” icon provides quick access to additional information about the Page activity.
-
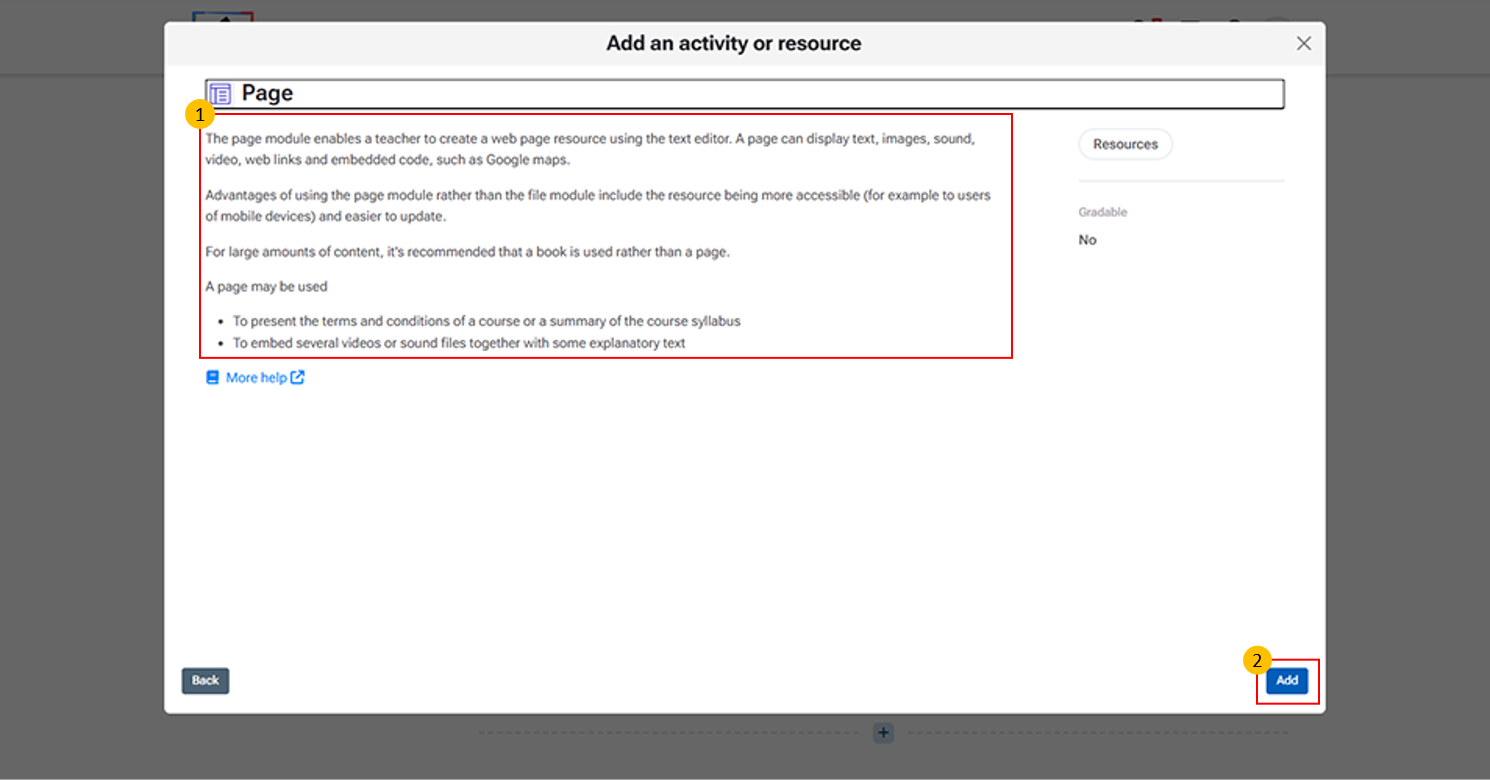
Page Description Panel:
- This section provides an overview of the Page resource in Moodle LMS.
- Allows teachers to create a web page using the text editor to present course content.
- Content Types: Supports text, images, audio, video, web links, and embedded content (e.g., maps or external media).
- Advantages: Easily accessible on all devices, including mobile
- Simple to edit and update without re-uploading files.
Recommendations:
- Use Page for short to medium content
- Use Book for large, multi-page content
- Use Cases:
- Sharing course information or syllabus
- Embedding videos or audio with explanations
-
Click "More help" to open the official Moodle LMS help page with detailed information on the Page activity, including its features and settings.

Steps for Creating a Page Activity:
- Enter a Name – This is the title visible to students.
- Add a Description – Provide instructions or context (optional).
- Add Page Content – Use the text editor to include text, images, links, or media.
- Configure Appearance and Access – Set visibility, restrictions, or access conditions if required.
- Set Completion Conditions – Define when the activity will be marked as complete.
- Add Tags – Helps in organizing and searching the page later.
- Click Save – Choose Save and return to course or Save and display to finalize.
8.5. URL
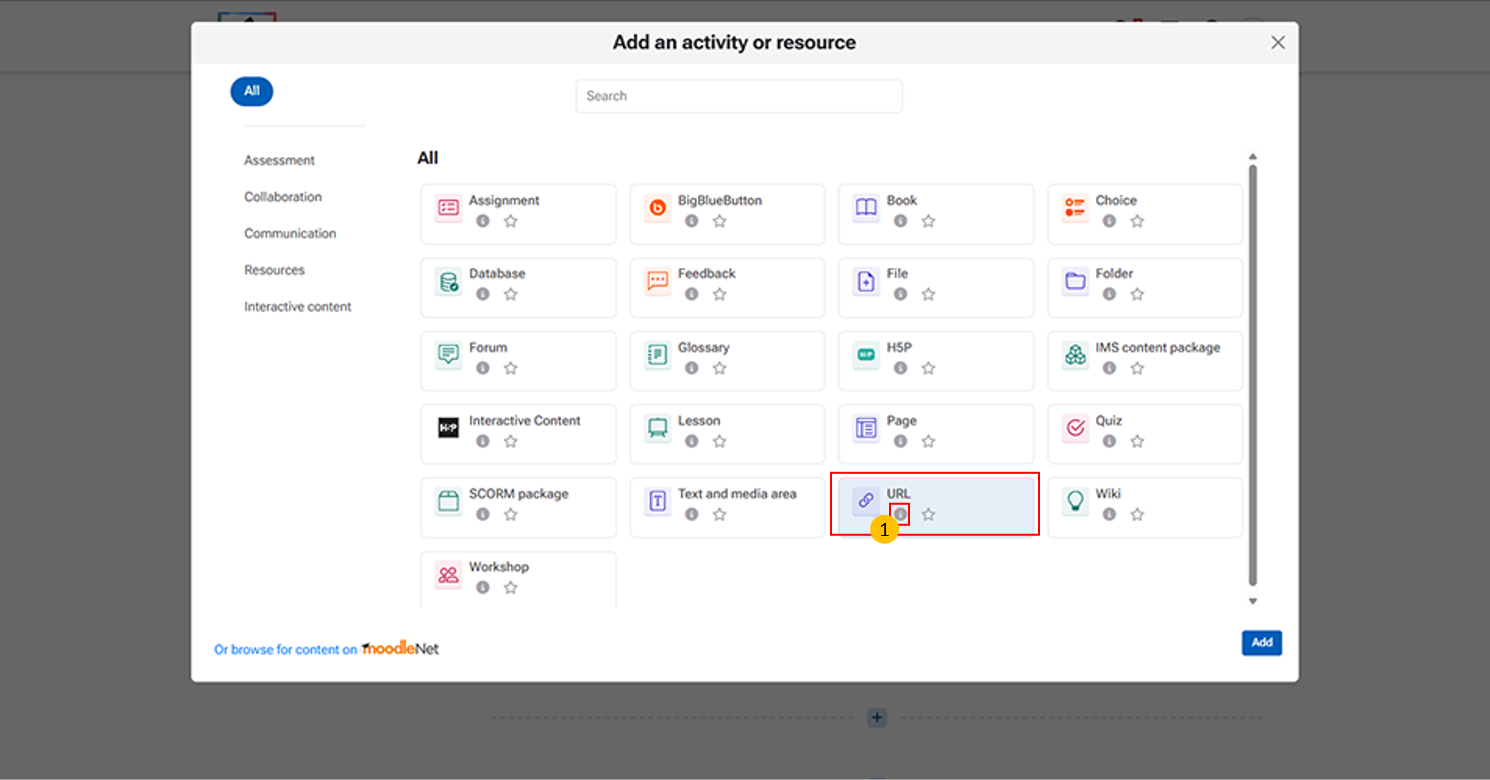
The URL activity is a simple way to connect your Moodle course with external online content.
“i” icon provides quick access to additional information about the URL activity.
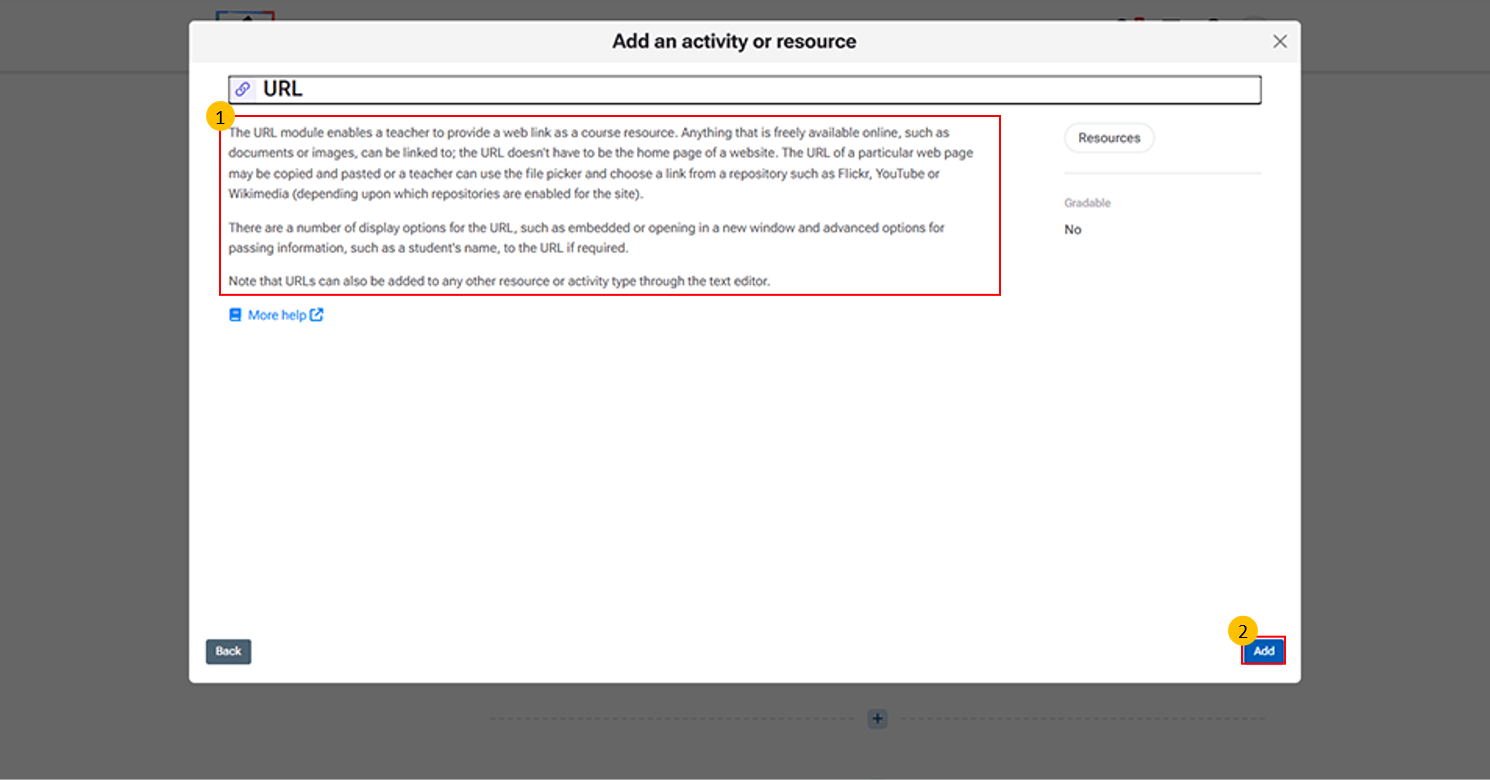
URL Activity Page Display
- Description panel → Explains that the URL module lets teachers add a web link as a course resource.
- Content options → Links can be copied/pasted directly or chosen from repositories (e.g., YouTube, Flickr, Wikimedia).
- Display settings → Choose how the link opens (embedded, new window, or inline).
- Advanced options → Can pass information (like student name) to the linked site if required.
- Add button → Confirms selection and opens configuration to enter the web address and settings.
-
Click "More help" to open the official Moodle LMS help page with detailed information on the URL activity, including its features and settings.
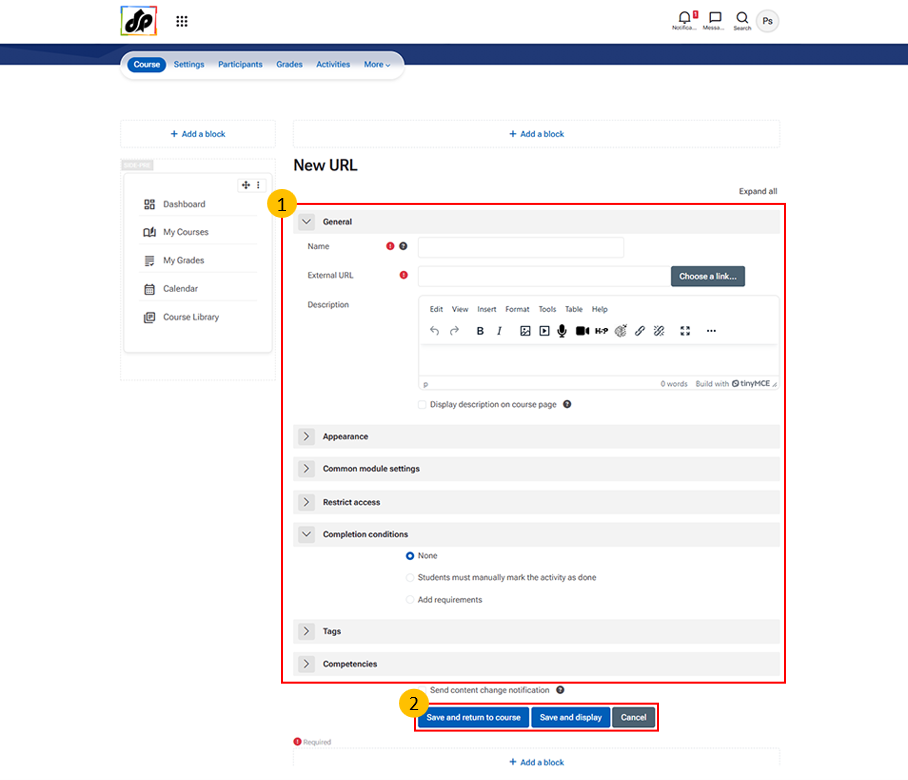
Steps for Creating a URL Resource
- Enter a Name → Title students will see in the course.
- Add External URL → Paste the web link (e.g., article, video, or tool).
- Add Description → Optional instructions or context for the link.
- Adjust Settings → Use Appearance, Access, or Completion options if needed.
- Save → Choose Save and return to course or Save and display.
8.6. SCORM Package
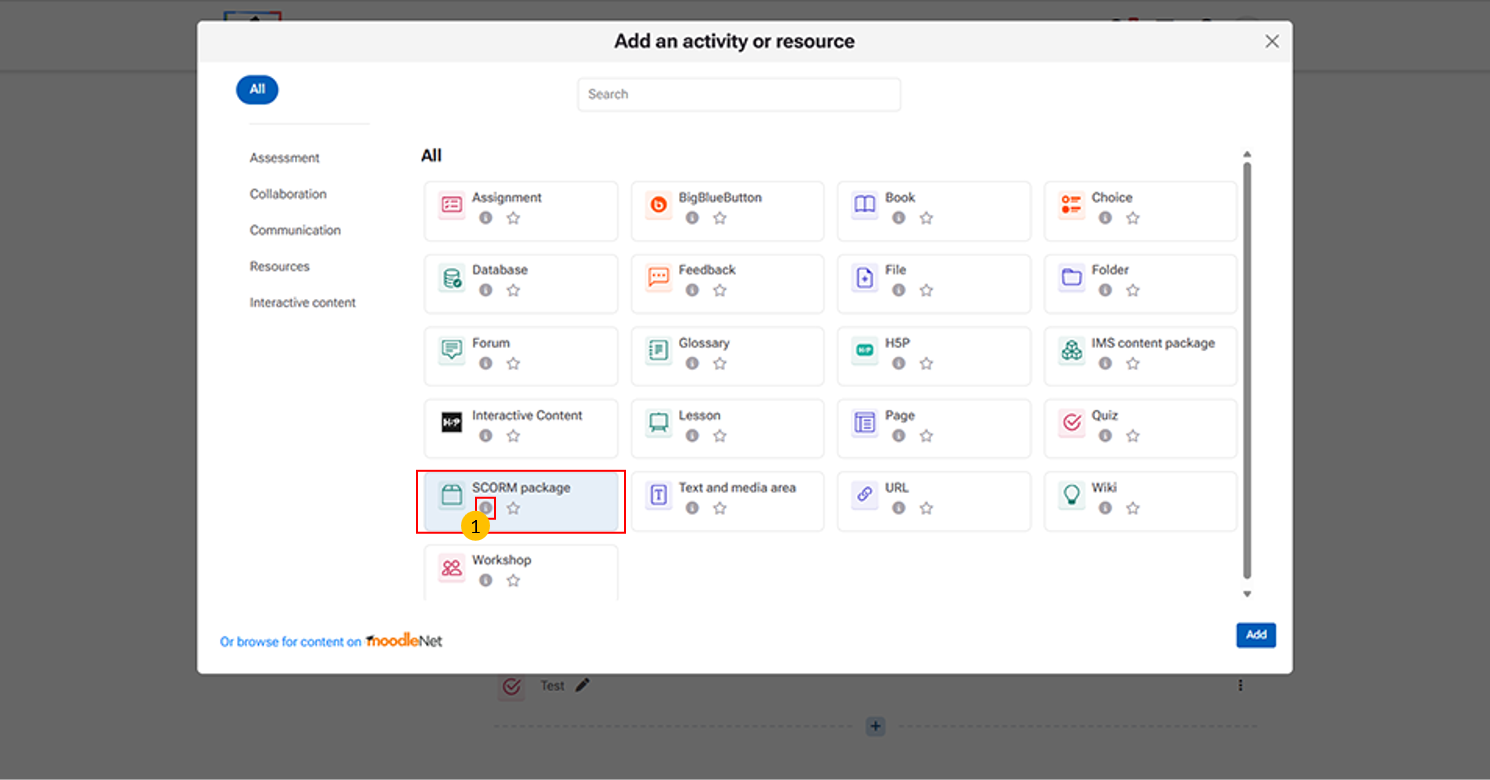
Allows teachers to upload and deliver standardized e-learning content (SCORM/AICC packages).
“i” icon provides quick access to additional information about the SCORM package activity.

This page essentially shows the overview of SCORM functionality and provides the entry point for adding it into a course.
Add button → Confirms selection and opens configuration for uploading the SCORM file.
Click "More help" to open the official Moodle LMS help page with detailed information on the SCORM activity, including its features and settings.

Steps for Creating a SCORM Package Activity
- Enter a Name → Title of the activity students will see.
- Add a Description → Provide instructions or context (optional).
- Upload Package File → Use Choose a file to upload the SCORM/AICC .zip package.
- Configure Settings → Adjust appearance, availability, compatibility, grading, and attempts.
- Set Completion Rules → Define activity completion and restrictions if needed.
- Add Tags/Competencies → Helps organize and link to learning outcomes.
- Save → Use Save and return to course or Save and display to finalize.
9. Managing Course Participants and User Enrolment
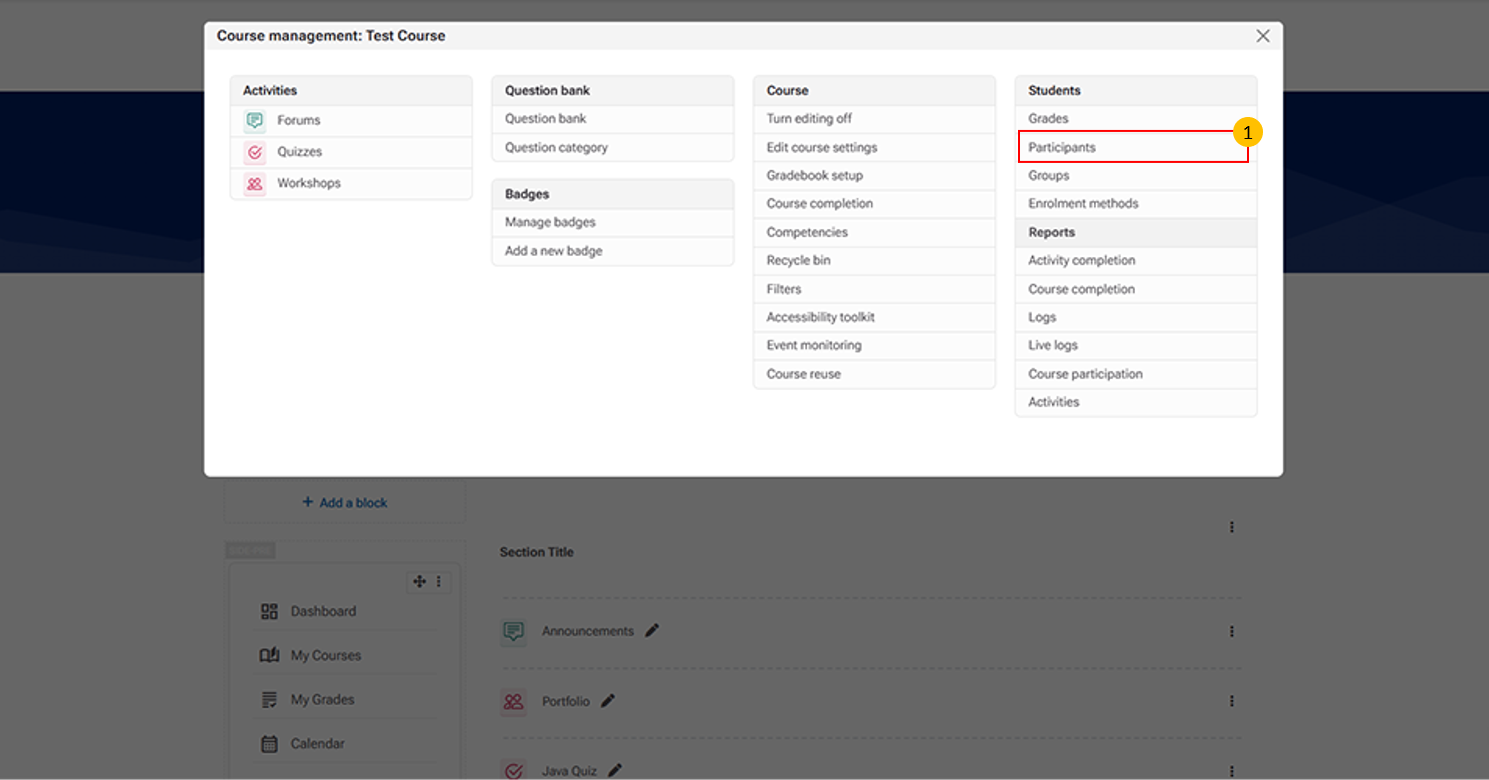
- Participants Tab: This tab displays all enroled users in the course.

- Enrol Users Button
-
This option allows instructors or administrators to add participants to the course.
-
- Participant List
This section displays all users currently enroled in the course.
It includes details such as:
-
-
Name and email address – For identification and communication
-
Role – Indicates the user’s role (e.g., Student, Teacher, Manager)
-
Group membership – Shows the group assigned to the user
-
Last access – Displays the user’s most recent activity
-
Status – Indicates whether the user is active or inactive
-
Edit option – Allows you to modify user roles or details
-
-
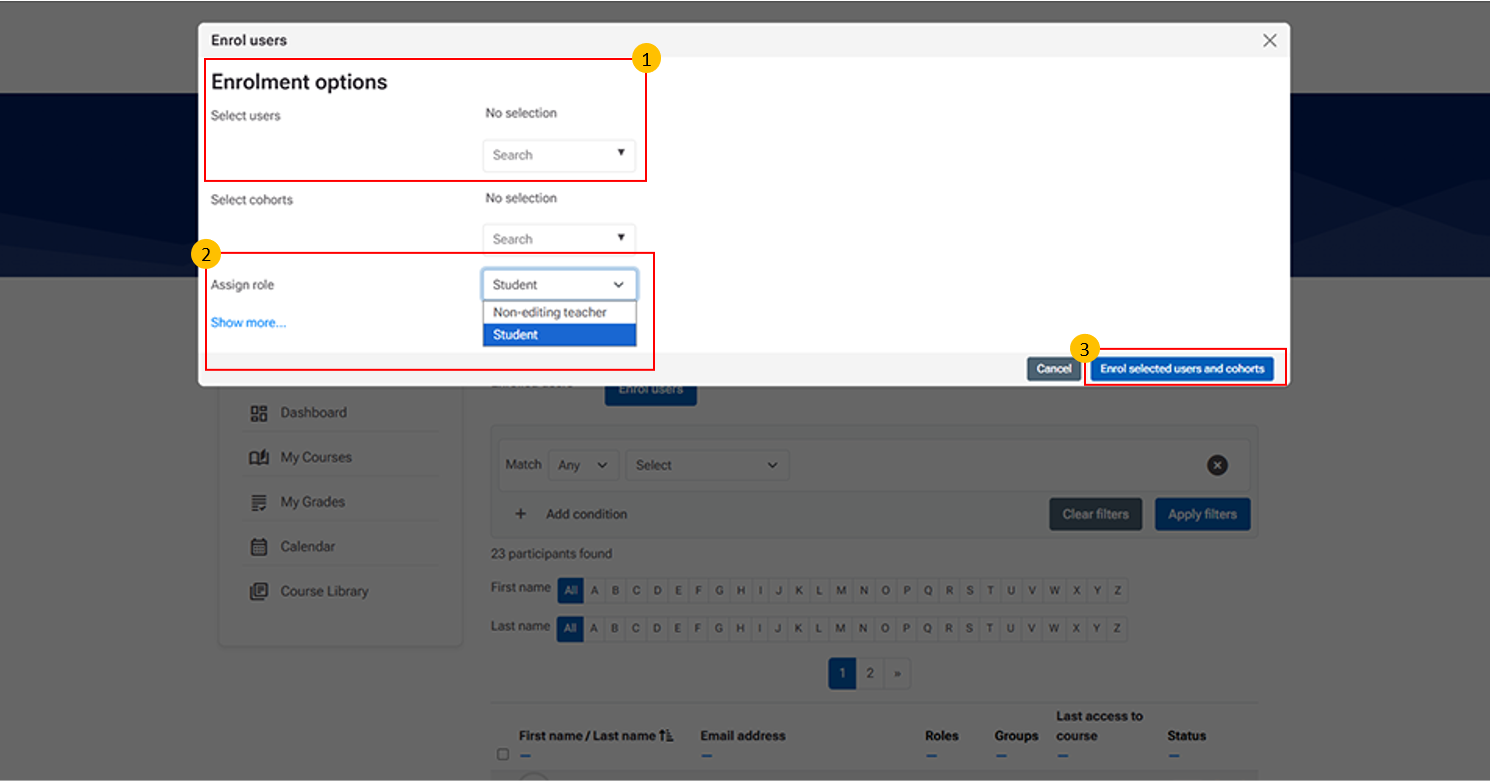
- Select Users / Select Cohorts
This section allows you to choose participants to enrol in the course.
You can select:
-
-
Users – Individual participants from the system
-
Cohorts – Predefined groups of users
-
-
-
Assign Role Dropdown
This option allows teachers to assign appropriate roles to the selected users or cohorts during enrolment.
-
Common roles include:
-
Student – Assigned to learners who will access course content and activities
-
Non-editing teacher – Assigned to users who can teach and grade but cannot modify course content
-
-
- Clicking “Enrol selected users and cohorts” finalizes the process and enrolls the participants in the course.
10. Grade
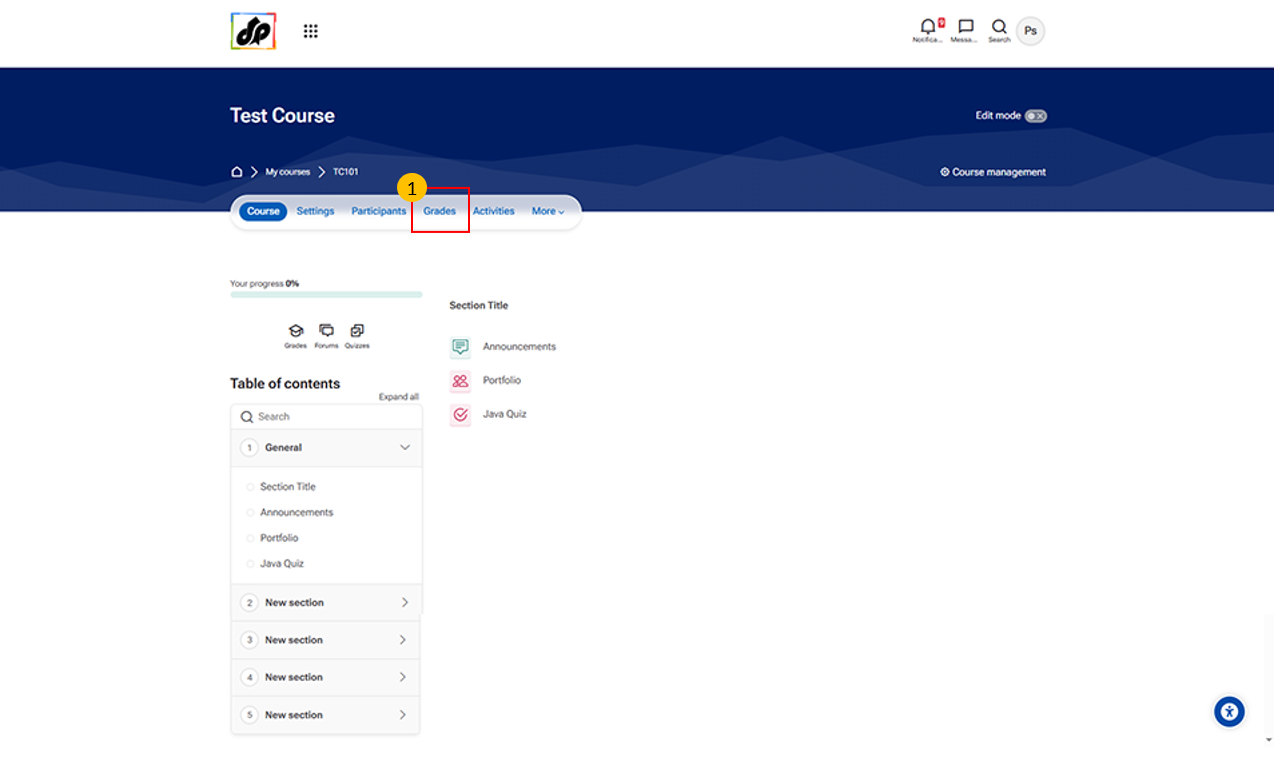
- Grades Tab This tab provides access to the course gradebook.
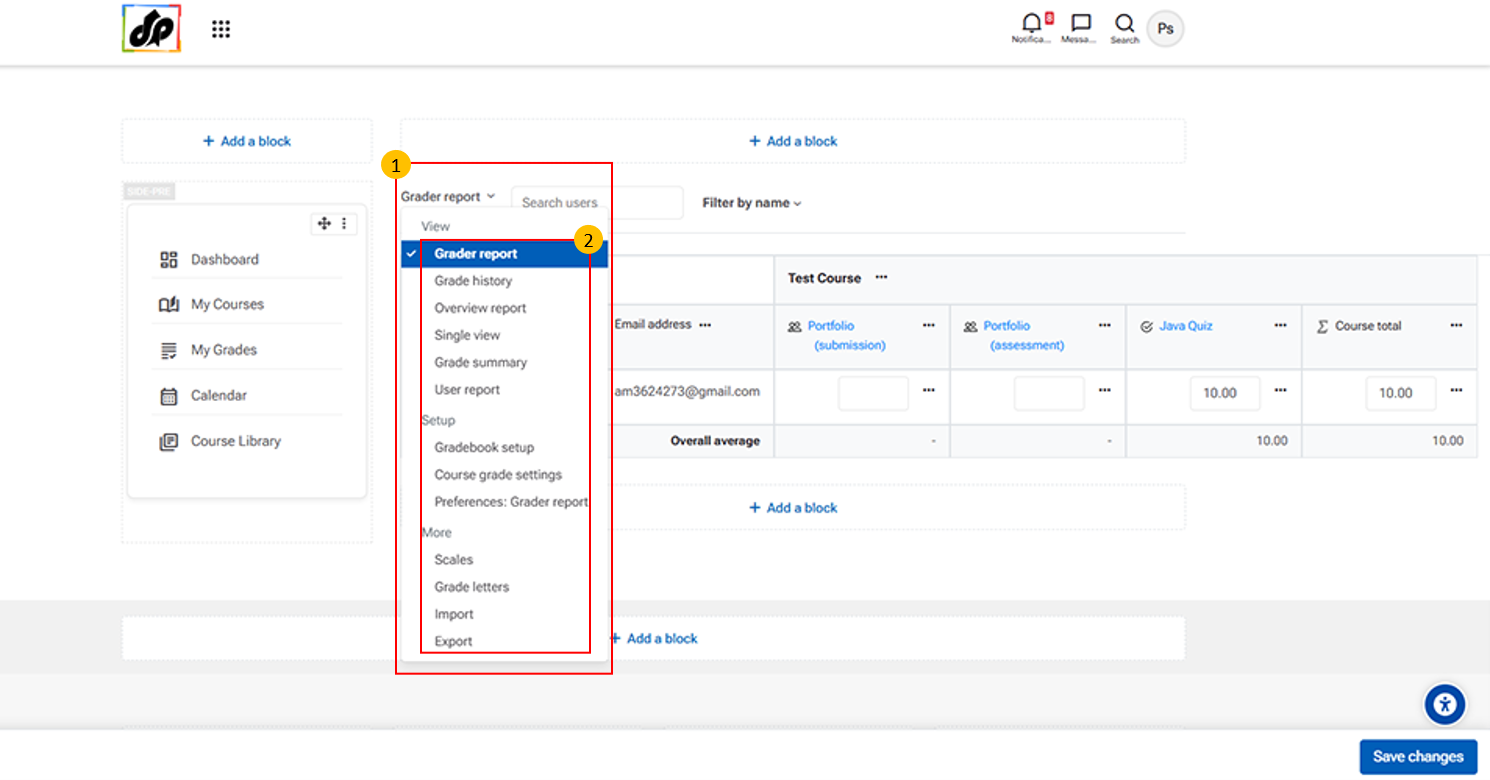
- Gradebook Dropdown Menu
-
This menu allows teachers to access different gradebook views and management tools.
-
It includes options such as:
-
-
Grader report – Provides an overview of all student grades
- User report – Displays detailed grades for an individual student
-
Single view – Focuses on one student or one activity
-
Grade history – Shows records of past grade changes
-
Overview report – Summarizes grades across courses
-
Gradebook setup – Configure grade categories, items, and calculations
-
Import/Export – Import or export grade data
-
-
-
Use this menu to view, manage, and analyze student performance within the course.
-
10.1. Grade Report
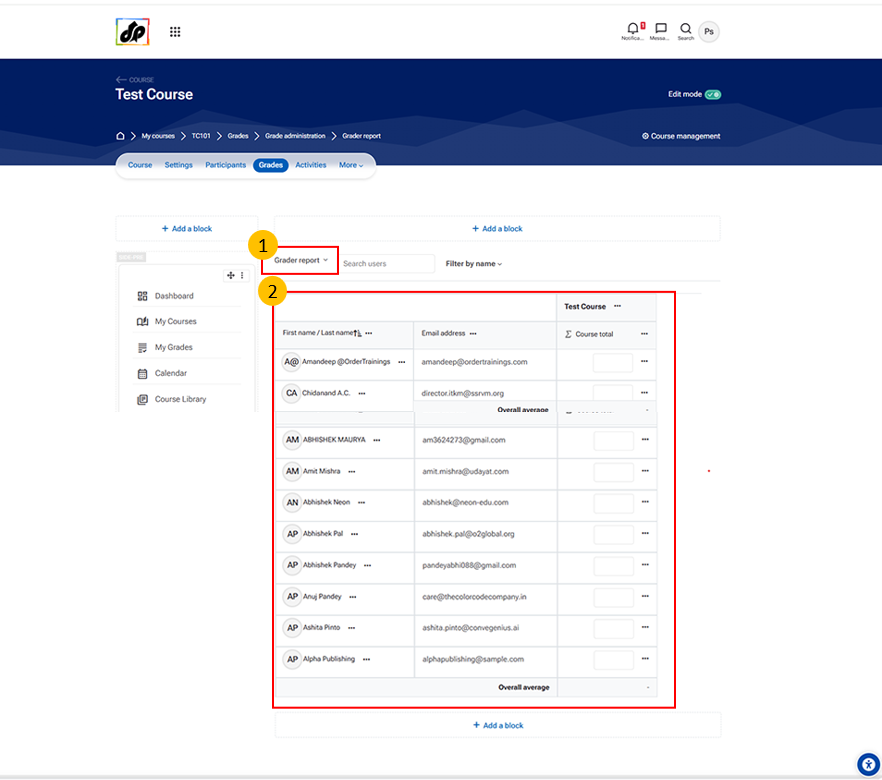
- Grader Report Tab
- The Grader Report allows teachers to view and manage student grades in a tabular format.
-
It displays:
- List of students (rows)
- Grade items like assignments, quizzes (columns)
-
This is the default and most commonly used grading interface.
- Student Grades Table
- This section shows a complete overview of grades for all students.
- Key elements:
- Student Name Column
- Displays enrolled students in the course
- Grade Columns
- Each column represents an activity (Assignment, Quiz, etc.)
- Shows marks obtained by each student
- Editable Fields
- Teachers can enter or update grades directly
- Course Total Column
- Displays the overall grade of each student
- Student Name Column
10.2. Grade History
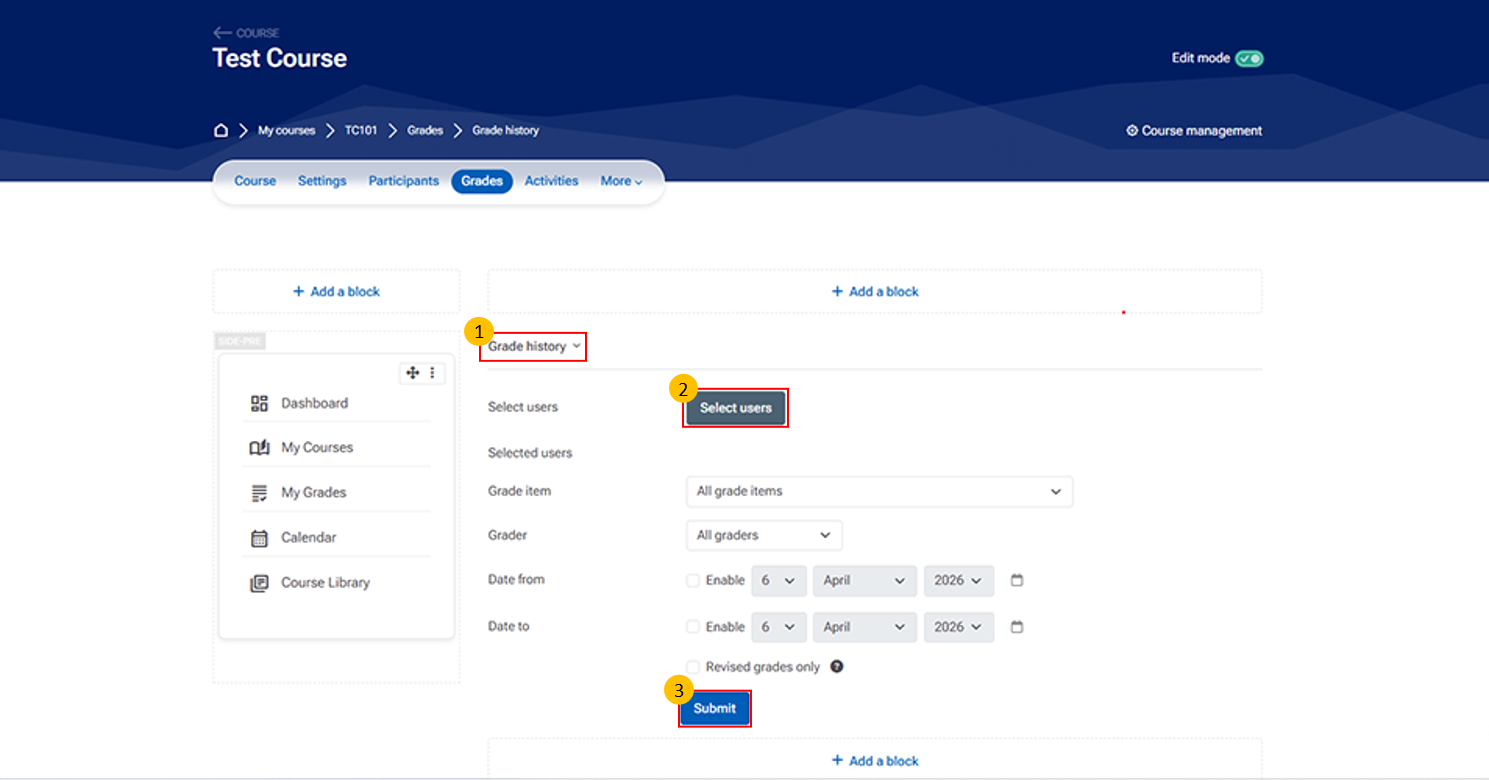
- Grade History:
- The Grade History section allows teachers to track changes made to grades over time. It provides a record of who modified grades, what changes were made, and when.
- Select Users
- Allows you to choose specific students You can:
- View grade history for selected users
- Leave blank to view for all users
- Allows you to choose specific students You can:
- Submit Button
- Click to generate the Grade History report
- Displays results based on selected filters
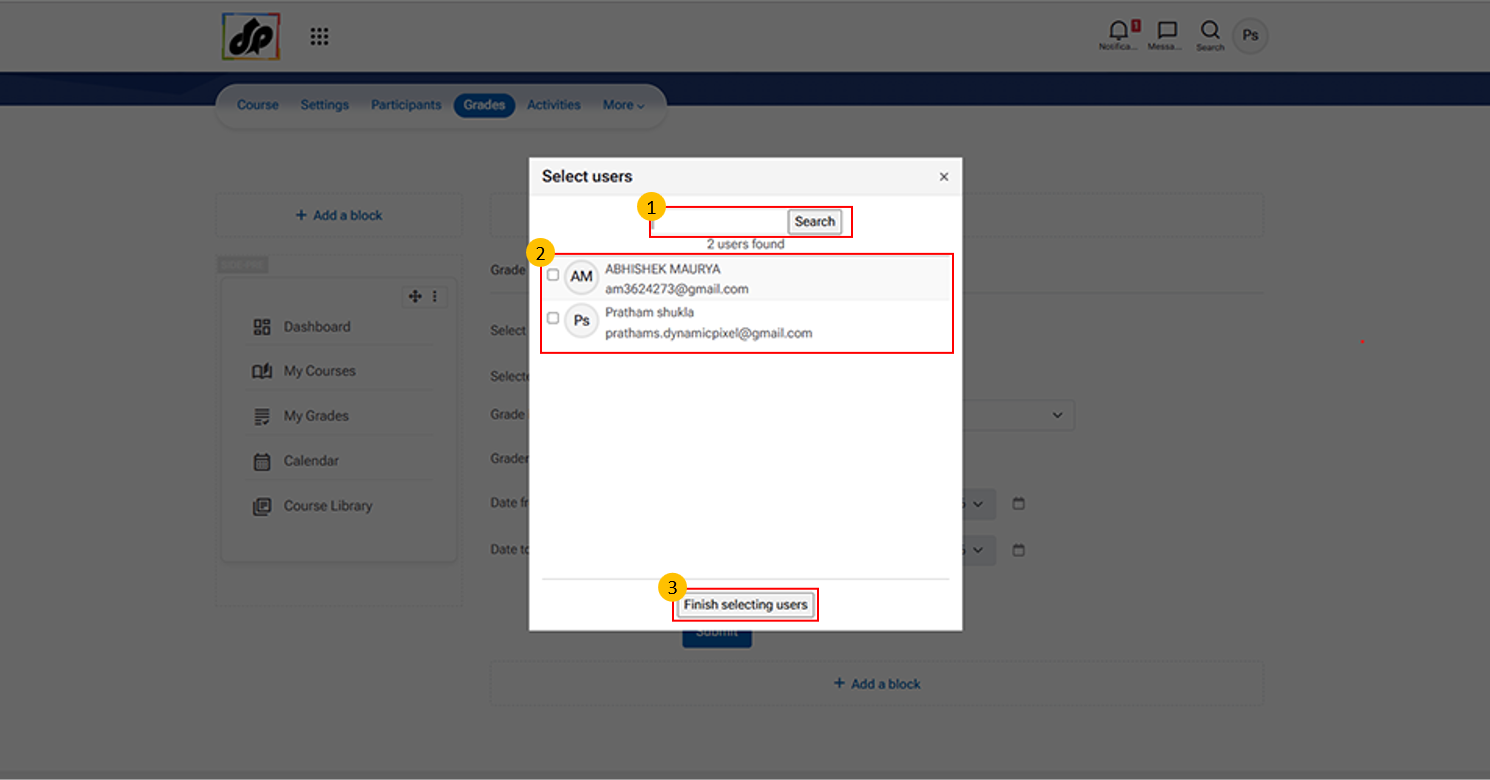
- When you click on “Select users” in the Grade History section. It allows teachers to choose specific students for viewing grade records.
- Multiple users can be selected if needed
- Finish Selecting Users Button
- Click this button after selecting users
- Adds selected users to the Grade History filter
10.3. Overview Report
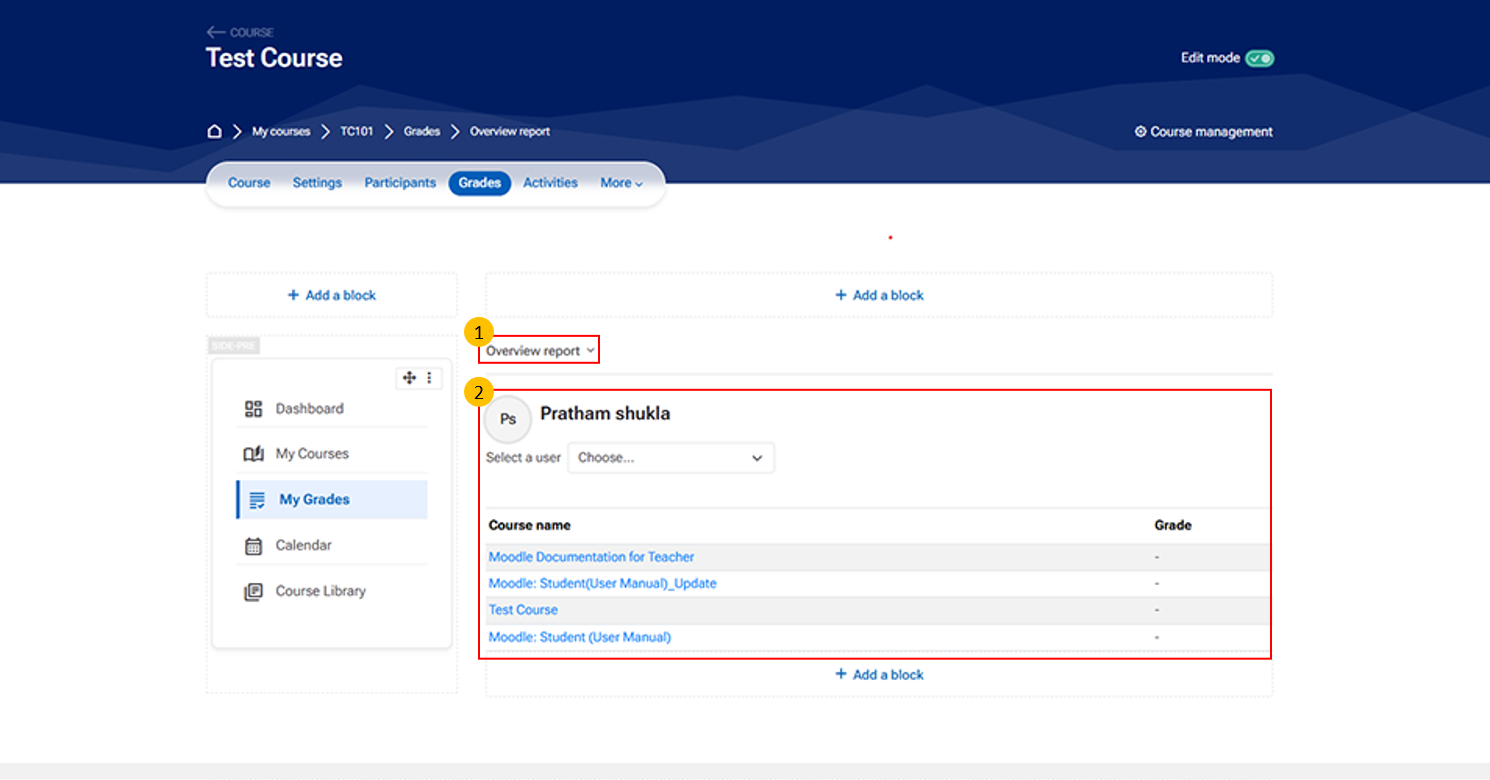
- Overview Report Tab
- The Overview Report allows teachers to view a summary of a student’s grades across different courses or grade items.
- Student Grade Summary Section
- This section displays grade details for a selected student.
- Key elements:
- Student Name
- Displays the currently selected user
- Select a User Dropdown
- Allows you to switch between students
- Course Name Column
- Lists courses or grade items
- Grade Column
- Shows the corresponding grades
10.4. GradeBook Setup
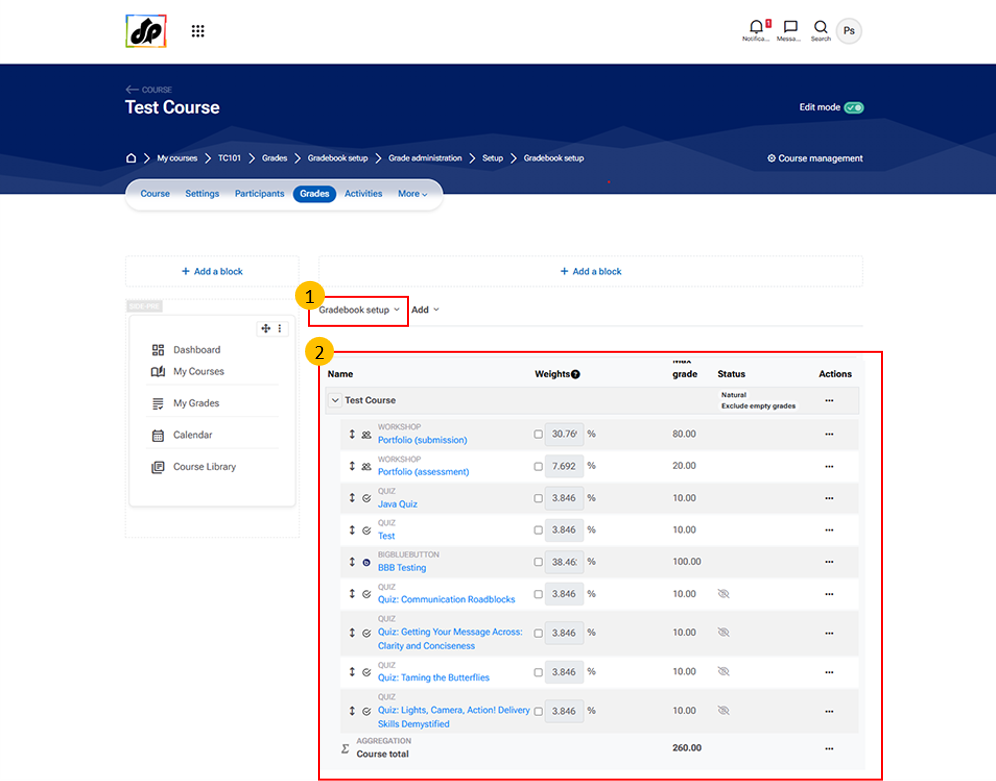
The Gradebook Setup section allows teachers to organize, structure, and control how grades are calculated in a course.
It helps you define how different activities (assignments, quizzes, etc.) contribute to the final grade.
- Grade Categories used to group related activities Examples:
- Assignments
- Quizzes
- Exams
- Grade Items Individual graded activities such as:
- Assignments
- Quizzes
- Manual grade entries
- Weightage (Weights) Defines the importance of each category or activity Example:
- Assignments = 40%
- Quizzes = 30%
- Final Exam = 30%
- Aggregation Method Determines how final grades are calculated.
10.5. Grade Summary
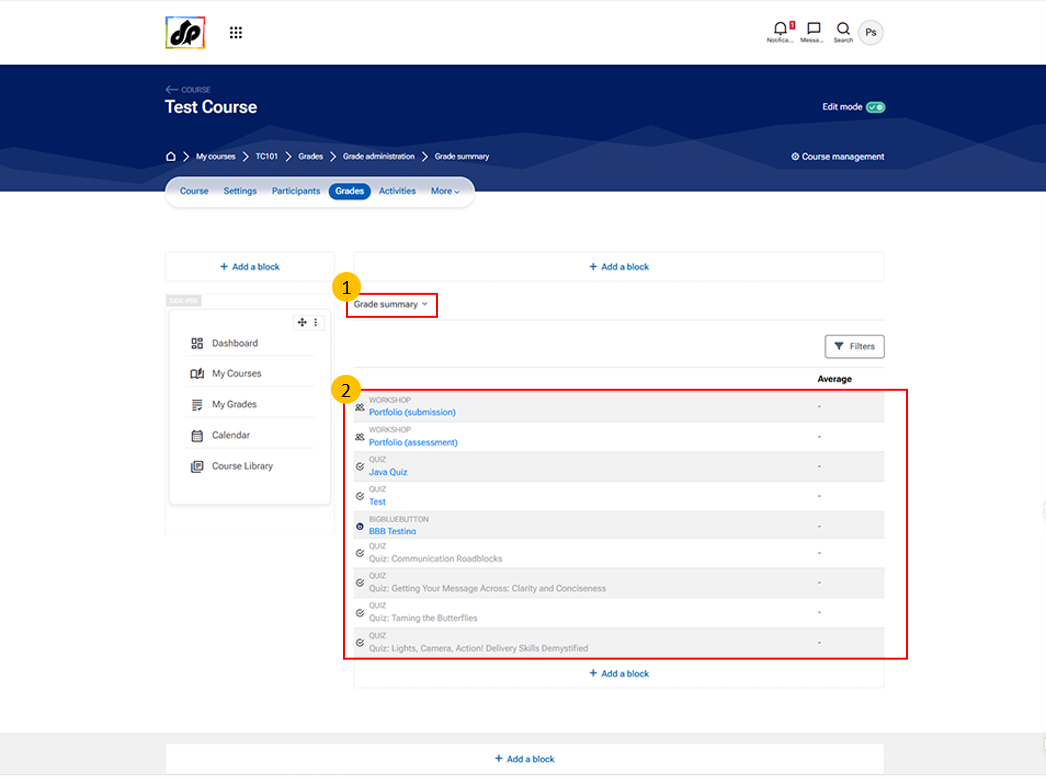
- The Grade Summary provides a quick overview of a student’s overall performance in the course. It highlights key grading information without showing detailed activity-wise marks.
- Course Total
- Shows the final or overall grade of the student Calculated based on:
- All graded activities
- Assigned weightages
- Shows the final or overall grade of the student Calculated based on:
10.6. User Report
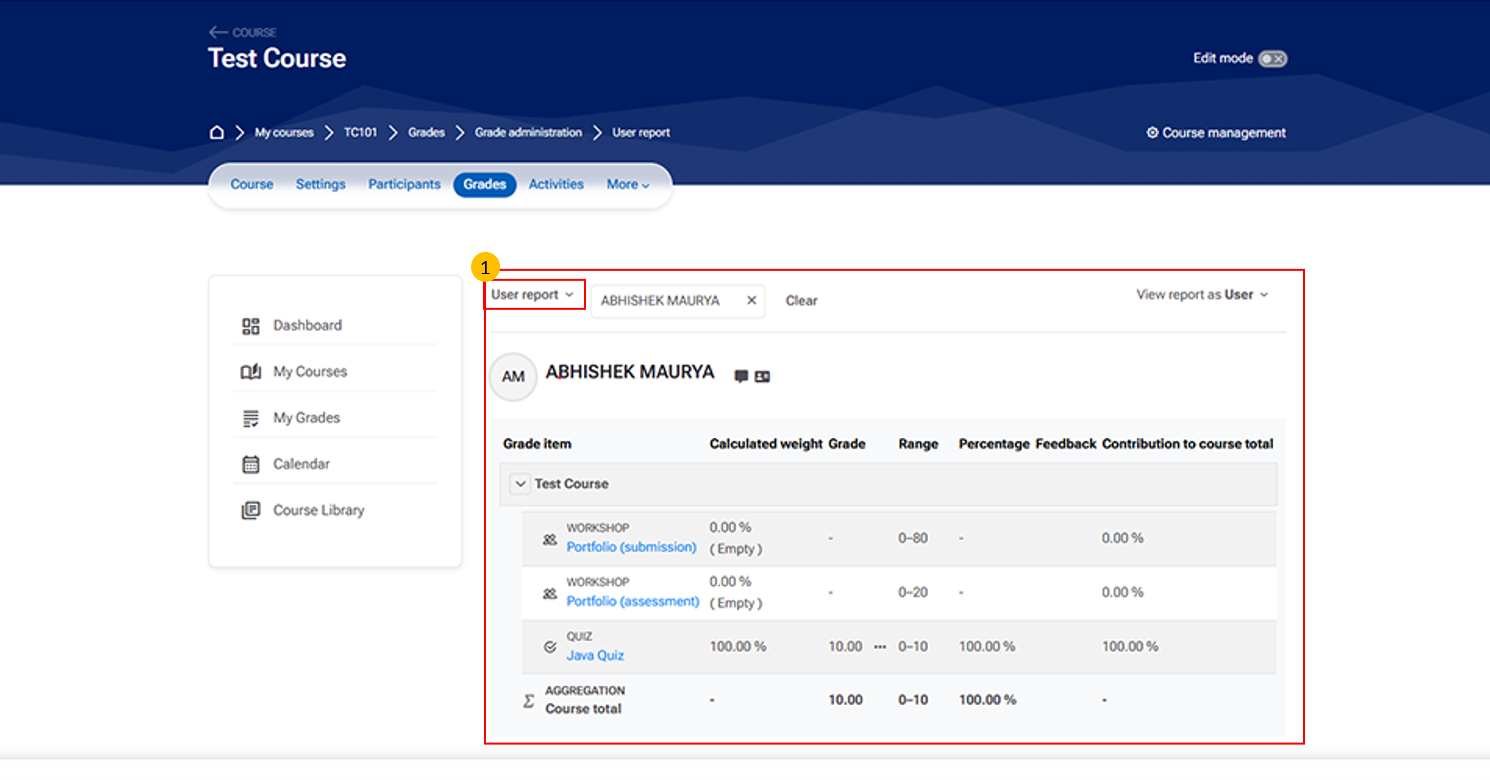
- User Report Section
-
This section allows teachers to view the grade details of an individual student.
-
It includes information such as:
-
-
Student name and profile – Identifies the learner whose grades are being viewed
-
View report as dropdown – Switch between different perspectives (e.g., user or teacher view)
-
Grade details table – Displays activities, grades, and performance metrics
-
-
- Use this section to monitor and evaluate a student’s progress in the course.
-
11. Course Setting
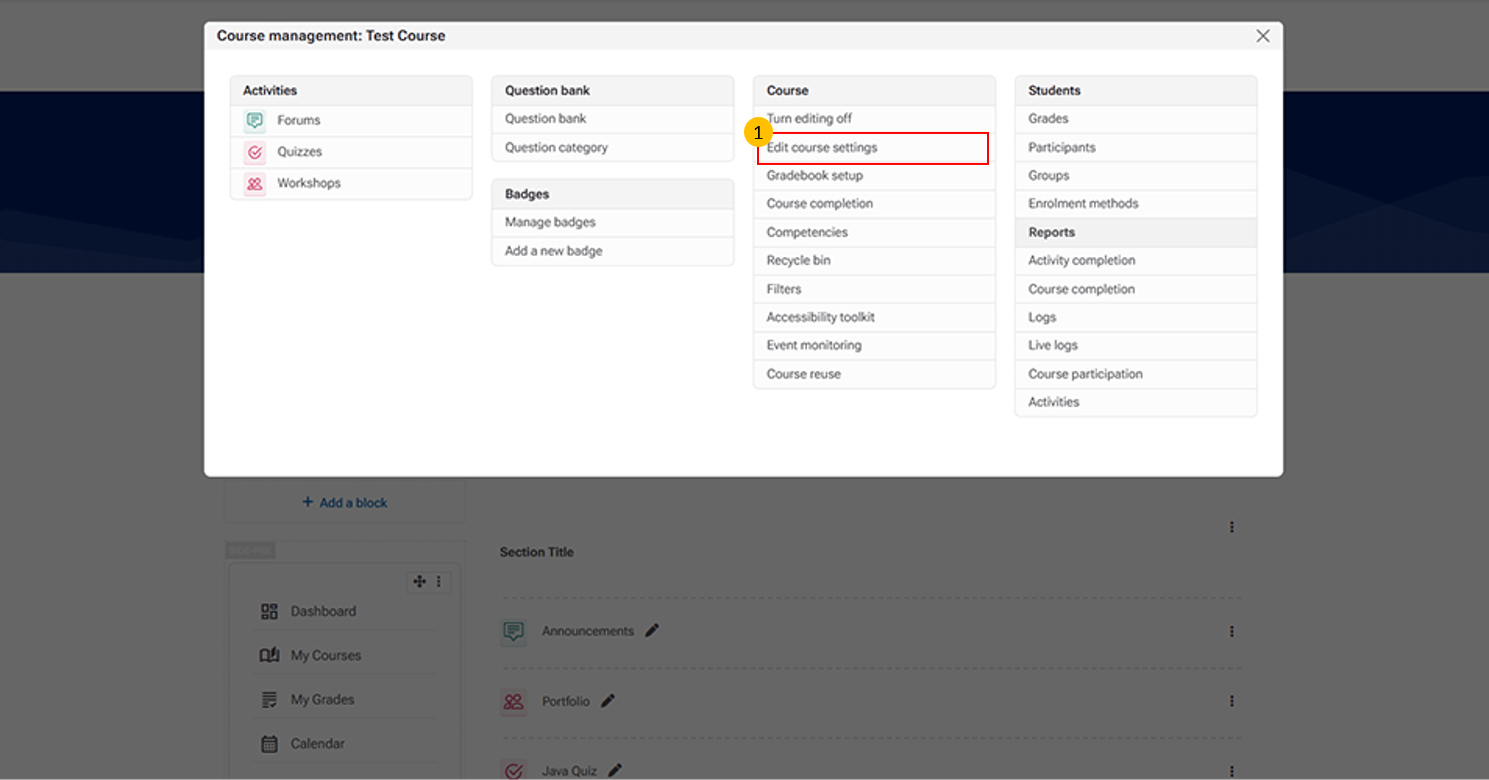
- Edit Course Settings
-
This option allows instructors to modify and update course details.
-
- Edit Course Settings
-
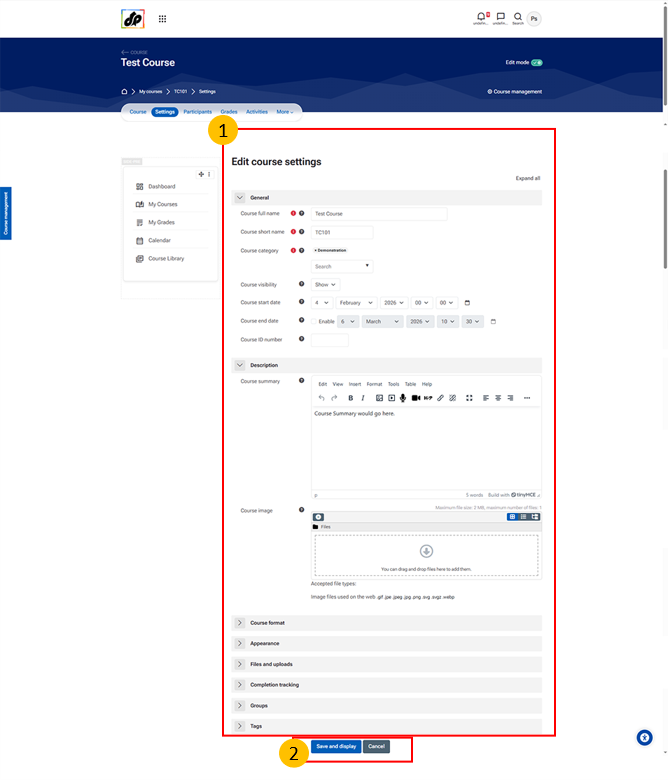
This section allows instructors or administrators to configure the overall course setup and properties.
-
It includes options such as:
-
-
Course name and short name – Used for course identification
-
Course category – Organizes the course within the LMS
-
Visibility settings – Controls whether the course is available to learners
-
Course start and end dates – Defines the course duration
-
Course ID number – Used for administrative tracking
-
Summary and course image – Provides an overview and visual identity
-
Format and appearance – Determines the course layout and display
- File upload settings – Defines limits for file submissions
-
Completion tracking – Enables monitoring of learner progress
- Groups and role renaming – Manages collaboration and customizes role names
-
-
-
-
Save and Display Button
-
This button saves the changes made to the course settings and displays the updated course.
-
12. Profile Management & Logout
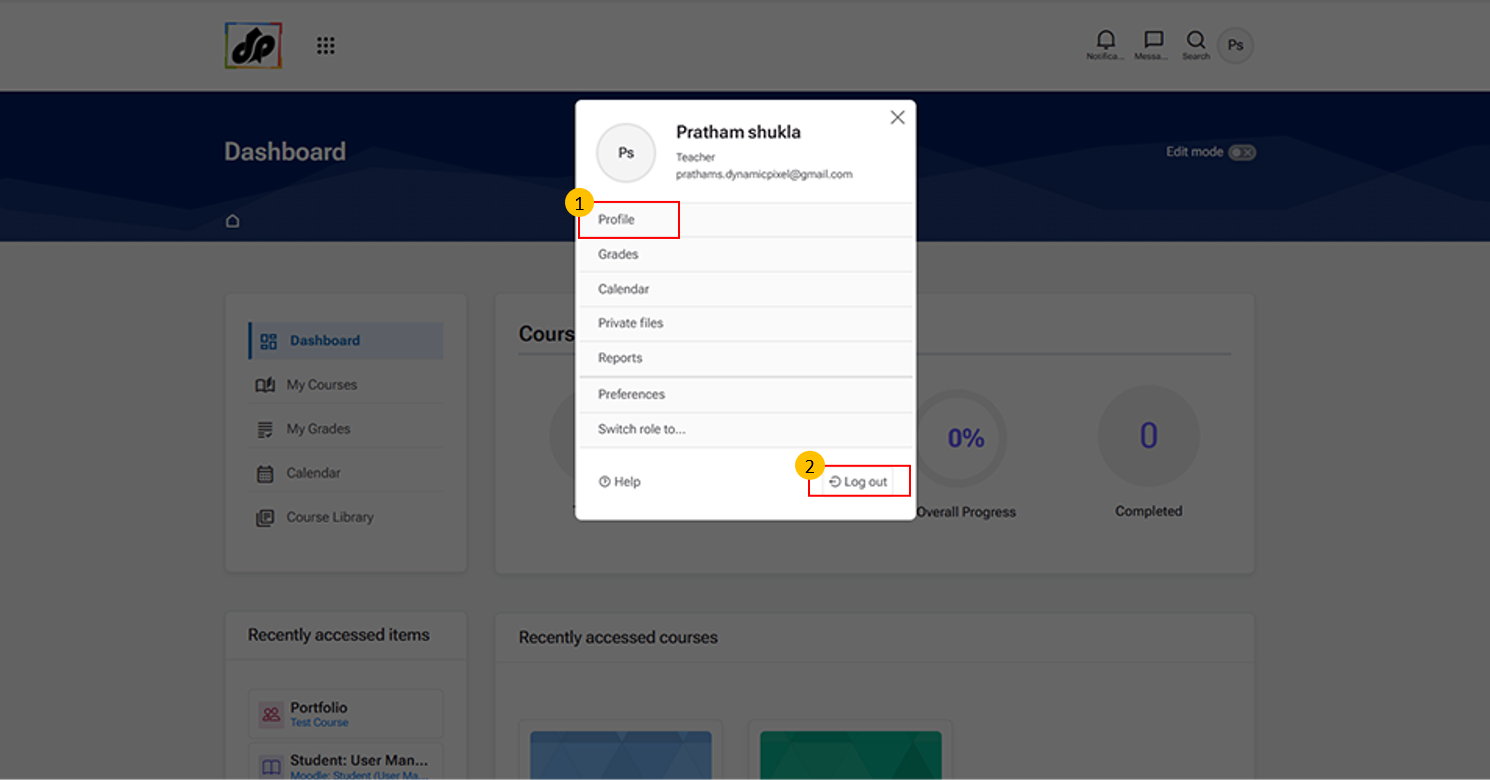
- Profile Option
-
Clicking “Profile” opens the user’s profile page, where learners and teachers can view their personal information.
-
-
Logout Option
-
Click “Log out” to securely sign out of your account. This ensures that your session is closed and prevents unauthorized access.
-
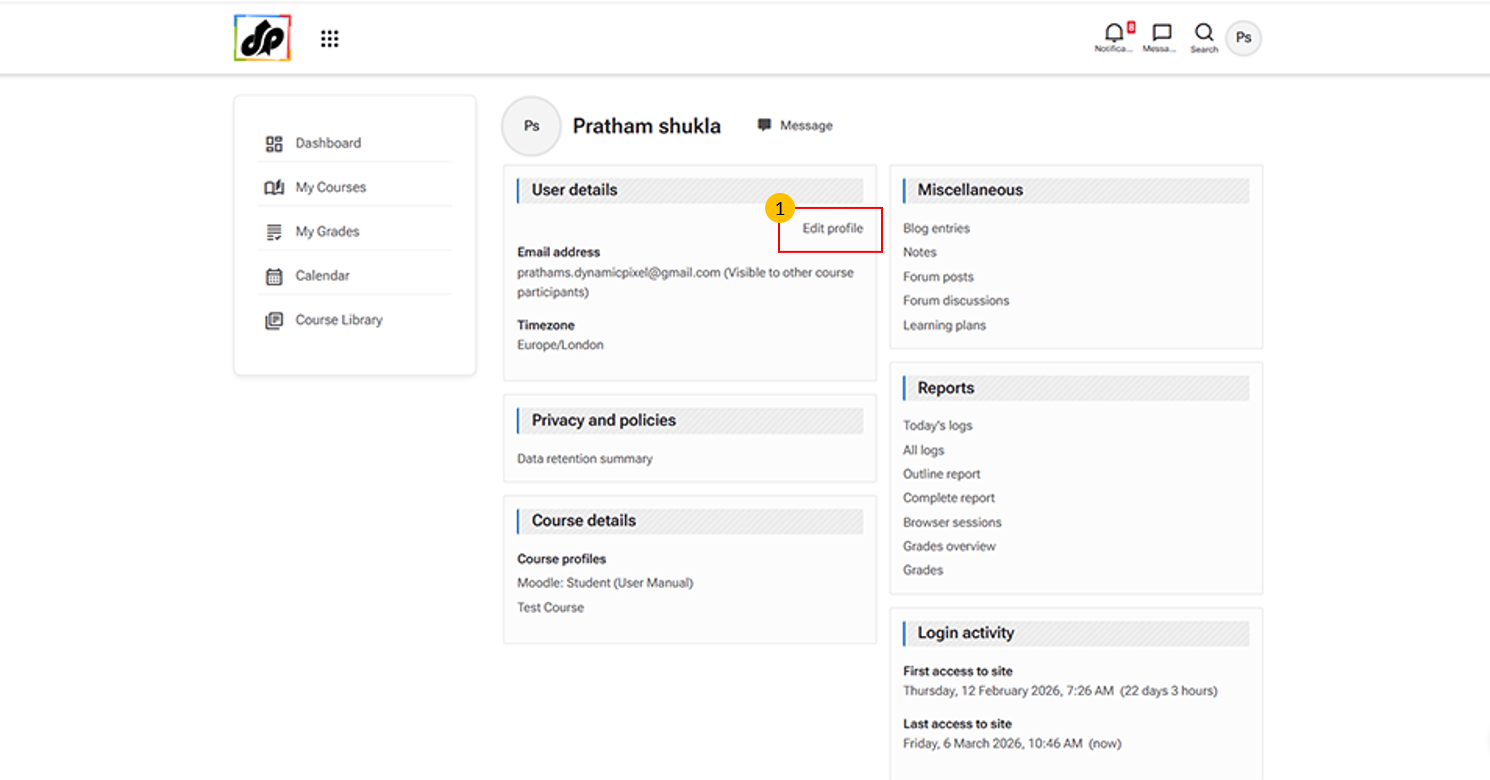
- Edit Profile Button
-
This option allows users to update their personal information within the learning management system.
-
You can use it to:
-
Update contact details (e.g., email address, time zone, and other personal information)
-
Change profile picture and description
-
-